To use Communicate to send Broadcasts and otherwise, one must have a User Account to be a user. Users may be created manually or through a data import. If you plan to restrict user access to data for only certain organizations, Broadcast Types, or data fields, you should set up your data imports and broadcast settings before creating User Accounts. Also, be sure to create Access Profiles for your user groups before you create users.
In order to manually create a User Account, you must have access to the Admin tab and Users sub-tab. In general, only System Administrators and other top-level users will have this access.
Note: Creating users automatically with a data import is typically done by our Implementations team for specific reasons - manually creating users is the most common. Contact support for details if you think that this may be necessary or if you have questions.
Create a User Account (Manual)
Navigate to the Admin tab, then to the Users sub-tab.

Click Add New User.
On the User Editor: New User screen that appears, enter the appropriate account information and select the appropriate Access Profile and restrictions for the User (see the next section for details on each field/setting).
Click Done when you finished preparing your account details.
User Editor Options
This section details the different information fields and settings you will see when creating a new User Account manually.
Once a User Account has been created, you can access the User Editor at any time to change these fields and settings by clicking Edit next to the User Account in the Admin tab, then Users sub-tab.

Account Information
When creating an account, you will be asked to supply the following information:
First Name and Last Name: This will be used to automatically populate certain fields for the user, such as the From Name when creating email messages.
Description: Lets you optionally add a description of the user, such as their job title.
Username and Password: Used for logging into the web interface.
Phone User ID and Phone PIN Code: Used for sending Broadcasts by calling in to the system using the Remote Phone Access System. See the Remote Telephone Access chapter in the online help to learn more about this feature.
Account Email: The email on which the user receives reports of their broadcasts. This is also used to populate the From Email when creating email messages and is used for retrieving/resetting lost passwords. The Account Email field entered in the User Account is only used by the Add Me feature in the Message Sender during broadcast creation. This will NOT ensure this User gets emails from broadcasts to your staff. You will still need to have their contact information in your regular Staff Import.
Auto Report Emails: Defines any other email addresses besides the Account Email that should receive a report when this user sends a Broadcast. If you need to add multiple email addresses, use semicolons to separate them, like email1@schoolmessenger.com; email2@schoolmessenger.com; email3@schoolmessenger.com.
Phone: The phone number associated with the account. The Phone field entered in the User Account is only used by the Add Me feature in the Message Sender during broadcast creation. This will NOT ensure this User gets calls from broadcasts to your staff. You will still need to have their contact information in your regular Staff Import.
Optional Account Fields dependent on Account Features
Depending on the settings of your Account and the Profile settings used for this User Account, you may see the following fields and settings when reviewing or setting up the User Account.
Use LDAP Auth: Only available if you are using LDAP to manage user credentials.
Use SAML Auth: Only available if you are using a SAML service to manage user credentials.
SMS: Used when the user selects Add Me when creating a Broadcast.
Caller ID: Only available if you have elected to allow this Access Profile to define their own personal Caller ID instead of using the account default. If a number is entered here, it will override the Default Caller ID to this number.
Account Restrictions
You can restrict User Accounts in various ways. The most important restriction is to set their Access Profile, but there are other options as well.
The Access Profile drop-down is where you will select one of the previously configured Profiles for the User Account to define their overall access.
The Broadcast Type, Survey Type, and Feed Category Restriction boxes let you restrict the User to only sending certain types of broadcasts, surveys, and sending to certain feeds for push notifications. If you do NOT want the User to be restricted, leave all boxes un-checked. When at least one box is checked, then the restriction begins. If you check all of the boxes, that will give them access to all of the options, until another one is added, at which point you would need to edit the User Account to check that box. Leaving them un-checked allows them to be un-restricted going forward, with no further need to modify them.
Data View Restrictions
Data View Restrictions are used to restrict a user to see certain types of data. Some of the following restriction settings may or may not appear, depending on your Account’s configuration.
The Staff ID field is for the User’s unique Staff ID if Classroom Messaging is enabled and set up on the account. Restricting a User’s access based on their Staff ID number is only necessary if you are importing student schedule/enrollment data, which will include the ID number of the staff member assigned to teach each class section. If you are not importing student schedule data this should be left blank or may not appear at all. If you need to fill it out, enter the Staff ID, and click Set Staff ID.
The Additional Sections setting appears if Classroom Messaging is enabled with Section data. This is used if you want to assign that user to an additional Section (Class) that is not normally under their list of classes. You would first select the school, then check the box for the additional sections, and click Add.
Important: Classroom Messaging / Enrollment Data is a complex integration of various data types. This field is often automatically set by the imports. If you are unsure of how to proceed with this field or not sure if you need to, consult support for more information.
The School field is used to restrict the user to only being able to see contacts at a particular school. If you do not want the user to be restricted, leave all boxes un-checked. This way, if a new school is added in the future and you want them to have access to it, you will not have to go back to make further changes.
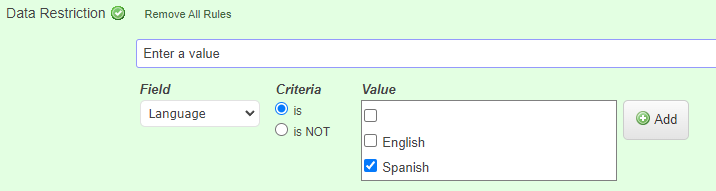
The Data Restriction fields are for restricting the user to viewing only certain types of data, such as only data from a particular Grade or Bus Number. The interface is the same as selecting rules in a list, using rules.
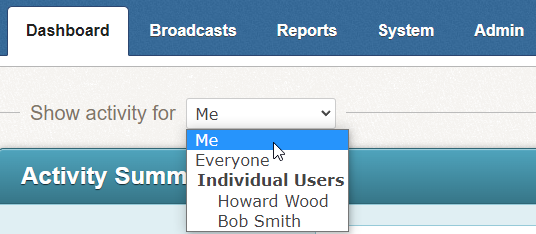
Viewable Users lets you select users whose Broadcast information will then be shown on this user’s Dashboard. It is not common for base-level users to have this setting, but can be used for any user, regardless of Profile settings. Unlike the other restrictions, if you leave all boxes un-checked here, no other users will be visible on the Dashboard.
If an account has access to view other users, they will be available on the Dashboard.