
The Forms feature allows forms-enabled user profiles to create forms to send to recipients to collect specific information. This feature is only visible if your system includes the Forms feature. For more information regarding the Forms feature, please call 1-800-920-3897.
Creating a Form
For forms-enabled user profiles, follow the steps below to access the Forms feature:
-
Click the Broadcasts tab and then the Forms sub-tab. A new window for forms will open.
-
In the Forms window you will see all forms you’ve created, as well as be able to create a new form.
-
Click the plus button in the upper right-hand corner to create a new form. A window to create a new form will open.
-
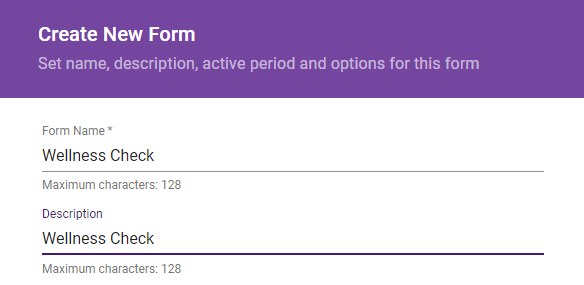
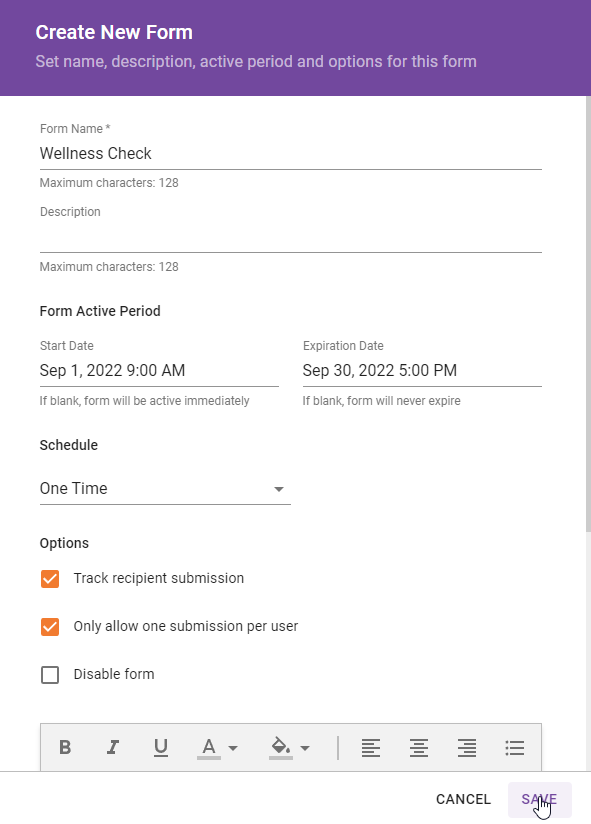
Enter a Form Name and a brief Description.
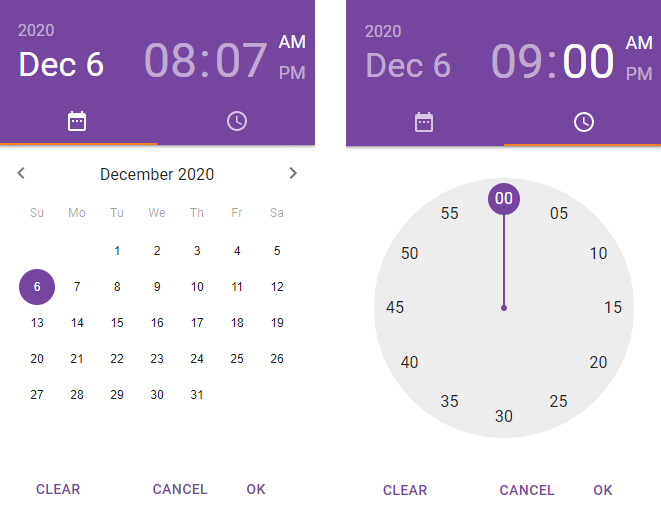
Enter a date and time for when the form will be active and an expiration date for when submission will no longer be allowed. Switch between setting the time and date by clicking their respective tabs.
Click CLEAR to reset the date and time and enter a new date and time.
Click CANCEL to cancel submitting a form and to return to the Create New Form screen.
Click OK to save your settings and to return to the Create New Form screen.
With the Schedule, you can choose if you want to send the form out just One Time or you can choose to have the form sent out Daily.
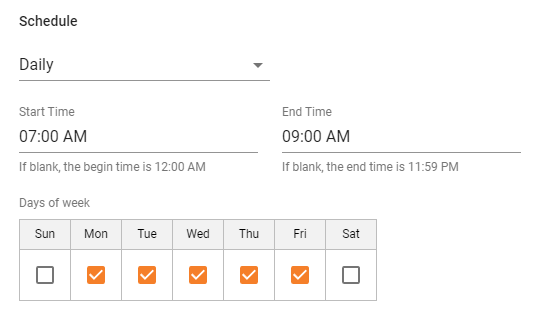
If you choose Daily for the form, you will also be prompted to choose a Start Time and End Time and the Days of the Week for the form.
Under Options you can choose to Track recipient submissions and Only allow one submission per user per day.
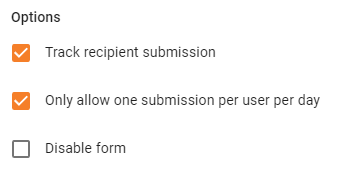
If you wish to inactivate a form before its expiration, you can choose Disable form.
Enter a confirmation message that you would like to display to your recipients once you’ve submitted the form.
You are also able to choose to Share Form with Nobody, Anyone, only Top-level Users or only Specific Organizations. This will determine which, if any users, can see the Form when they go into the Forms module within Communicate.
Click SAVE to start configuring the form contents.
Adding a Form Title and Description
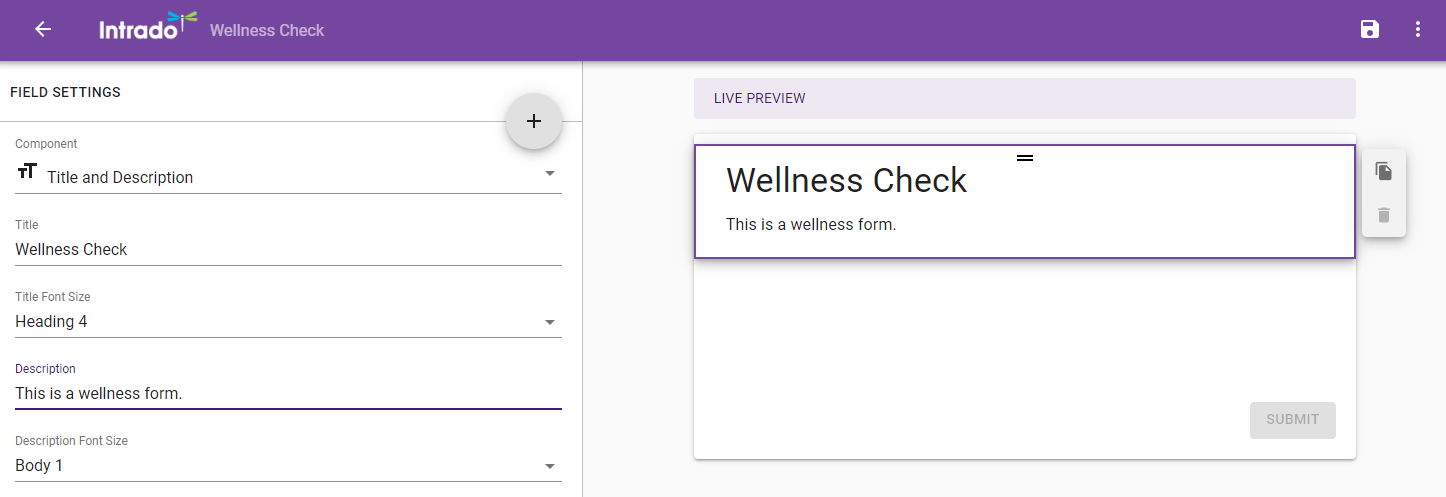
To add a title and description, simply click the section in the right-hand area, or LIVE PREVIEW, of the form editing window. In the left-hand area, or FIELD SETTINGS, you’ll be able to add content and view options for the section selected.
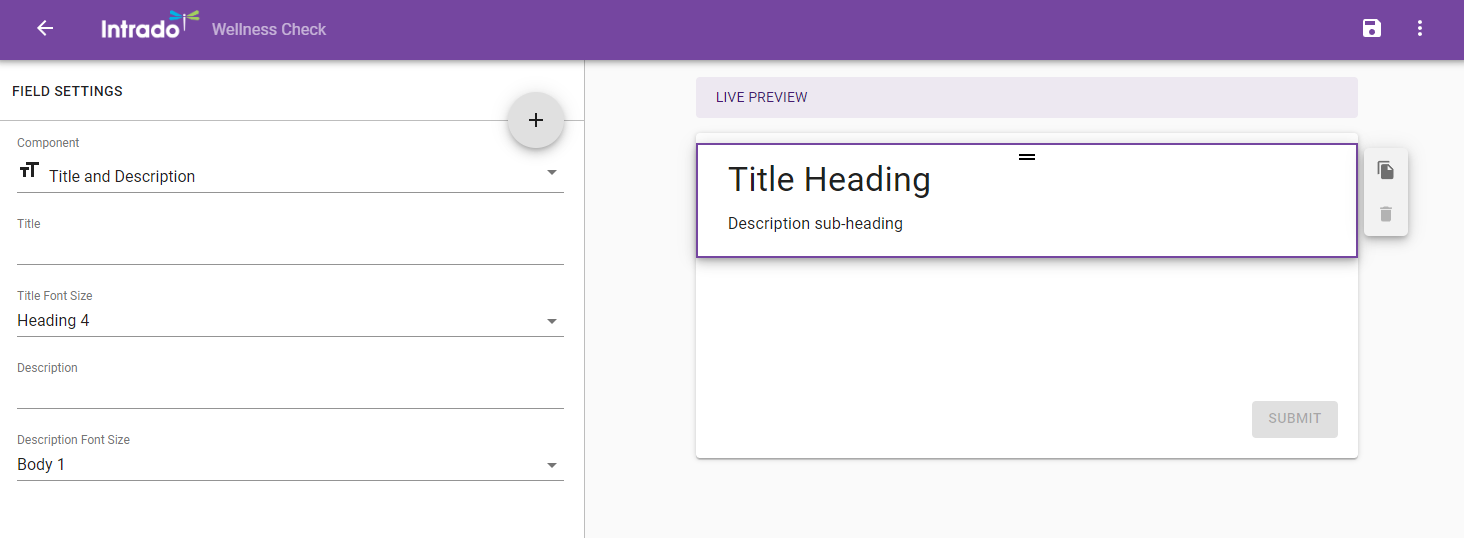
In the example above, the Title and Description sections has been selected in the LIVE PREVIEW. Selected sections are highlighted in blue. In the FIELD SETTINGS, you’ll find fields to add a title and description, as well as any other options to further configure the section.
Adding content in the FIELD SETTINGS will automatically update the LIVE PREVIEW.
Adding a Form Section
Next, you’ll need to add questions, text and whatever other content you’ll need for their form. To add sections, click the plus icon in the FIELD SETTINGS area.
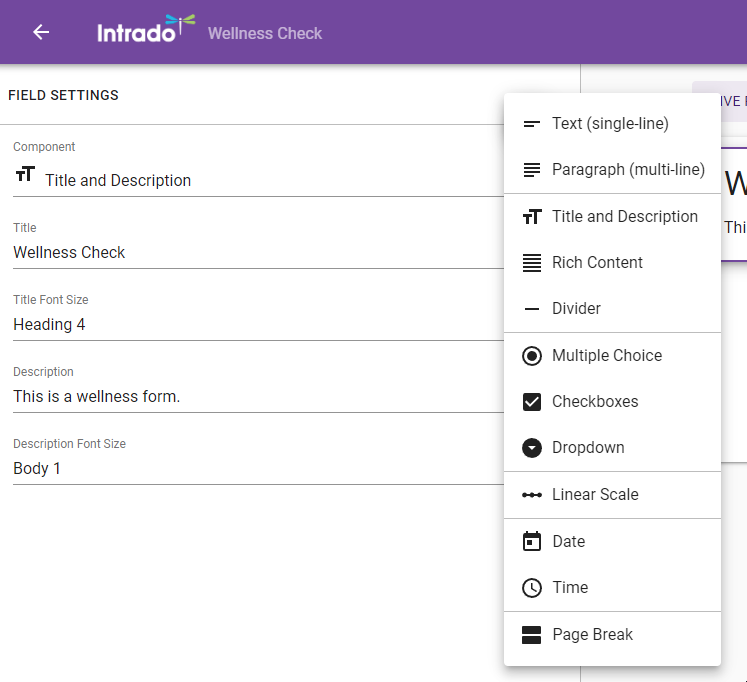
Any of the following section types can be added:
Text (single-line): Use for questions that only require short answers.
Paragraph (multi-line): Add any questions that require further explanation or paragraphs.
Title and Description: Add any more titles and descriptions if your form has multiple sections.
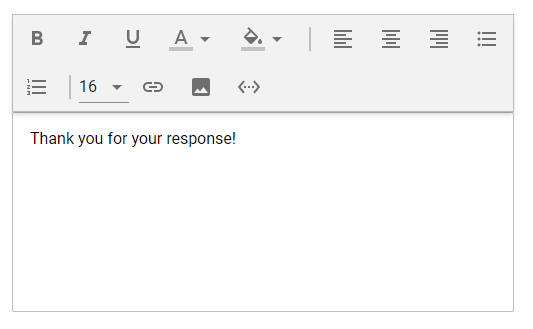
Rich Content: Add more robust text. The editor allows you to add images, hyperlinks, colors, etc.
Divider: Places a line between sections.
Multiple Choice: User for questions where you want the user to select one of several choices.
Checkboxes: Use for questions where you want the user to select one or more checkboxes.
Dropdown: Use for questions where you want the user to choose from a dropdown to answer.
Linear Scale: Use when you want users to answer on a scale, like 1 to 5, 1 to 10, etc.
Date: Use when you want the user to specify a date.
Time: Use when you want the user to specify a time.
Page Break: Use if you want to break your form into multiple distinct pages.
Each question type allows you add the question in the Label field under the FIELD SETTINGS and select the Label Font Size from the dropdown menu.
You can also add a Form Reporting Label if you want it to vary from your question text and add Help / Instruction Text if you feel it is necessary.
If this is a field that the respondent must answer when filling out the form, choose Required Field.
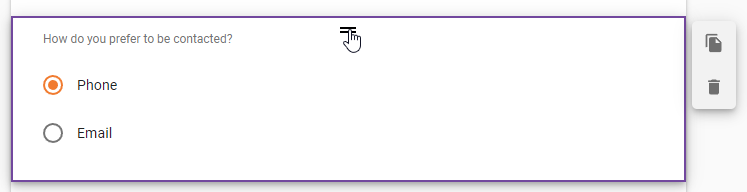
Adding a Question with Selectable Answers
For the Multiple Choice, Checkboxes and Dropdown questions, there’s the ability to add options that the form recipient can select.
After adding the section and selecting it in the LIVE PREVIEW, add the question in the Label field under the FIELD SETTINGS and select the Label Font Size from the dropdown menu.
In the Options section you can add, delete, and configure your answers for a question.
Click the Options field to type in an option. By default this says Option 1 so change it to whatever answer you want.
Click Add Option to add another option.
Click the X icon to the right of an option you wish to remove.
Click and hold the three dots icon to the left of the option to change the order of your answers.
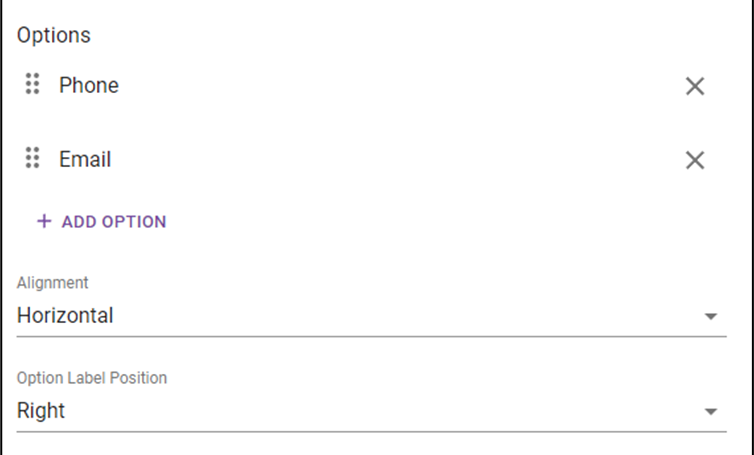
Use Alignment to choose if you prefer the options to be listed horizontally or vertically.
Use Option Label Position to choose where the label for each option appears next to each option.
Adding a Question with an Answer Scale
For a Linear Scale question, you can set the From and To numbers to determine what numbers the respondent can choose from.
You can also specify the From Label and To Label that shows the range of answers the values can cover.
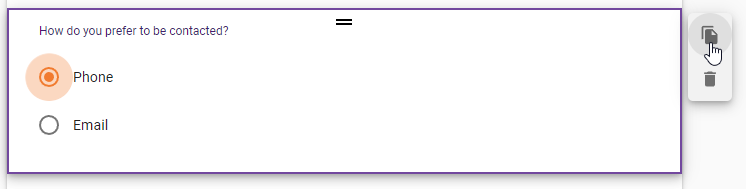
Moving, Copying and Deleting Form Sections
You can further configure your form sections by moving, copying and deleting them. To configure a section, simply click it in the LIVE PREVIEW.
Move a Section
Click within the section you wish to move. Then click and hold the equals icon located in the top middle of the section and drag the section wherever you’d like it to be in the form.
Copy a Section
Click within the section you would like to copy. Click the copy icon in the upper right-hand corner of the section you’d like to copy. A copy of the section will appear below the original section.
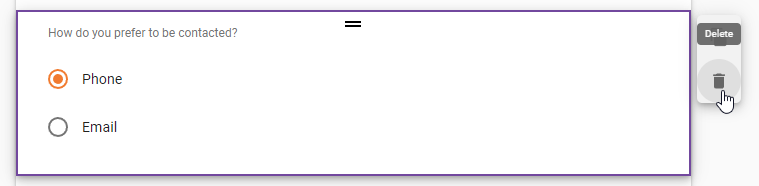
Delete a Section
Click the trash can icon to the right of the section you’d like to delete.
Saving Your Form
When you have finished setting up your form fields, click the save icon in the upper right-hand corner of your screen to save your form.

You’ll be taken back to the My Forms page.
Editing a Form
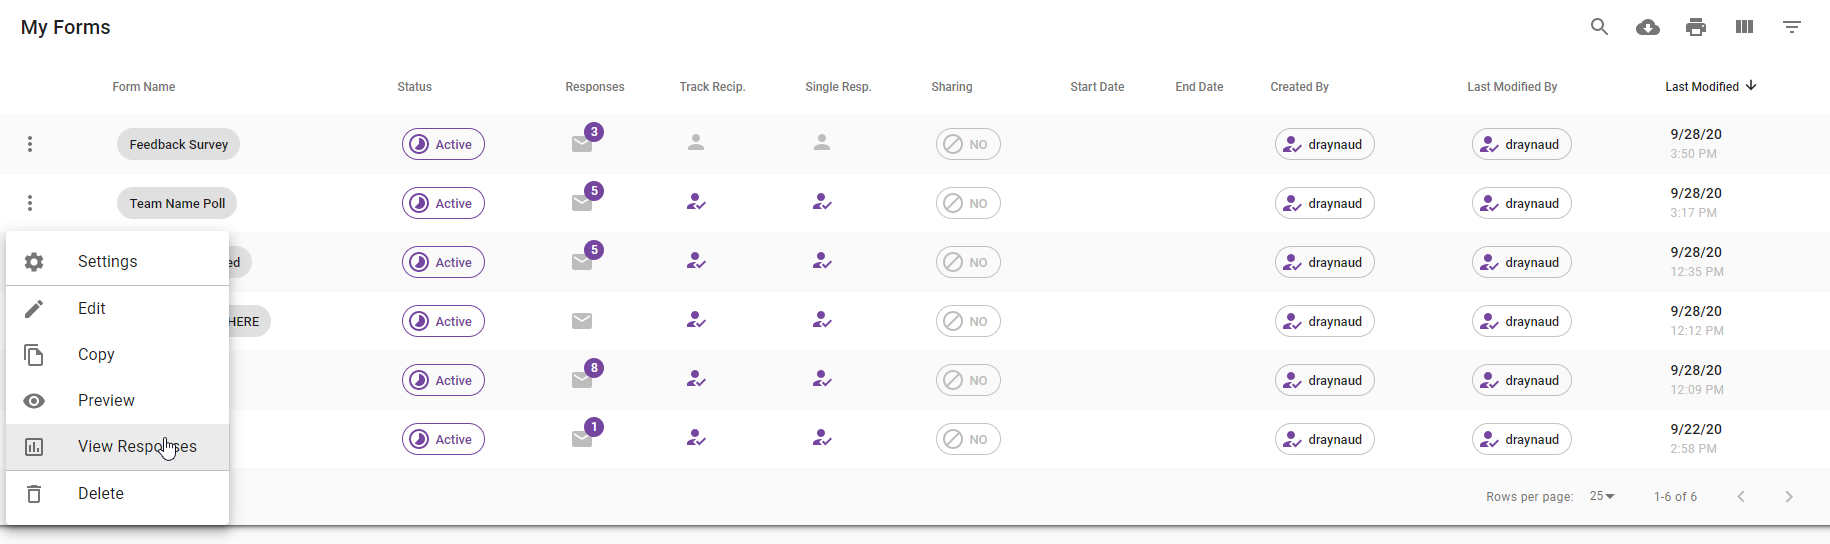
To begin editing an existing form, click the more icon from the menu to the left of the form.

Once you select Edit, you’ll be taken to the form editing window. Here, you’ll be able to customize your form and add specific sections for their survey like multiple choice, check boxes, and/or drop-down menus.
You can also configure your form settings by clicking the more icon from the menu to the left of the form and then choosing Settings.
Sending Saved Forms
Once forms are saved and are listed in the My Forms page, you’ll be able to access them when sending email and SMS broadcasts.
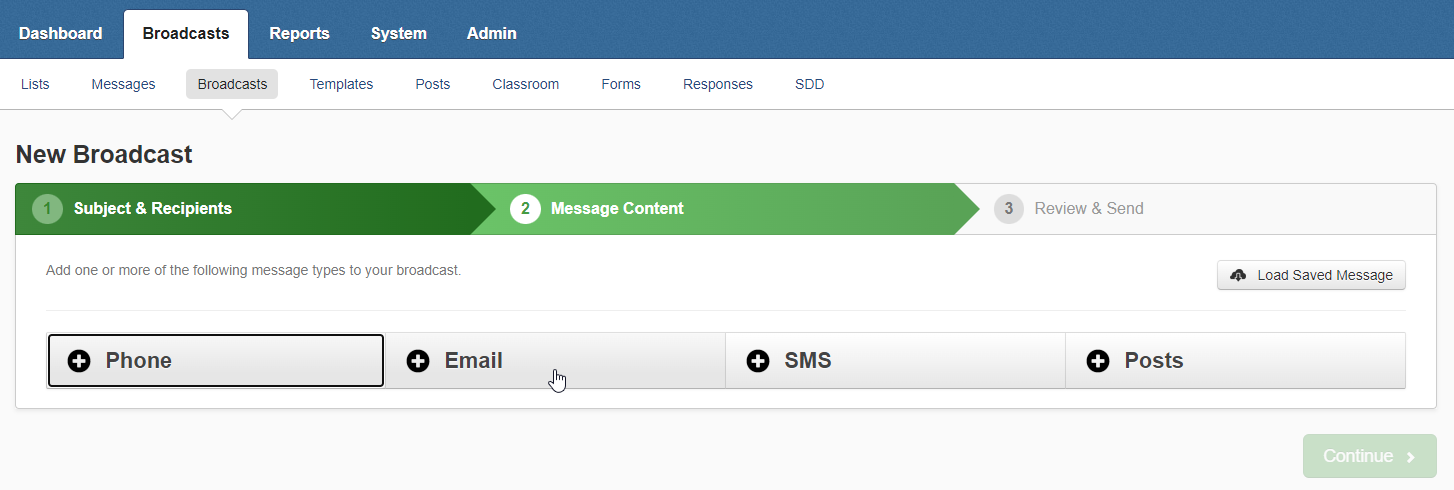
To send a form within a broadcast, from the Dashboard, click New Broadcast.
If you send a Saved Form as a Broadcast any new responses to the form will be appended to any existing responses that have been created for that form.
After entering a subject and adding recipients, click either the Email or SMS Message button to create your broadcast containing the form.
Email a Form
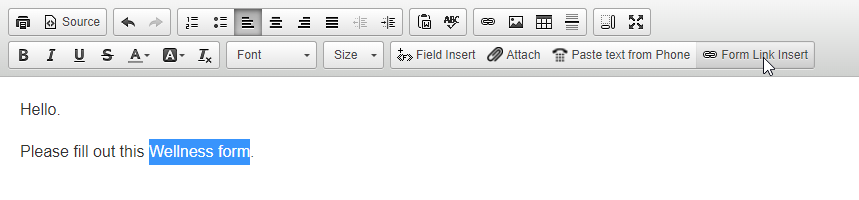
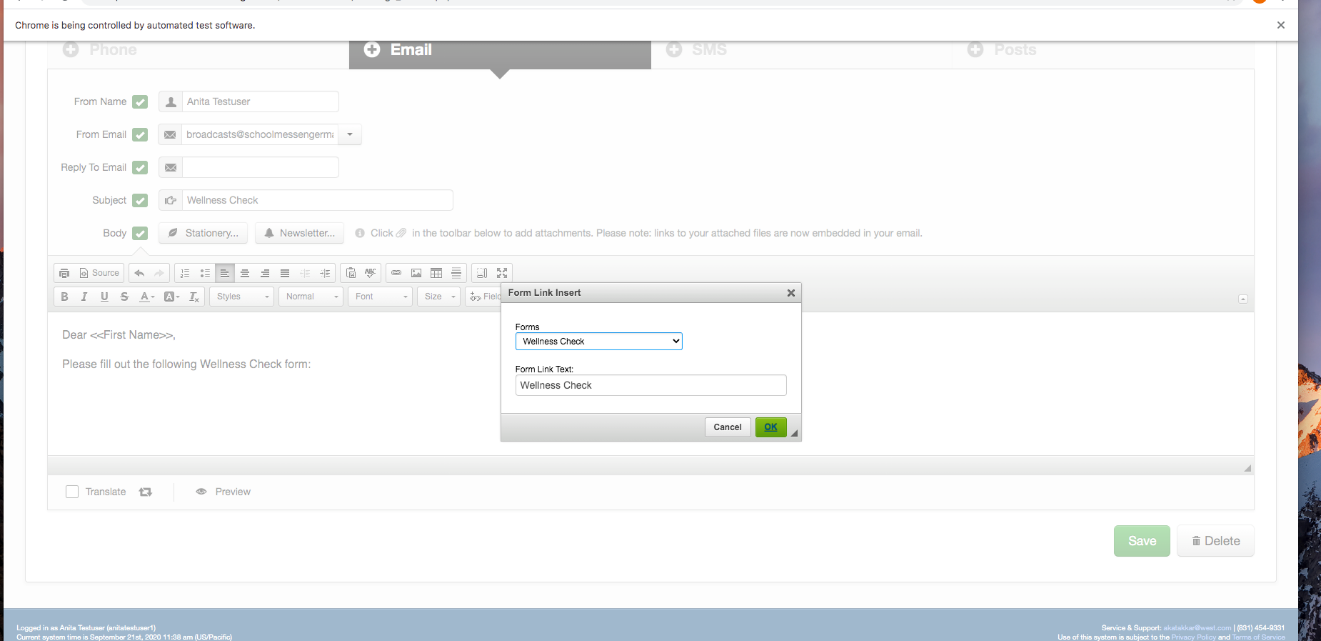
Write the body of your email informing your recipients what the form is for. To insert a link to your form, click Form Link Insert located in the editing pane.
A Form Link Insert window will appear. Select your saved form from the dropdown menu and enter a text that will appear in your email.
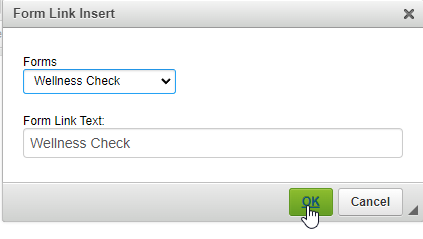
Click OK to return to the Email editing window.
A link to your form will appear with the text you entered in the Form Link Insert window.
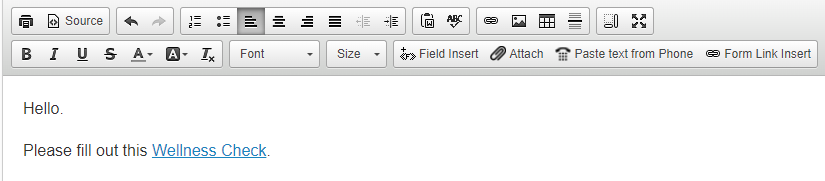
Click Save to save your email content and either continue to Step 3 of sending the broadcast (Review & Send) or create content for an SMS message with your form.
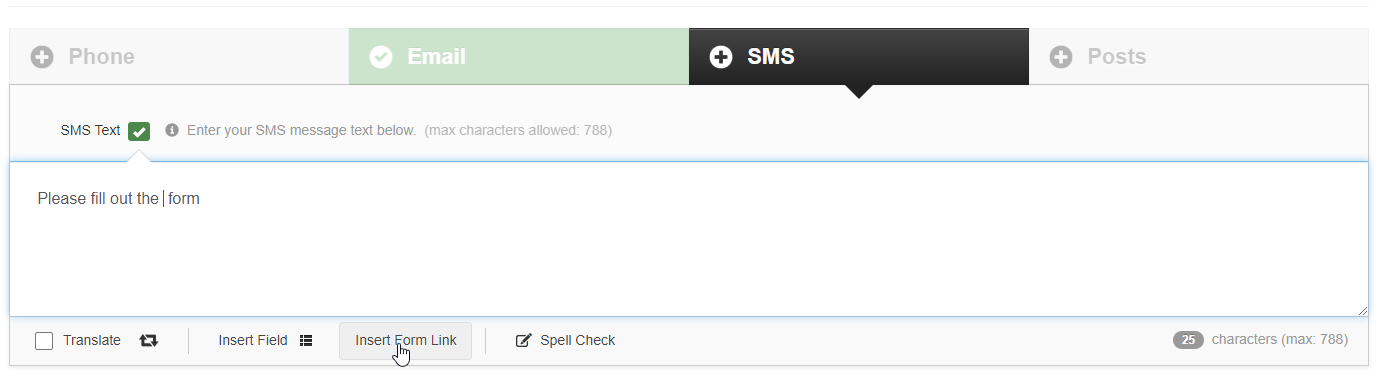
Text a Form
To send a form through text, your message will need to be brief as there is a max character allowance. Write the content of your text and click Insert Form Link at the bottom of the SMS text field.
An Add Form Link window will appear. Select your saved form from the drop-down menu.
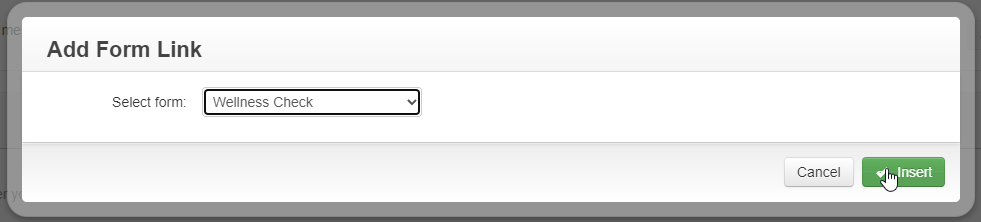
Click Insert to return to the SMS editing window.
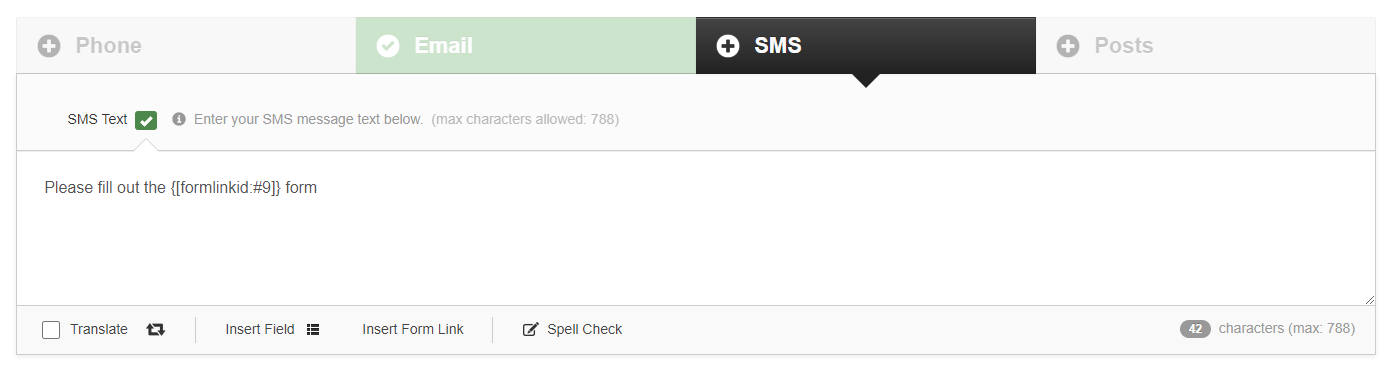
The link to the form will be long and will take up a lot of characters. If you would like to send a form through text, you may want to send a separate text with some information before sending the actual link to the form in a separate text as editing the link in any way will break the link.
Click Save to save your SMS content and continue with your broadcast.
Form Use Cases
Wellness Check Form
The Forms module can be used to create a form template as a health attestation or wellness check for schools and organizations. These can be helpful to know who is unwell to identify whether a subsequent follow-up is necessary and to prevent further spread of any physical illness.
When the forms template needs to be re-used in subsequent health attestations or wellness checks, the administrator will need to duplicate the form template. We suggest having a unique name, including the date, for each form template. Once the duplicated form is created, the administrator will need to include this updated form link in their broadcast messages.
Create a new form. In your new form, be sure to enable Track recipient submission and Only allow one submission per user. The Track recipient submission option needs to be enabled to be able to see who responded to your form and to access the No Responses tab.
Finish creating your new form, populating it with any questions you wish to include.
Send a new Broadcast and include your Wellness Check form.
If you want to follow up on users that have not yet submitted a response to the form, follow these steps:
View the responses to the form and click the No Response tab.
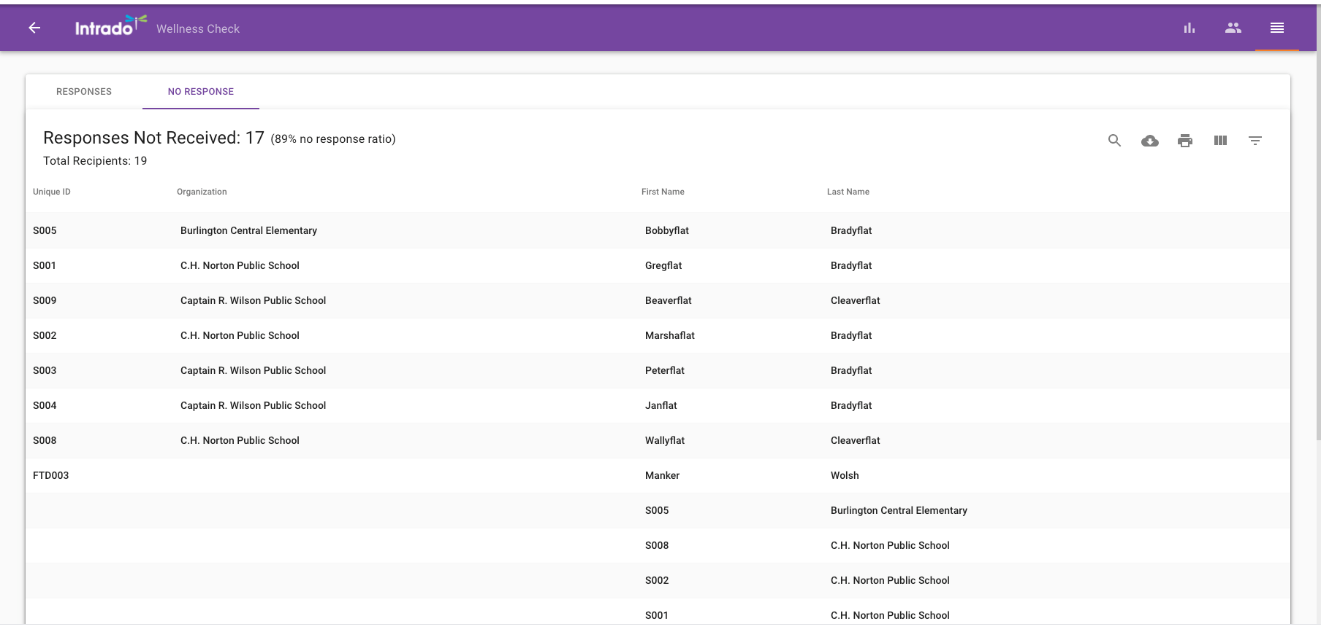
Click the download icon to download a CSV of the users that have not responded.
View Form Responses
You can at any time view the responses of the contacts that received your web survey. To view their answers, simply go to the My Forms window and select the View Responses option from the menu to the left of the form.
You can also click on the Responses icon in the Responses column to view the form responses.
You’ll be able to see the number of responses you receive, as well as all of their answers.
To view individual responses, click the human icon.
.To view a table of response data, go to more option..
When viewing the table, there’s also the ability to filter and sort answers so that you can easily view the information you want to see.

To filter the responses, click the filter icon.
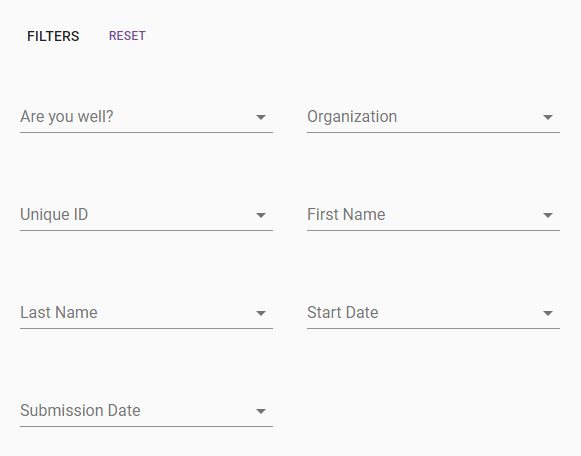
Choose the fields you wish to filter.
Form Size Limits/Recommendations
We generally recommend limiting your forms for several reasons. Trends show that large forms with many questions have lower response rates than forms with fewer questions. To encourage high participation rate, we recommend keeping your questions short and limiting the number of questions in a form. Forms with about 8 questions or less generally provide enough information needed without overwhelming the form recipients.
Forms with fewer questions and recipients are also easier to sort through and see the responses than forms with many questions or recipients. Smaller forms with more limited recipients enable you to quickly see and sort through form responses without having to spend a long-time filtering and sorting large results. Forms with about 10,000 recipients mark the point where, even after sorting and filtering results, deciphering the form responses starts to get tedious.
Finally, large forms will take more time to load in the web UI and increase time to download as a CSV. Smaller and more targeted forms will make allow you to view the form responses faster. If you have a large district, we recommend breaking the form out to multiple forms, each form targeting a specific location. This will help limit your form responses to be more manageable and when sorting through the responses, you are not overwhelmed.