
Organizations use tools that produce large PDF reports, filled with individual reports for each recipient that include each recipient’s unique ID number. For example, a school's student information system may output one large PDF file containing report cards for each student. Each report card will have the student's ID number somewhere on the page. These reports are typically printed and e-mailed to each individual.
SecureFile, previously known as Secure Document Delivery (SDD), allows you to automatically slice (burst) large PDF reports, containing multiple member reports, into individual reports and then email each individual report to the corresponding contact in the database. SecureFile matches individuals to their portion of the PDF report using their ID number. Additionally, SecureFile can protect each individual report by requiring recipients to enter a password to open the file.
When using SecureFile, there are two possible methods of creating your document. One requires the creation of a template created by our support team. The other is a self-service option that allows you to create a document without needing assistance from our support team. Both options are highlighted in this document, however if you do not see an option you wish to use on your account, please contact your account manager to discuss.
Report requirements
Reports must meet the following requirements to be used with SecureFile:
-
SecureFile only supports PDF format. The report must be a native PDF file. It cannot be an image file, or an HTML file saved as a PDF.
-
Each recipient's unique ID must be present in the report.
-
If using a template, the location of the unique ID field in the report must not change from recipient to recipient. This requirement does not apply to self-service documents.
-
All content being delivered to a specific user must be on consecutive pages (for example, the data for John Doe must be pages 41 through 44 rather than having the data on pages 41, 44, and 86).
-
The Unique ID must be present on at least the first page of each recipient's report. It can be present on multiple pages in any single report, but it must appear on the first page of each report.
-
The unique IDs must match what is currently in the Communicate database.
-
The report file must be smaller than 50 MB in file size.
-
There must be the same number of pages for each recipient’s report in the PDF if using a template to create the document. This restriction does not apply to self-service documents.
Create and deliver a document
A document is created by uploading and processing your PDF file. This can be done with a template created with the help of the PowerSchool/SchoolMessenger support team or it can be a self-service document (if you have this feature enabled). You can view your documents by clicking on the Broadcasts tab followed by the SDD subtab.
Note: Only those features that you have been granted access to will be displayed. For access to additional features, contact your system administrator.
Create a New Self-Service Document
You can create a Self-Service Document yourself without needing support to create a template that matches your PDF.
Note: If you do not see an option to create a self-service document and you are interested in using this feature, contact your account manager to discuss enabling this feature on your account.
-
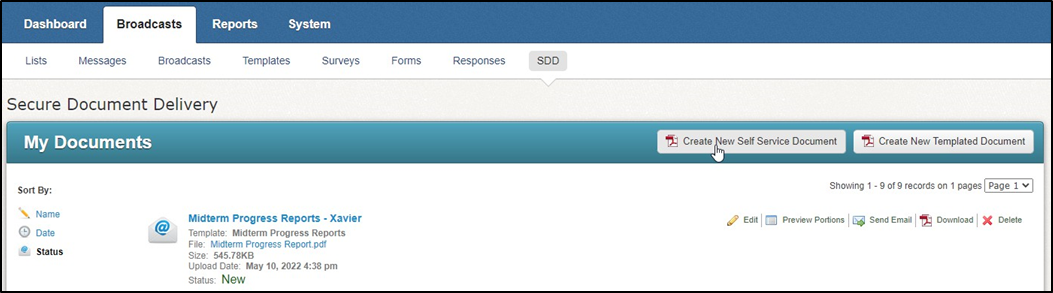
Click the Broadcasts tab, and then the SDD sub-tab to open the Secure Document Delivery window.
-
Click Create New Self Service Document to open the Document Editor.
-
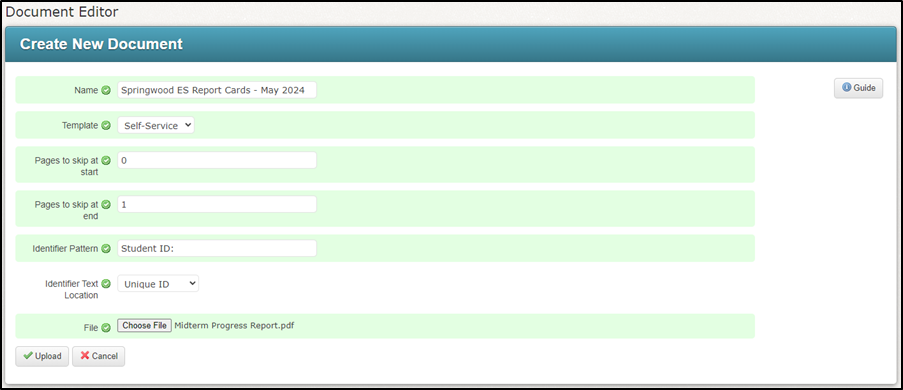
Enter a descriptive Name for the document. The Template will be set to Self-Service.
-
Specify the number of Pages to skip at start of your document. This is to bypass any title pages and other content at the start of your document that is not being shared.
-
Specify the number of Pages to skip at end of your document. This is to bypass any closing pages in your document that are not being shared.
-
Fill in the Identifier Pattern. This is text used to identify the first page of each portion of the document. This text should be present on at least the first page of each portion, preferably a label that precedes the unique ID used to identify the student record in our database such as "Student ID:". See the following example.
Note: All the pages you wish to send to a specific user must be consecutive. Your identifier can appear on the first page of each portion of the document. It can also appear on the consecutive pages of the document.
However, if it appears again later in the document (after the portion has ended), that later entry will be ignored. For example, if pages 56 and 57 have John Smith’s student ID as the identifier and then page 105 also has John Smith’s ID, page 105 will not be included in the section of the document that is delivered to John Smith.
The Identifier Text Location is used to match the unique id in the document with that data in our database. It should always be Unique ID but could also be another field that was set up by a support representative such as State ID.
-
Click Upload to upload the file and save the document.
-
Your document will now be processed. Depending on the size of the document and whether you chose to optimize the portions, this may take some time.
-
After the document is ready, this message will be displayed: The PDF Document was successfully created.
Create a New Document with a Template
Template Creation
If you are using templates to create and deliver your document, you will first need to have a template created. Templates, which are generated by our support representatives, are sets of rules used by SecureFile to burst your PDF file into individual reports for delivery. After a template is created for a type of PDF file, it can be reused for future reports so long as the layout of the report has not changed. If the layout of the report changes, then you will need to work with support and have them create a new template for you.
To facilitate template creation, you will need to provide at least a portion of the PDF file, that you wish to burst, to our support representatives. Provide support with a multiple-page example of what you want to deliver, or ideally, an actual report that you want to deliver. For example, if it is a student report card, include multiple students’ report cards in the PDF file. After you have provided support with the report, allow one to two business days for the template to be created. Support can create as many templates in advance as you need but allow one to two business days after sending support the reports to allow for any complications with the files itself (for example, missing IDs, layout changes, and so on). Support will contact you to let you know when the template has been created and is ready to be used to create your document.
Note: If you would like to use SecureFile with a template to deliver report cards, contact support to create your templates well in advance of the end of the quarter or semester. Remember that once your template has been created you may use it for report cards repeatedly until your PDF layout changes, at which point support will need to create a new template.
Create a Document from a Template
After support has created a template has been created for your PDF file, you are ready to create a document. Follow the steps below to create a document.
-
From the Secure Document Delivery page in the SDD subtab, click Create New Templated Document to open the Document Editor.
-
Type in a descriptive name for the document in the Name field.
-
Click the Template drop-down menu and select the template that is compatible with your PDF file.
-
Choose the Identifier Text Location to indicate the unique token you are using to indicate each distinct entry in your PDF.
-
Click Choose File to locate the PDF file on your computer.
-
Click Upload to upload the file and save the document. The document is now ready to be delivered at any time.
Your document will now be processed. Depending on the size of the document and whether you chose to optimize the portions, this may take some time.
After the document is ready, this message will be displayed: The PDF Document was successfully created. This processing will continue whether you stay on the current page, go to Preview Portions, prepare another broadcast or even leave the app entirely.
Preview a Document
To preview how your document will be sent and confirm that your IDs have been appropriately captured on each page, click Preview Portions.
On the preview page, you will see a Summary section.
Within this section, the PDF Processing Status will show you the PDF being processed for your preview. This will be updated in real time as each portion of your document is processed.
After the process has completed, in the PDF Processing Status, you will see an error message indicating an issue with your PDF file or you will see that the process is complete and ready to deliver portions to contacts.
You will also see the following:
-
Deliverable Portions: The number of distinct portions that had been found in the file that fit the criteria to be sent.
-
Pages Per Portion: The number of pages being processed.
-
Portion Sizes: The range of sizes of the files that will be emailed from smallest to largest.
Deliverable Portions
-
In the View options, choose Deliverable portions to see the portions that can be sent. The following information will be displayed for each deliverable portion:
-
Identifier Text: The text identifier being used. This will usually be Unique ID.
-
First Name: The first name of the student.
-
Last Name: The last name of the student.
-
Destinations: Destinations associated with the portion.
-
Page: The page of the PDF file where the portion is found.
-
Page Count: The number of pages in the portion
-
Size: The size of the portion being sent.
-
-
To download an individual portion, click the ID under the Identifier Text.
If any of the deliverable portions have a possible issue, a message will be displayed telling you to See warnings. Portions with a warning will still be delivered but we recommend reviewing and resolving the warning. -
If you select Warnings, you will see any portions that had an error as well as an explanation of the error.
-
If you select Ignore portions, you will see any portions that have been ignored and why they were ignored.
If you wish to resolve any of the warnings or include any of the ignored portions, you will need to edit and re-upload your PDF file.
-
After you are happy with your file, click Send Email.
This will take you to the Send Email page.
Deliver Documents
To send your document to recipients you can either click Send Email from the Preview Portions page for your desired document, or you can click Send Email directly from the My Documents section of the SDD tab.
It is recommended to go through Preview Portions so you can ensure there are no issues with your file prior to delivery.
After you click Send Email from either page, you will be brought to the Send Email page.
At the top of the page, you will see a Portion Summary of the information that will be sent. This includes PDF Filename, PDF Processing Status, Deliverable Portions, and Number of Contacts with Emails.
-
In the Broadcast Settings section type in a name for the broadcast in the Broadcast Name field.
-
Select a Broadcast Type.
-
If Guardian Data Model is being used, you can select the target recipients just like in a list in the Target Recipients section and you can set the Guardian Category Restriction also if needed.
If you do not see the Target Recipients and Guardian Category Restriction headers, you can ignore this step. -
In the Schedule section, choose the Date of the delivery broadcast, the Start Time (earliest start time of the broadcast) and End Time (latest time the broadcast will run).
-
In the Secure Documents section, you can use the Require Password drop-down menu to select a field that can be used as a password if you wish to require recipients to enter a password when viewing the document. If you do not wish to apply a password (not recommended), leave it set to No Password.
-
In the Email Details section, do the following:
-
Type in a name that you wish to appear in the From field of the emails in the From Name field.
-
Type in an email address that you wish to appear in the From field of the emails, in the From Email field.
-
If you wish to set a reply email address that differs from the sender email address, fill it in to the Reply to Email field.
-
Type in a subject for the email in the Subject field.
-
If necessary, modify the text in the Message window. This is the message that the recipients will receive in the main body of the email.
If you have any warnings on your document, you will find a warning link that leads you back to the Warnings section of the portion previews.
-
-
After your messages are ready to be delivered, click Proceed to Confirmation.
A summary of your review will be displayed. -
Review the broadcast details and click Submit.
Your document will begin its delivery immediately. Recipients will receive an email containing a link and a brief message instructing them to follow the link to download their PDF report. If the report requires a password, then recipients will need to enter the password to download their file.
At this point, the document delivery becomes like other email Broadcasts, and you can view the delivery results by accessing the Email Log report.
Clean Up
Once you have finished successfully delivering a secure document, we recommend that you delete the original document in Communicate after backing it up locally. This is because keeping sent documents clutters up the screen and increases the chances that you may end up delivering the document again by mistake. If you do decide to delete the secure document, then you should keep a local copy of the PDF that you sent out in case you later need to look at the document you have already sent.
Keep in mind that if you delete the secure document, you will still be able to view the report for the email broadcast. If you decide not to follow our advice and not delete the secure document, then please be careful not to deliver the same document again by mistake in the future.
Delete a Document
Follow the steps below to delete documents that you have already sent.
-
Find the document you wish to delete from the list in the My Documents window in the Broadcasts tab, and then select the SDD sub-tab. Make sure this is a document that you have already sent.
-
Click the Delete link.
-
When the system prompts you and asks if you are sure you want to delete the item, click OK to proceed.