
Configuring Self-Signup
SchoolMessenger Communicate’s Self-Signup feature allows users (which we refer to as subscribers) to subscribe to your messages and control the ways in which they prefer to be contacted using a convenient online account that they create and manage.
Settings
Configuring Self-Signup Settings
If you prefer to limit who may subscribe to receive your notifications, you may optionally configure your subscriber settings to only allow subscribers who fulfill certain requirements, such as having an email address from a specific domain or requiring the entry of a special site access code.
Navigate to Admin, Settings, and then Subscriber Settings.
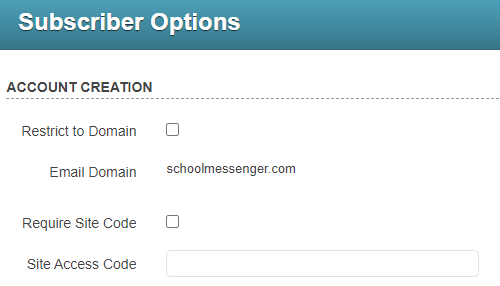
If you would like subscribers to sign up only with email addresses from specific domains, use the Restrict to Domain option. Domain restrictions can only be added or removed by SchoolMessenger Solutions Support. Contact support@schoolmessenger.com to add or remove restricted email domains to your account.
To restrict subscribers by requiring a Site Access Code, check the Require Site Code checkbox and enter a code, a word or a phrase in the Site Access Code field. Only subscribers who know the code may sign up for your messages.
Creating Subscriber Fields
Subscriber fields let you choose what information a subscriber must enter in the form when subscribing. When you create a notification list, the fields that your subscribers choose when configuring their notification preferences will determine whether or not they are included on your list.
These fields are selected from the fields that were already defined in your account under the Admin tab and Settings sub-tab menu. Available fields are defined in the Field Definitions and Group Field Definitions menus and will be of the List or Text type.
Navigate to Admin Settings Subscriber Fields.
Click Add Field.
Choose an available field from the drop-down menu.
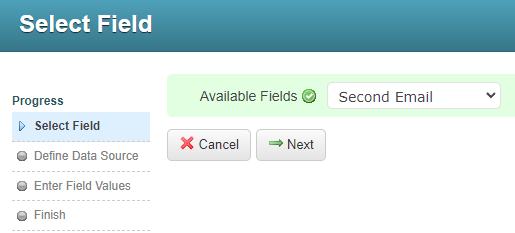
Click Next.
Depending on the type of field selected, there are multiple ways for the data to be populated.
For fields of the List type, you may choose to manually enter a list of possible values, or you can allow the list to auto-populate with the data values that you mapped in your data imports (Admin tab Imports sub-tab).
Fields of the Text type may be populated with a default value by selecting Set by Admin. Alternatively, you may select Set by Subscriber which allows the subscriber to enter the data themselves.
Editing Static Subscriber Field Values
If you would like to change the field values for a field you’ve created, just navigate to Admin Settings Subscriber Fields and click Edit Values for the field you wish to edit.
Note: Whenever you add a new organization or other value generated by imported data, and you want that data to be available to subscribers to select, make sure to edit the relevant Subscriber field and check the box to include the new data items in your subscriber’s accounts. It will not be automatically enabled by default.
Notifying Your Subscribers
Once you’ve configured your subscriber settings, you will need to let your potential subscribers know how to sign up.
One way to do this is through sending a letter or email. We’ve created a letter template on the following page, which you can use as a guide to notify potential subscribers. You will need to change this template based on how you’ve configured your subscription settings.
Using the Template
Change the URL so that it matches your customer URL. Remove the CustomerID portion and enter your Customer ID to make it your own account URL.
If you’ve chosen a Site Code, put it in the Site Code section, otherwise make sure to delete this line.
Subscriber Outreach Template
Dear «First_Name» «Last_Name»:
Our school district has contracted with PowerSchool, provider of SchoolMessenger Solutions such as Communicate to provide timely communication to students and staff members on matters such as admissions, general interest activities and campus emergencies.
In order to enhance our ability to accurately deliver that information we kindly request that you create your own contact preference profile using our school district’s subscriber website for Communicate. This allows you to control the ways in which you prefer to be contacted. It also works like a mailbox, giving you a place to review messages you may have missed.
To utilize this feature, simply follow the steps below to create an account through this secure website.
Steps for setting up your account:
Enter the following URL into your web browser:
https://asp.schoolmessenger.com/CustomerID/subscriber/
-
Click the Sign Up Now link near the bottom of the page.
-
You will be taken to the Sign-Up page where you will need to confirm the encrypted image, your name, a valid email address and a password. You’ll use your email address and the password you enter here to sign in later. Review and accept the Terms of Service. Click Create Account when you are done.
-
Check your email. There will be an Account Activation email from support@schoolmessenger.com with the subject Account Activation, which contains a link to activate your account; activation codes are valid for 24 hours. This link will take you to a confirmation page where you must enter your password in order to activate your account.
-
Once you’ve activated your account, you’re ready to select your notification preferences.
-
Simply select the type(s) of notifications you wish to receive and the groups to which you belong.
-
When you have finished making selections click Save.
-
Follow the instructions to add additional contact information to your account.
Thank you for signing up and hope you enjoy Communicate!
-
PowerSchool has a strict privacy policy and does not sell or distribute your contact information to any third party.
-
Do not reply to this email directly – you only need to follow the directions.