The intent of this training guide is to equip those familiar and comfortable with the features reviewed in the Getting Started training guide with information on additional features. This guide is not intended to cover every feature of the product. More advanced system features are spotlighted, along with references to the online help section, where they are covered in greater depth.
The Getting Started guide reviewed most of the features available from the Dashboard. In this guide, we will review features located in the Broadcasts and Reports tabs.
Advanced Lists
Building and saving simple rules-based lists during the New Broadcast process is covered in the Get Started Guide. This guide covers how to use the other options in the Add Message Recipients menu and how to manage your saved lists using the List Builder.
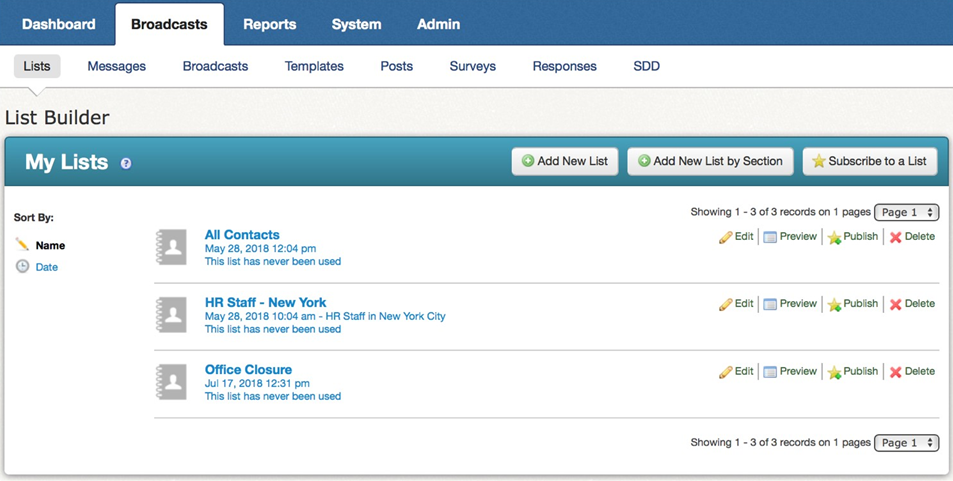
List Builder
The List Builder is located under the Broadcasts tab in the Lists sub-tab. Any list you have saved, whether created and saved while setting up a broadcast or from within list builder itself will be shown in the My Lists section, along with the date/time it was created and the last time it was used on a broadcast.
This section will focus on the features available from the List Editor, which you can access by making a new list in the List Builder. Note that any list you create here will also be available for you to use when creating a new broadcast from the Dashboard.
Create a List
-
Click on the Broadcasts tab. You will be taken to the List Builder by default.
-
Click the Add New List button. This will take you to the List Editor.
You can build any type of list from the List Editor, including simple rules-based lists like those that you saw in Getting Started; however, the List Editor allows you to access additional list building tools that can help you build lists that are more sophisticated when rules just aren’t enough.
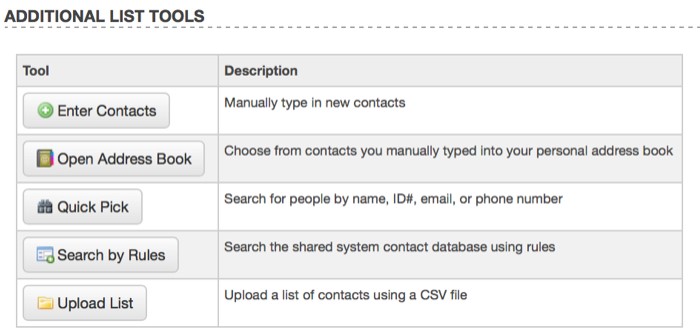
Additional List Tools
The following sections will discuss the features found in the Additional List Tools section of the List Editor.
Note: When you create a list using the List Editor, you can combine any of list building tools to create your perfect list. You can even use these features to add individuals to lists which are otherwise based on rules.
Manually Enter Contacts
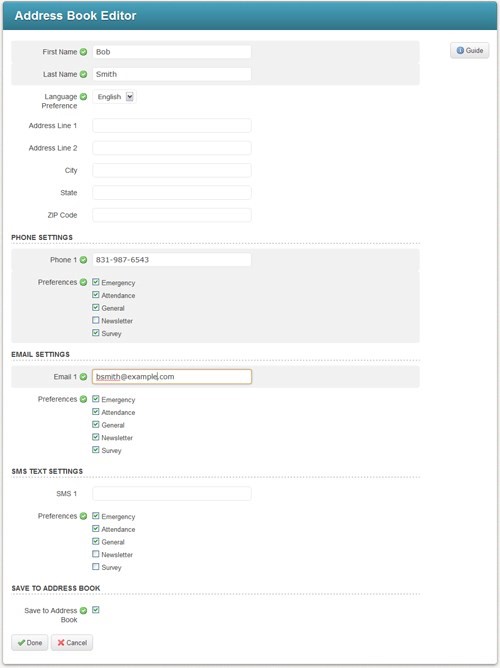
The Enter Contacts button can be used to manually add individuals and their contact information to your lists.
-
Click the Enter Contacts button.
-
Enter the individual's contact information into the appropriate fields.
-
You may also choose how this person is contacted based on notification type preferences by checking the appropriate boxes.
-
Click the Done button at the bottom of the screen to add this person to your list. To add this person to your personal Address Book, make sure Save to Address Book is checked. You can add this individual to future lists by simply using your Address Book.
-
To add another person to your list, repeat the process.
Note: To remove a manually added individual from your list simply uncheck the box next to the individual's name in the Additions section of the List Editor. Refreshing the screen will show the person is no longer in your list.
Add Contacts from Your Address Book
The Open Address Book button opens your address book. Your account has a personal address book where you can store contact information for individuals you want to include in notifications, but who are not included in your simple lists.

-
Open your Address Book, as shown above, by clicking on the Open Address Book button located in the Additional List Tools section.
-
After selecting the contacts you wish to add, finish by clicking the Done button.
-
If your list is complete, click the Done button to save your changes, or continue adding additional rules or individuals to this list.
Note: You can also access your address book by clicking the Address Book link in the upper right corner of your screen and add individuals at any time by clicking the Add New Contact button in your address book.
Quick Pick
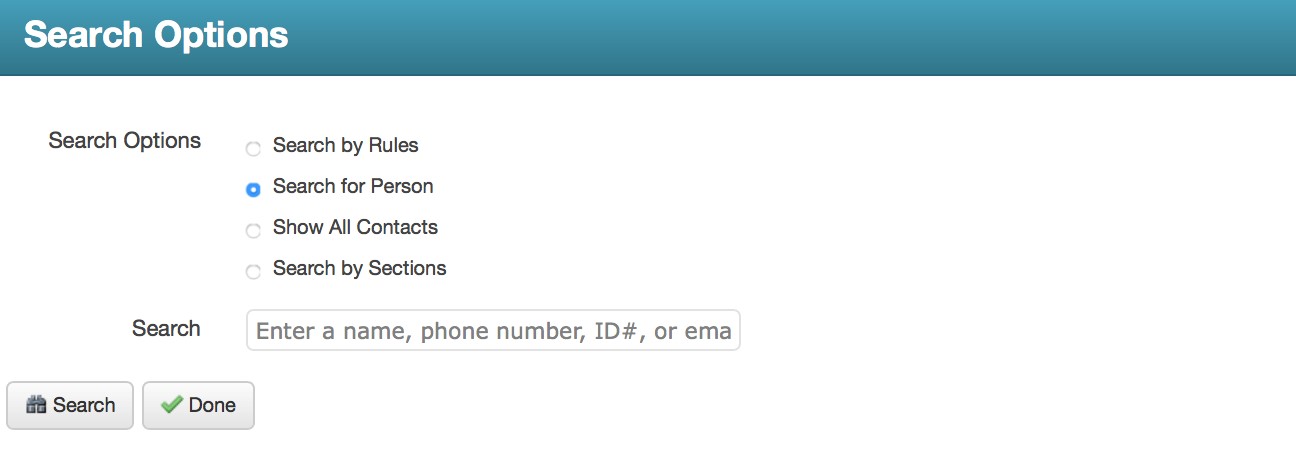
Quick Pick allows you to rapidly search for individuals in your database by entering their name, phone number, ID number, or email address.
-
Click the Quick Pick button located in the Additional List Tools section to access the List Search screen
-
Enter the individual’s name, phone number, ID number, or email address in the search field.
-
Click the Search button to display the results of your search.
-
Select the individual for your list by checking the checkbox next to their name.
-
Click Done to save your changes or continue building your list.
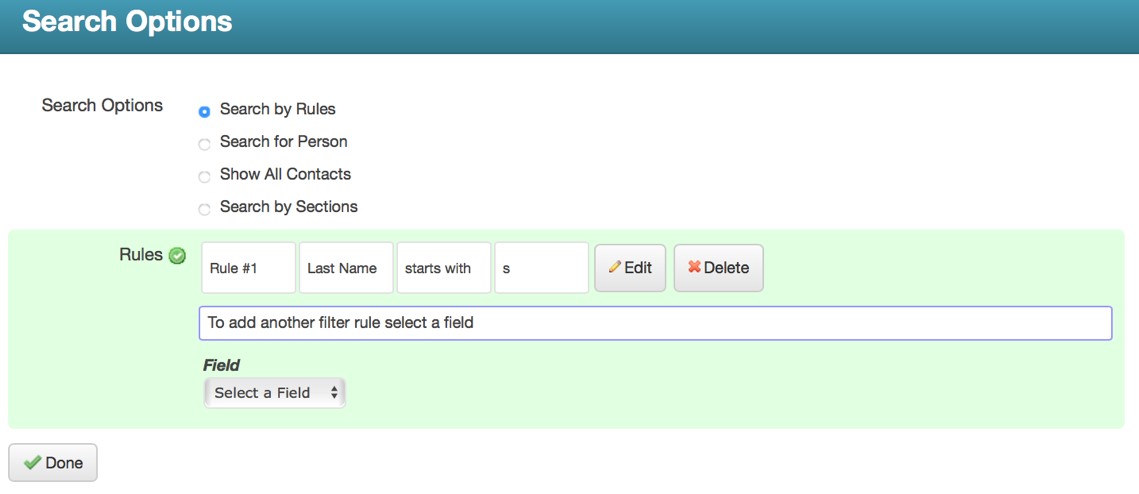
Search by Rules
You can use the Search by Rules option to filter through your contacts and find individuals you want to add to your list. This can be useful if you need to find an individual when you do not have all the information you need to just use Quick Pick. For example, if you need to find someone where you only know their last name or you aren’t sure quite how to spell their last name, you can search with a rule that includes only their last name or the first letter(s) of their last name.
-
Click the Search by Rules button located in the Additional List Tools section. This will redirect you to the List Search window.
-
To filter your contacts by rules, select the search field and the comparison operator you wish to use (that is, “is", "is not", etc.) in the Criteria area. Then select the data items that you wish to include in your search rule and click the Add button.
-
When you locate the person (or people) who you want to include in your list, simply click the checkbox to the left of their name. Repeat until you have selected everyone that you want included on your list.
-
When you are finished, click the Done button at the bottom of the window, and you will be returned to the List Editor. From there you can save your list or continue by adding rules or more individuals to your list.
Upload CSV File Lists
The Upload List button allows you to create a list of contacts by uploading a Comma Separated Value (CSV) text file. You can create a CSV file with spreadsheet software such as MS Excel.
Upload Types
GroupCast can work with two types of CSV files, named for the data included in the file.
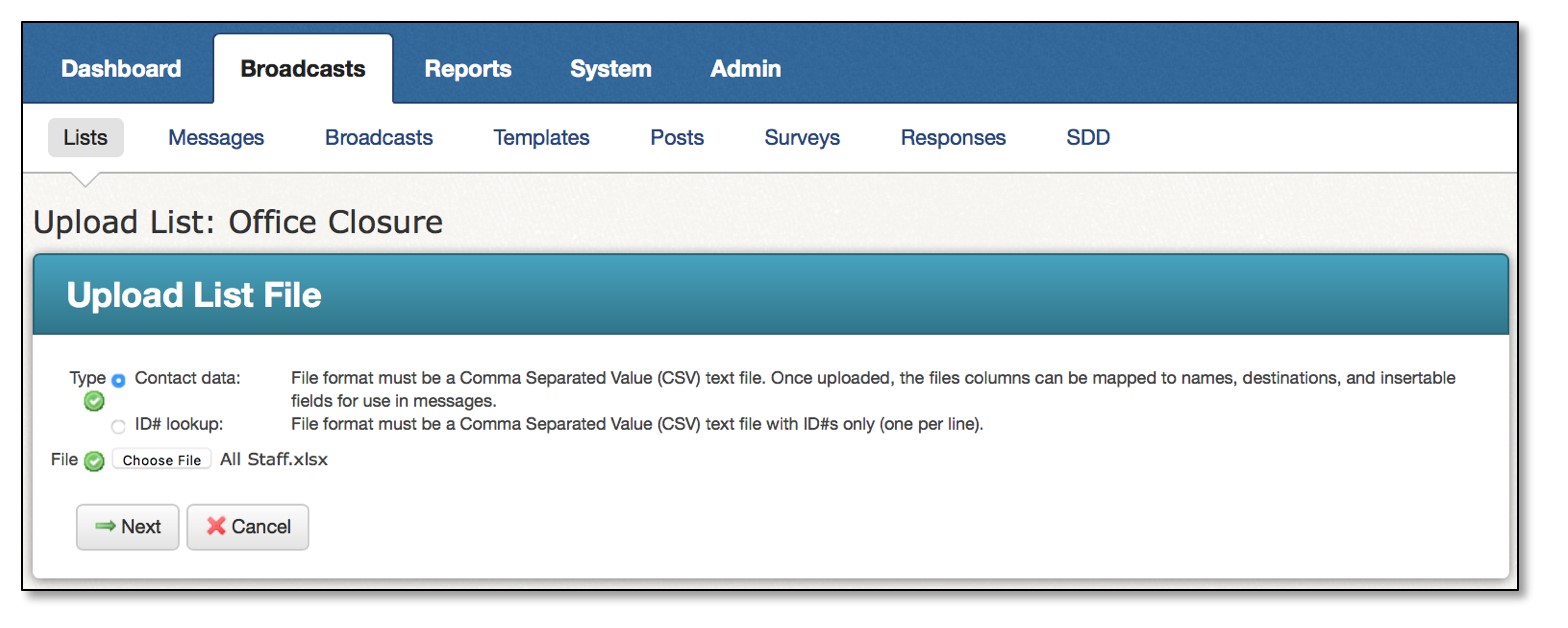
Contact Data type
Contact Data CSV files contain complete contact information for your recipients with each column containing one field. For example: First name, Last name, email 1, email 2, phone 1, phone 2, etc.
-
If you are uploading a Contact Data CSV file, be sure to select the radio button labeled Contact Data.
-
Click Choose File to locate the file you would like to upload from your computer.
-
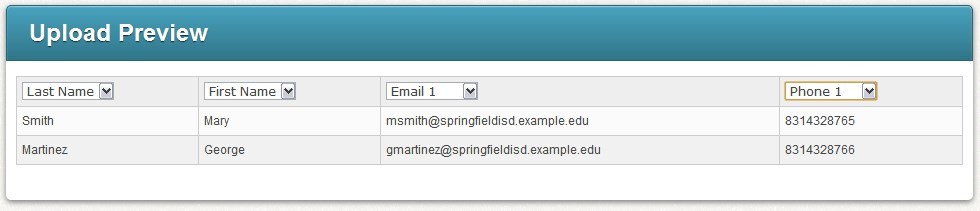
Click Preview. In the Upload Preview, use the dropdown menus to tell the system what type of data is in each field.
-
When you are done, click Save to return to the List Editor.
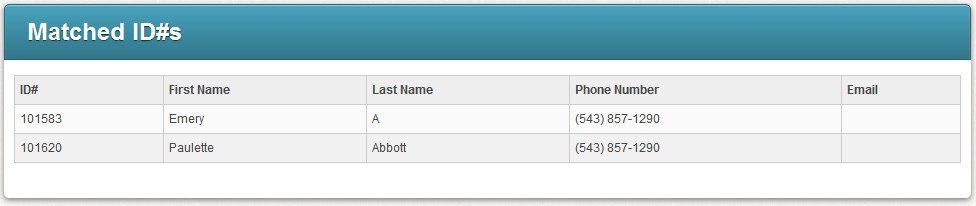
ID # Lookup type
ID # Lookup CSV files contain only the ID numbers for your recipients as they exist in your database. The system will use the ID number to match the recipient's contact information already stored in the system.
-
Click the Browse button to locate the file on your computer that you wish to upload.
-
Click the Preview button to see the list once the ID numbers have been matched to the data in your database.
-
If your list looks correct, click Save to return to the List Editor.
Save and Reuse Lists
After you have finished adding all of the recipients to your list, be sure to save your list by clicking Done at the bottom of the List Editor.
You will be able to use your new list next time you create a new broadcast from the Dashboard by clicking Saved Recipient Lists while adding building your list of Recipients in the list selection step.
Advanced Messages
As you saw in the Getting Started guide, you can easily create a simple broadcast from the Dashboard. While it is frequently the case that you will just want to send a simple message, you will probably want to take advantage of some of these advanced features.
In this section, you will learn how to:
-
Personalize your message with dynamic data fields.
-
Use a blend of audio and data fields in a phone message.
-
Use the Social Media features.
-
Creating a message using the Message Builder allows you to create a single message object that contains phone, email and SMS content (in multiple languages if you choose), which can then be easily selected later when creating a new broadcast from your Dashboard.
Message Builder
The Message Builder is where you can create new messages and find any messages you have saved or subscribed to.
This guide will focus on the features you will find in the Message Editor, which you can access by making a new message in from the Message Builder. Note that any message you create here will also be available for you to use when creating a new broadcast from the Dashboard.
Note: To learn more about publishing and subscribing to messages, read the Publish and Subscribe content in the Online Help.
Create a Message
-
Click the Broadcasts tab followed by the Messages sub-tab.
-
Click the Add New Message button.
-
Enter a name for your message and click Next.
Message Editor
When you create a message for a broadcast, you must create message content for all of the destinations you like to use.

Message Content
Note: You may not be able to see certain content types due to settings in your Access Profile.
You can send your broadcast to a number of destinations, each with one or more content types. The Message Content area contains a grid of content types and languages you can use. The content types are:
-
Phone: The phone message component.
-
Phone Confirmation: If events are enabled, this message is played after the patient has confirmed their appointment. Note that you will not see either Phone Confirmation or Phone AMD until you have created and saved a phone message.
-
Phone AMD: The message played when there’s an answering machine detected.
-
SMS: SMS text message.
-
HTML Email: The HTML version of your email.
-
Plain Email: A plain text email for recipients who prefer to not receive HTML emails or are otherwise unable to view HTML.
-
Facebook: The message to post to an authorized Facebook page.
-
Twitter: The message to post to Twitter.
-
Page: This creates a web page which will be linked via a tiny URL (short link) to your Facebook and Twitter posts. This allows you to post larger messages and provide downloads of files such as PDFs to Facebook and Twitter.
-
Page Media: If you would like to embed audio in your Page, use the wizard here to record or upload an audio message. It will appear in an embedded player on the Page.
At each column, you will find the name of each content type accompanied by an Add icon. Clicking this icon will take you to a guided process for creating content of that type.
Under each content type, you will find a series of clear icons with a dropdown tab menu component. As you create content, these will go from clear to green and can be used to quickly tell which content types have been created. Additionally, if you wish to create, edit, or remove the content for a particular language, click the dropdown tab to open the menu for that message component.
Add Phone Message Content
Let us start by adding the phone message component to the new message.
-
Click the
Add icon next to Phone in the Message Content Type grid.
-
Select Write and click Next.
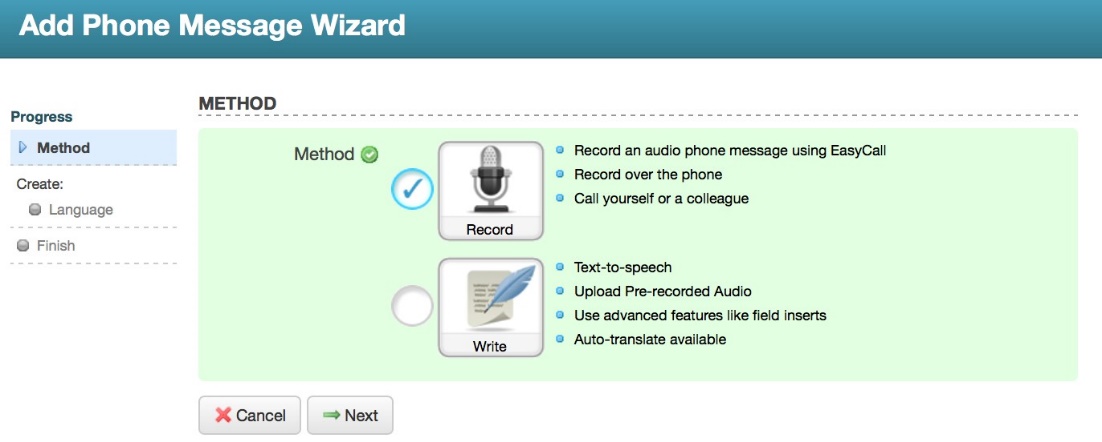
You will have two options for creating Phone message content.
-
Record: This option is just like Call Me to Record, which you’ve already used when you followed the tutorial in the Getting Started guide. If you just want to create simple phone message content, you should use this option. The system will call you and guide you through recording your phone message.
-
Write: This option gives you access to the Advanced Phone Message Editor, which is loaded with powerful features for creating phone messages. You should use this if you want to create phone messages with dynamic data inserts, mixtures of audio files and text-to-speech, or to upload audio files you’ve recorded elsewhere.
This guide will focus on the Write option which gives you access to the extensive features of the Advanced Message Editor.
Personalize your Message with Data Fields
In this section, you will be creating a text-to-speech message, which uses data fields to provide a personalized message for each recipient. Once you learn about inserting data fields, you’ll be ready to take on mixing audio files and data fields in the next section.
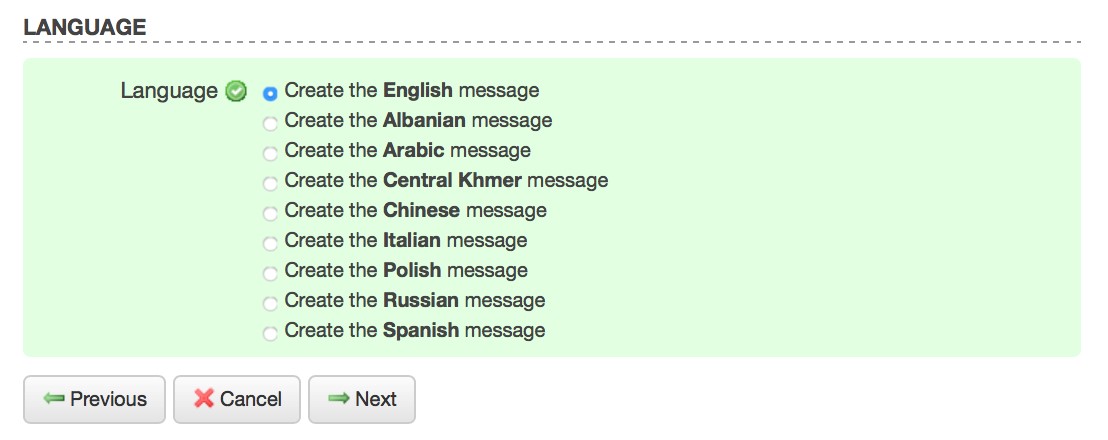
When you create a Text-to-Speech phone message, you may choose to automatically translate your English message to other languages, using machine translation from Google, or choose to create a message in one particular language. If you choose to create your message in just one language, you can add the other languages later by clicking on the icon corresponding to the language and content type in the Message Content grid.
-
Select a language option.
-
Click Next to continue.
-
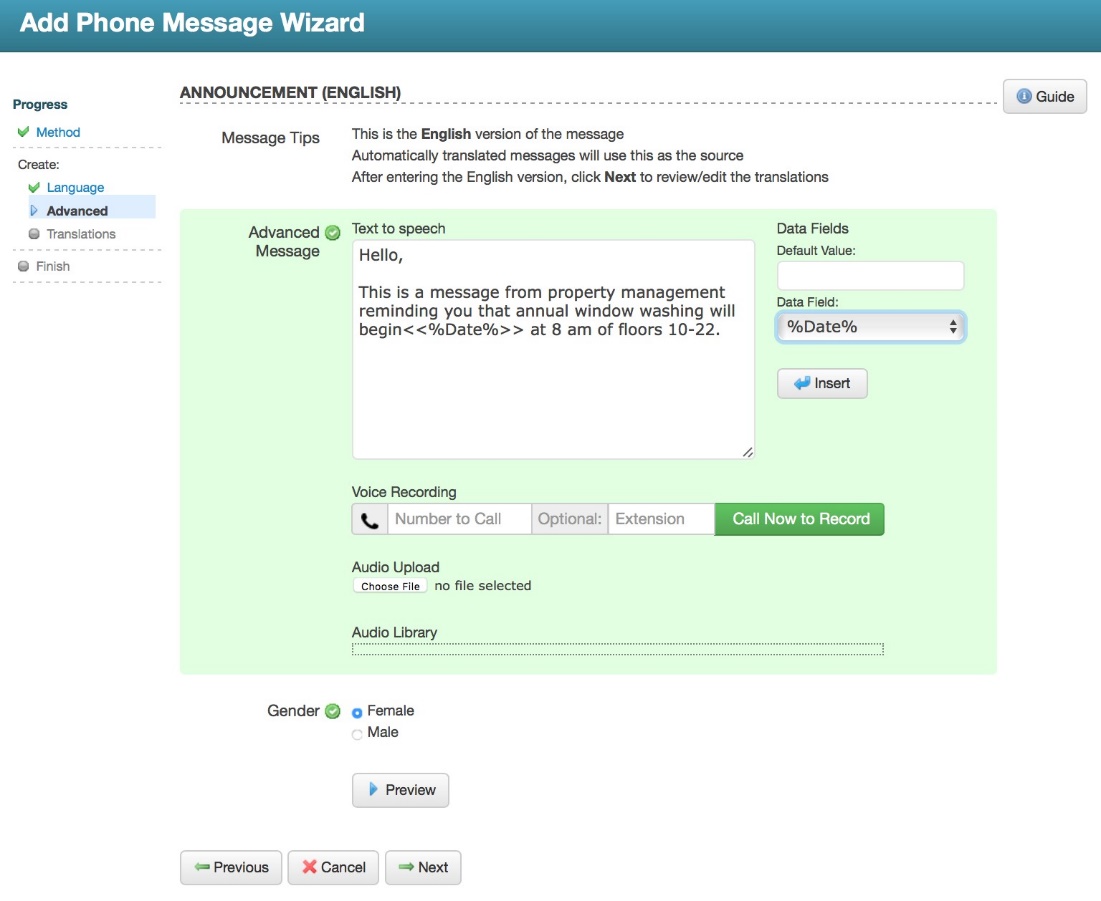
The next screen is the Advanced Phone Message Editor. Here you will enter your message to be read by text-to-speech and then insert data fields as needed.
-
Type your message in the Advanced Message field.
-
Place your cursor at the location where you would like to insert dynamic data.
-
Select the field you wish to insert from the Data Fields menu at the bottom of the screen. You may optionally enter a default value for the data field you insert. This value will be read in situations where a recipient is missing data of that type.
-
Select a gender for the text-to-speech voice and click Preview to listen to your message.
-
Click Next when you are ready to continue.
-
Click Done in the following screen to return to the Message Editor.
Tip: The content migration team cannot guarantee that content not listed on the Migration Sheet will be migrated, or that every piece of content listed will be able to be migrated due to the unpredictable nature and cross-compatibility of web content.
Some languages do not have options for both genders. In this situation, your message will play in the available gender for that language, regardless of your selection.
If you chose to automatically translate your message, you will be presented with the translated versions generated by Google’s translation service.
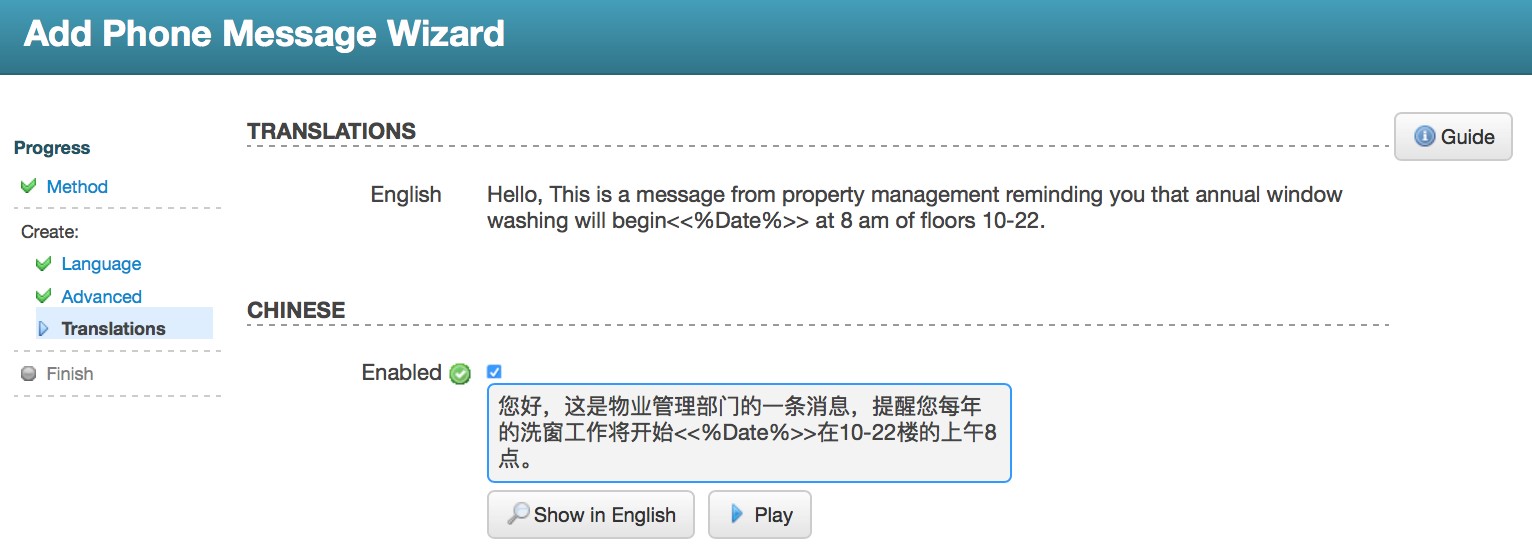
Any translation can be disabled, causing recipients with a preference for that language to receive the message in your default language. A translation can be manually overwritten by clicking on the message content for that language in the Message Content grid and selecting Edit.
Compose a Phone Message with Audio Files and Data
If you would prefer to use recorded audio, but still have the ability to insert data fields, you can do this from the Advanced Phone Message Editor as well.
Note: Automatic translation only works on typed messages. You will not be able to automatically translate audio recordings.
-
Click the next to Phone in the Message Content Type grid.
-
Select Write and click Next.
Call Me to Record
In the Advanced Phone Message Editor, you can use Call Me to Record to have the system call you to record snippets of audio for your message. You can record one snippet per call. These snippets will appear as audio files in the Audio Library.
You must record the audio so that you can insert data fields between snippets. For example, from the message in the screenshot above, each section of blue text would be an individual recording:
Hello, this is a message from property management reminding you that annual window washing will begin <<%Date%>> at 8 am of floors 10-22.
Upload Audio
If you have recorded your audio files elsewhere and would like to use them in your message, you can upload them to the Audio Library. Click the Choose File button and locate the audio files on your computer. You can also use this method to upload entire messages that have been recorded elsewhere, such as professionally recorded messages that you will not use with data fields.
Note: The system supports the following audio file formats: .wav, .aiff, .au, and .mp3.
Compose Audio Snippets and Data Fields
After your audio files are in the Audio Library, you are ready to assemble your message.
-
In the Audio Library, select the first audio file for your message and click Insert.
-
Insert any data fields, as you did in the previous section.
-
Repeat this process for each audio file and data field you wish to include.
-
Select the gender of the text-to-speech voice. It typically sounds best if you pick the same gender as the speaker in your audio files.
-
Click Preview to listen to your message.
-
Click Next when you are ready to continue.
-
Click Done in the following screen to return to the Message Editor.
Confirmation Message
Tip: In order to create a phone confirmation message, the user must be assigned to a profile that has Customize Confirmation Message enabled.
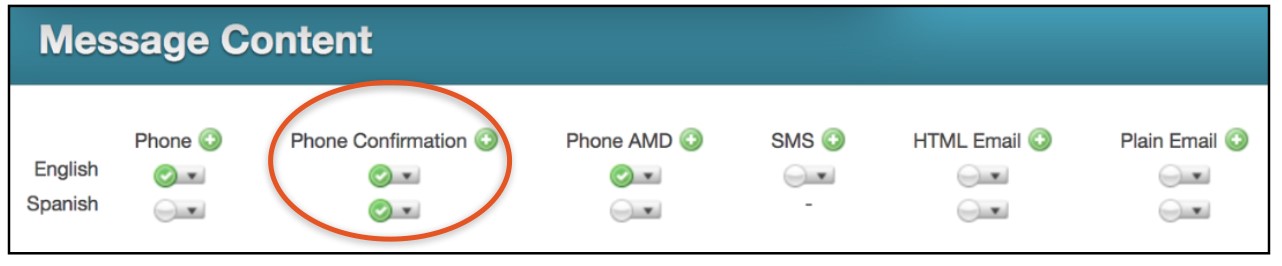
Confirmation Messages are played after the patient has confirmed their appointment.
-
To create, you must create a main phone message first. If you don’t create a main phone message, the option to create a confirmation message will remain hidden.
-
After creating a main phone message, create a Phone Confirmation message.
Sample Phone Confirmation Message:
Thank you for confirming your appointment, <<First Name>>. Your confirmation has been noted.
Answering Machine Message
Tip: In order to create an answering machine message, the user must be assigned to a profile that has Customize AMD Message enabled.
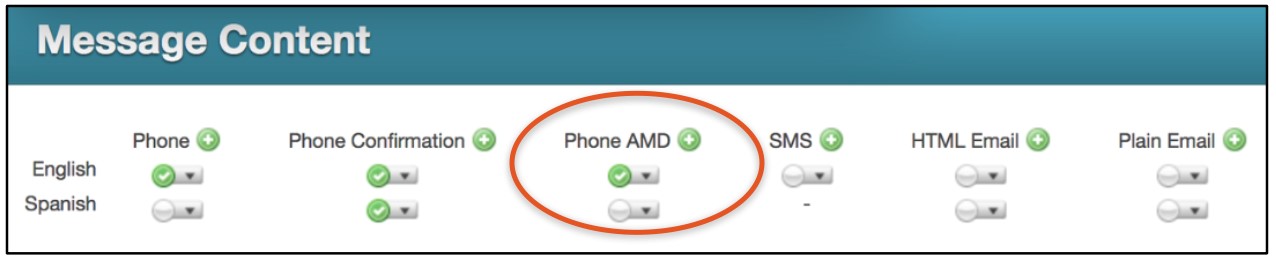
An AMD Message is the message played when there is an answering machine detected.
-
To configure, you must create a main phone message first. If you do not create a phone message, the option to create a phone AMD message will remain hidden.
-
After creating a main phone message, create a Phone AMD message.
Sample Phone AMD Message:
You have an appointment for a <<Procedure>> with <<Provider>> on <<Display Date>>. To confirm or cancel your appointment, please reach us at <<Location Phone>> or <<Location Email>>.
Add Email Message Content
Now you are ready to add an Email component to this message.
Create a new HTML Email with Data
-
Click the
-
Select a Language option and click Next.
-
To access the menu for editing HTML or using the Paste from Word feature, click the small triangle in the upper right corner of the Email Message field.
If you have already created a message using Microsoft Word and you want to paste that message into the HTML editor, you should be aware that messages that are copied and pasted from Word contain extra, non-standard, information that may cause your message to not display correctly. The system will automatically remove most of this information for you, but for best results, it is better to compose your message using the HTML editor if possible.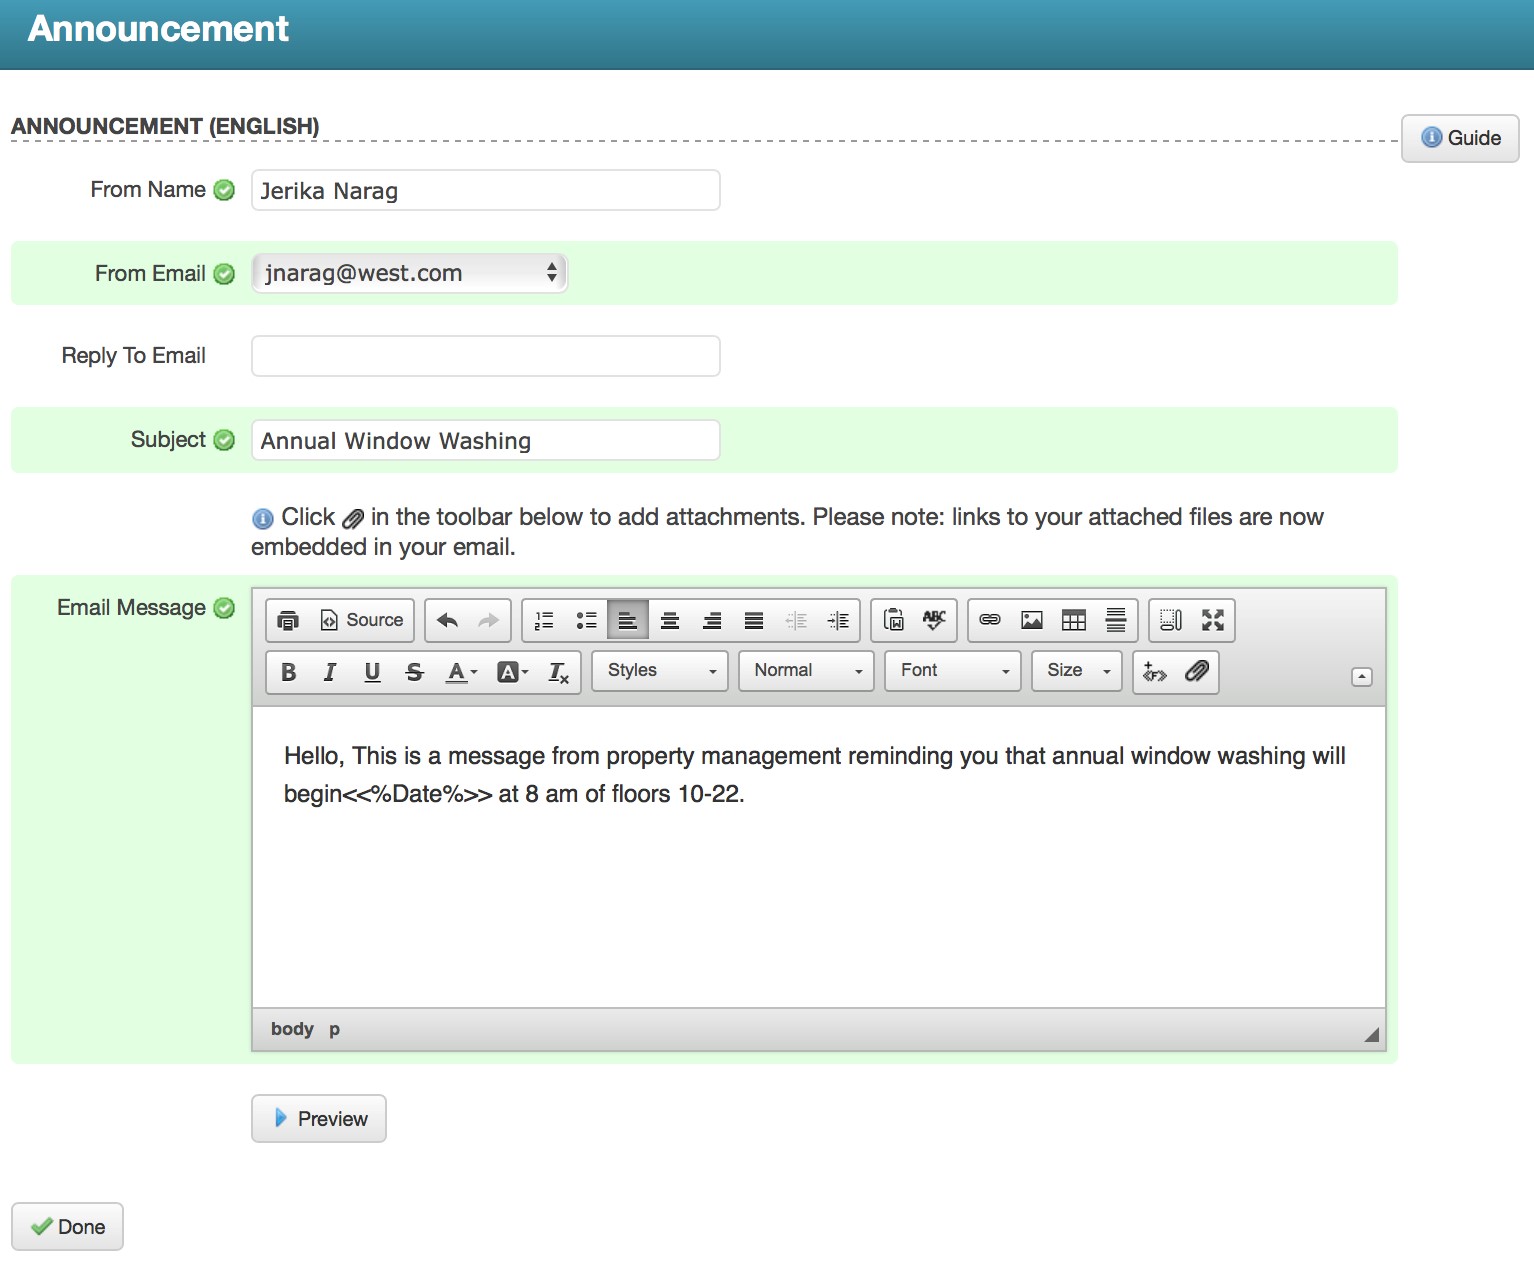
-
Place your cursor at the location where you would like to insert dynamic data.
-
Select the field you wish to insert from the Data Fields menu at the bottom of the screen. You may optionally enter a default value for the data field you insert. This value will be read in situations where a recipient is missing data of that type.
-
Click Preview to see how your HTML email looks.
-
When you’re ready to continue, click Next.
-
Click Done in the following screen to return to the Message Editor.
If you chose to automatically translate your message, you will be presented with the translated versions generated by Google’s translation service.
Any translation can be disabled, causing recipients with a preference for that language to receive the message in your default language. A translation can be manually overwritten by clicking on the message content for that language in the Message Content grid and selecting Edit.
Note: To include a plain text email for recipients who cannot view HTML emails, you will need to create a plain text email from the Message Content grid. You may use the Plain Email wizard, which you can access by clicking on the Add icon next to Plain Email.
SMS Message Content
To add SMS text message content, simply click the next to SMS in the Message Content grid, enter your message in the SMS text editor, and click Done.
Adding Posts Content
Post content to your social media, web pages or RSS feeds.
Facebook and Twitter Content
If your message should contain a Facebook or Twitter post, simply click the next to Facebook in the Message Content grid next to each of these types and enter your post into each editor.
RSS Feed Content
If your message should contain a post for your RSS Feed, click the next to Feed in the Message Content grid and enter your headline and post into the Feed Message Editor.
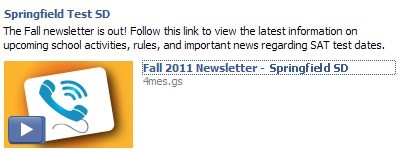
Adding a Page and Page Media
Do you have more to say than will fit in a mere 140 characters? You may have noticed that the previous screenshot contained an example that referred to a link. That is because this Facebook post is intended for use with a Page message type. A Page is not actually a message in the normal sense; rather, it is an actual web page that you can make as easily as you created an HTML email. Pages are automatically linked to your Facebook and Twitter posts using a short link.
Create a Page
-
Click on the next to Page in the Message Content grid. You’ll see an HTML editor just like you would if you were making an HTML email.
-
To access the menu for editing HTML or using the Paste from Word feature, click the small triangle in the upper right corner of the Email Message field.
Tip: If you have already created a message using Microsoft Word and you want to paste that message into the HTML editor, you should be aware that messages that are copied and pasted from Word contain extra, non-standard, information that may cause your message to not display correctly. The system will automatically remove most of this information for you, but for best results, it is better to compose your message using the HTML editor if possible.
Add Attachments for Download
Notice the Attachments option at the bottom of the editor. You may attach files to your page just as if you would with an email. The difference is that when the page is created, these files will appear as links in a Download section. This is a great way to distribute files that are too big for email. Attachments to pages are not as limited in size and number as they are for emails.
Add Embedded Audio
If you would like to embed audio such as your phone message or some new audio into your page, you can do this from the Message Content grid by clicking on the next to Page Media. People viewing your page will be able to listen to the audio in an embedded audio player. The player is also available for viewers to use right on your Facebook Page.
People viewing the post on Facebook can simply click on the play button to listen to the audio portion of your post. The player contains a link to your Page content. Alternatively, they may click on the link to view your Page content. An audio player will be available at the top of the Page, as shown in the example generated page.
Using Your Message in a Broadcast
Using your saved messages in a broadcast is simple. It is actually not very different from creating a New Broadcast as in the Get Started Guide.
-
Click the New Broadcast button on the Dashboard and proceed as normal.
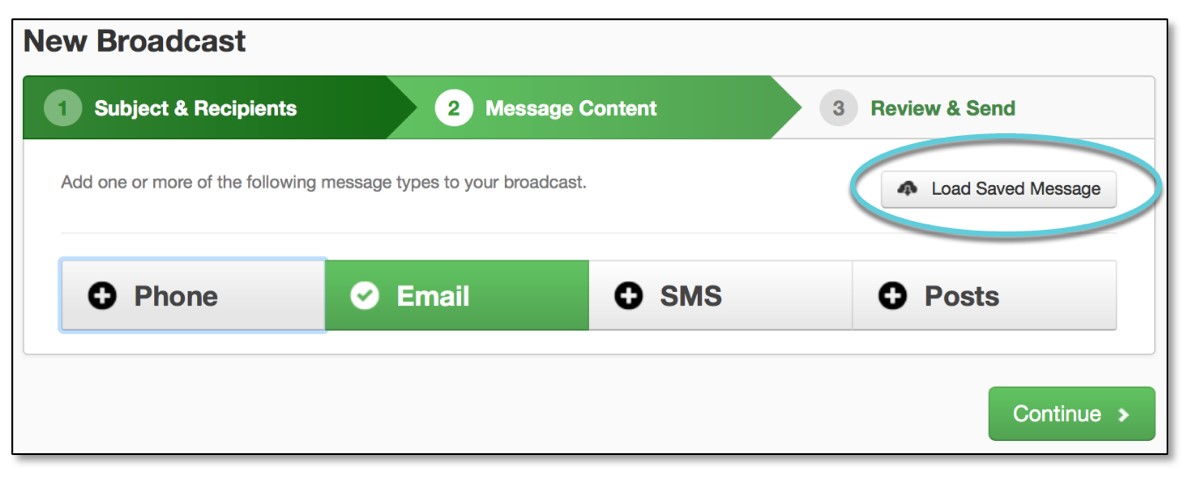
-
At the Message Content step, click the Load Saved Message button, highlighted below.
-
Select your message from the list of saved messages.
If your message contains an RSS Feed post, you will need to select which category under which the post should be published. If you do not do this, your RSS content will not be posted. After selecting your saved message, click Add Social. Below your RSS content, you will see the categories you can post to in the Post to Feeds section. Select the appropriate category and then click Save Social Messages. -
Click the green preview checkmarks to review any portions of the message you wish. Then click Continue.
-
Click Continue to move to the Review & Send stage.
-
If everything looks correct, click Send Now.
Authorizing Social Media Accounts
Before you can post to social media sites, you will need to allow the GroupCast social media apps to have access to your accounts. You can do this from the Account link at the top of any page. You will only need to grant permission once. Your permission will last until you deliberately revoke it.
Authorizing a Facebook Account
The social media options on the Account Settings page are found at the Account link in the header menu.
Either make sure that you are logged into the Facebook account you wish to authorize, or that you are not logged into Facebook at all.

Click the Connect to Facebook button.
If you are logged into Facebook already, the account you are logged into will be authorized. Otherwise, there will be a pop-up window asking you to please log into the appropriate account and grant permission.
If you accidentally authorize the wrong Facebook account, follow the simple instructions for changing accounts in the Online Help manual.
Authorizing a Twitter Account
Authorizing a Twitter account is almost exactly the same as Facebook.
Make sure that you are either logged into the Twitter account you wish to authorize or that you are not logged into Twitter at all.
Click the Connect to Twitter button.
The only difference between Twitter and Facebook is that you will be redirected to a new web page to authorize Twitter. As soon as you are done, you will return to the page you were on in our system.
Configuring an RSS Feed
Before posting your RSS Feed content, you will need to configure some RSS Feed categories and distribute the URL of your RSS feed to your potential subscribers. Configuring an RSS Feed is actually quite simple, and this tutorial will show you how.
Note: If you are interested in using the RSS Feed feature to instantly notify staff of emergencies, you may be interested in installing the GroupCast Desktop Alert software on staff computers. When you send an RSS Feed item to a Desktop Alert category, a window with the message will pop up on computers running the Desktop Alert software. Configuring Desktop Alert is as simple as any other RSS Feed category. Ask your Account Manager for more information.
Creating Feed Categories
RSS Feeds, like news bulletins, are organized into categories to which recipients can subscribe. Your categories can be as broad or as narrow as you like. For example, you could also create categories by topic, such as “Health”, “Upcoming Events”, or “Training Opportunities” to be used across your entire organization or specialized categories by site. You’ll be able to combine several categories into a single RSS feed when you create a feed URL and your subscribers will be able to enjoy filtering posts by their interests in their RSS readers at the same time.
Setting up Categories
-
Click the Admin tab followed by the Settings sub-tab, then click on Feed Categories in the Features section of the page.
-
Enter a category Name and Description, for example "Sports" and "Sports news for Oakdale".
-
Click the Add New Category button for any additional categories.
-
Click Save when you are done.
Generating an RSS Feed URL & Widget
Subscribers will use the URL you generate to subscribe to your RSS Feed. After you generate your feed URL, you can continue on to create a JavaScript RSS widget for your web site that will display the posts in your feed as they occur.
Generating a URL
-
Click the Broadcasts tab followed by the Posts sub-tab. Then click on the Generate Feed URL/Widget button at the top of the My Posts window.
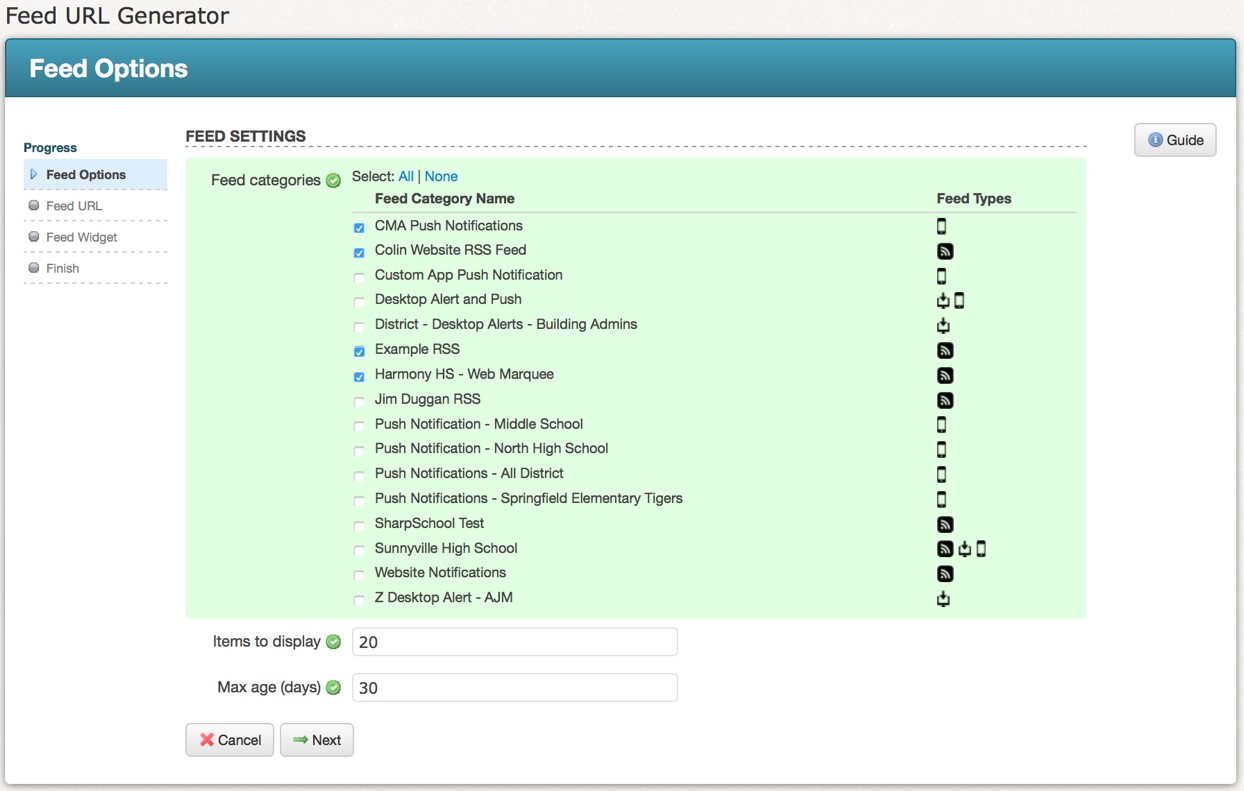
-
Select which categories this feed should include and configure the display options.
-
Click the Next button. You will see the URL for your RSS Feed. This URL should be copied and distributed to potential subscribers. You can stop here or continue to generate a widget that can be pasted into your web site.
Generating a Display Widget
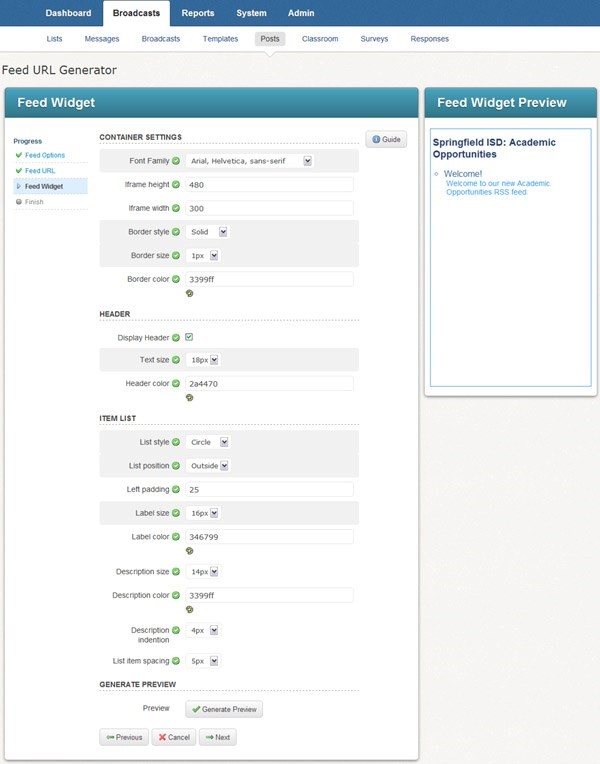
Continuing from the instructions in the previous section, you should click the Next button to configure the Display Widget.
Configure the appearance of the widget and click the Generate Preview button to get a feel for how it looks along the right side of the screen. The RSS Feed post that you sent earlier will be displayed in the preview, assuming your feed covers the same category as your post.
Click the Next button to generate the JavaScript code for your web page. You will see the URL and the JavaScript snippet to paste into your web page. It is not saved anywhere so make sure you copy and paste it into another document. Otherwise, you can come back and regenerate the URL and code at any time.
Broadcast Templates
The Broadcast Templates feature lets you create reusable broadcasts in which only some of the components are included. You can create templates for emergencies or any other type of broadcast that you might send more than once, but not frequently enough to warrant a Repeating Broadcast.
You can create templates of any shape and size. For example:
If you have a few separate lists including a couple of lists made from your address book with another list made from rules and you know you want to contact this odd grouping of lists more than once with different messages, you might consider making a template which contains only your group of lists.
You can also prepare for future weather emergencies by creating a template with a city-wide list and weather emergency message.
Create a Template
-
Click the Broadcasts tab followed by the Templates sub-tab.
-
Click the Add New Template button.
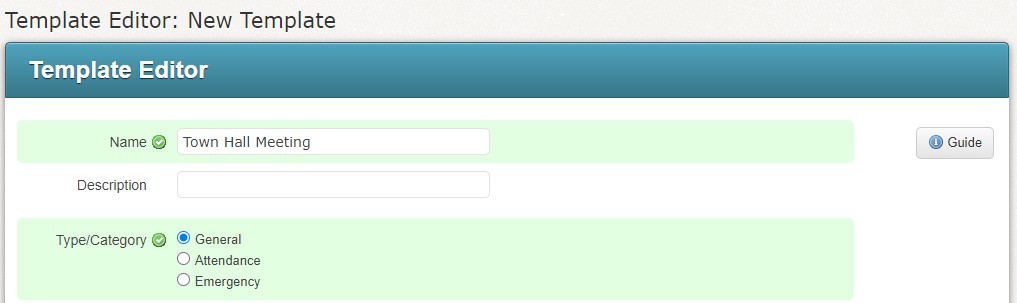
-
Add any combination of components and click Save when you’re done.
Add Your Template to Your Dashboard
Click the Show on Dashboard link next to your template on the Broadcast Templates page.
Use Your Templates
On the Dashboard, click the name of the template. Alternatively, click the New Broadcast link next to your Template on the Broadcast Templates page under the Broadcasts tab. Both work exactly like clicking the New Broadcast button, only the new broadcast will be populated with content from the template in this case.
Repeat Broadcasts
If you have a broadcast that should occur regularly during the week, such as for attendance or food service, you should create a Repeating Broadcast. Repeating Broadcasts can be scheduled to occur at a certain time any or every day of the week.
Tip: Never use Repeating Broadcasts for one-time broadcasts, such as Open House reminders, or Back-to-School Night. Those kinds of broadcasts are perfect for saved messages or templates. Repeating Broadcasts are intended for regularly scheduled messages, like attendance.
Create a Repeating Broadcast
-
Create a saved list and a saved message outside of a broadcast.
-
Click the Broadcasts tab followed by the Broadcasts sub-tab.
-
In the My Repeating Broadcasts section, click Add New Repeating Broadcast.
-
Enter a name for the broadcast and select its type.
-
Specify the days and times that the broadcast should automatically launch.
-
Select the list and message to use and set any other relevant broadcast options. Then click Save.
Tip: Be sure that your data will upload in time to populate the list that the job will be using.
Use Telephone-only Access to Create and Initiate a Broadcast
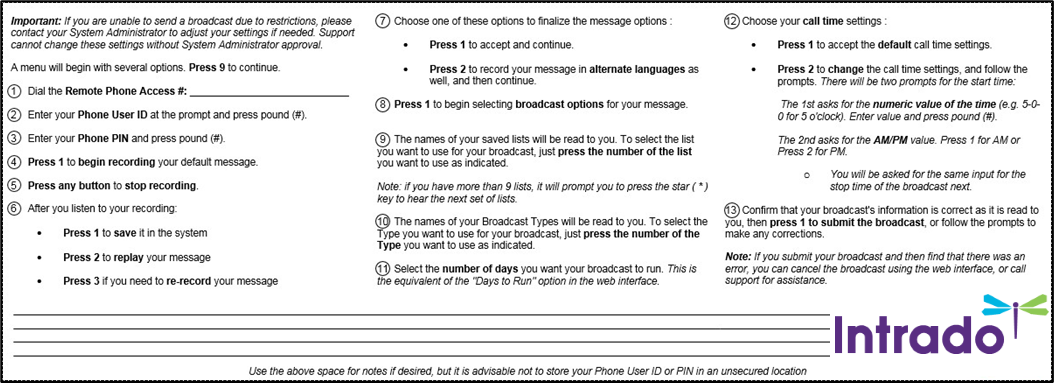
The Remote Phone Access feature allows authorized users to record messages and create broadcasts without the need of a computer or app. These steps have been made into a printable pocket guide (see Remote Phone Access Pocket Guide in Appendix A).
Note: Before calling into the system you will need your Phone User ID and Phone PIN code. These can be accessed and modified using the Account link located in the top right corner of the window, or in the Edit menu of the User Account in the Admin tab and Users sub-tab area.
Dial the Remote Phone Access phone number. You can find your Remote Phone Access phone number in the footer section while logged into the web interface for GroupCast.
-
After calling the number, a menu will begin with several options. Press 9 to continue.
-
Enter your Phone User ID at the prompt and press pound (#).
-
Enter your Phone PIN and press pound (#).
-
Press 1 to begin recording your default message.
-
Press any button to stop recording.
-
After you listen to your recording:
-
Press 1 to save it in the system
-
Press 2 to replay your message
-
Press 3 if you need to re-record your message
-
-
Choose one of these options to finalize the message options:
-
Press 1 to accept and continue. Or…
-
Press 2 to record your message in alternate languages as well, and then continue.
-
-
Press 1 to begin selecting broadcast options for your message.
-
The names of your saved lists will be read to you. To select the list you want to use for your broadcast, just press the number of the list you want to use as indicated.
If you have more than 9 lists, it will prompt you to press the star (*) key to hear the next set of lists. -
The names of your Broadcast Types will be read to you. To select the Type you want to use for your broadcast, just press the number of the Type you want to use as indicated.
-
Select the number of days you want your broadcast to run. This is the equivalent of the Days to Run option in the web interface.
-
Choose your call time settings:
-
Press 1 to accept the default call time settings. Or…
-
Press 2 to change the call time settings and follow the prompts. There will be two prompts for the start time:
-
The first prompt asks for the numeric value of the time (e.g. 5-0-0 for 5 o'clock). Enter a value and press pound (#).
-
The second prompt asks for the AM/PM value. Press 1 for AM or Press 2 for PM.
-
You will be asked for the same input for the stop time of the broadcast next.
-
-
-
Confirm that your broadcast's information is correct as it is read to you, then press 1 to submit the broadcast, or follow the prompts to make any corrections.
Note: If you submit your broadcast and then find that there was an error, you can cancel the broadcast using the web interface, or call support for assistance.
Create an Individual Contact History Report
The following section demonstrates how to create a specific report for an individual, such as calls over a date range or calls to a particular phone number.
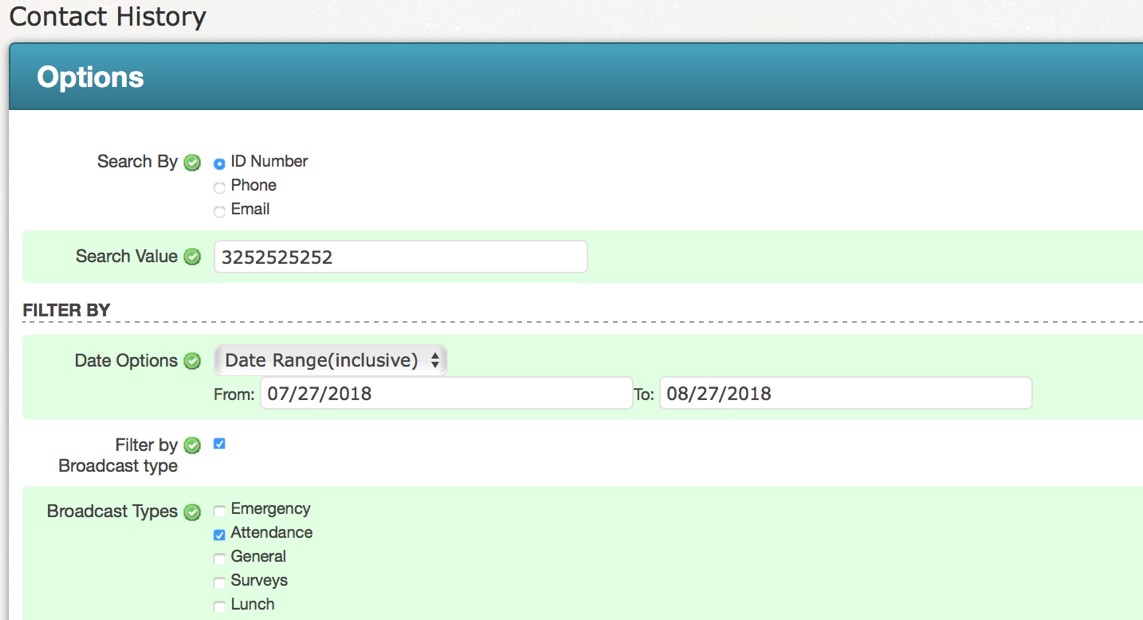
-
Click on the Reports tab, and then click the Contact History link (under the Individual heading).
-
Enter the search criteria for the report. You must enter at least one of the following: ID#, phone number or email address. For results from all contact items (phone, email, SMS, and so on), use the ID# option.
-
Enter optional filter criteria to narrow your search results (such as filtering by Broadcast Type or by data).
-
When you have completed your selections click the View Report button to display the results.
For additional information on Reports, including saving and scheduling reports based on notification results (for example, a list of all of the Disconnect results for the last month) please visit Online Help and click the Reports link in the Contents section on the Help menu.
Appendix A: Remote Phone Access Pocket Guide
The Remote Phone Access system for GroupCast is a feature that enables you to create a phone broadcast by simply calling a number and entering a few options. The only requirements to use the system are the following:
-
You must have a Phone User ID and Phone PIN code, set in your User Account by a System Administrator.
-
You must have saved lists under you own User Account in GroupCast. You will need to do this before using the system.
The following is a pocket guide that you can print and carry with you – in case of emergency, you will be prepared with the steps to use the system.
Note: You can find your Remote Phone Access phone number in the footer section while logged into GroupCast, or by calling support.
It is recommended that you DO NOT write your Phone User ID # and Phone PIN code on the pocket guide. Doing so would allow anyone who might come into possession of your pocket guide to initiate a broadcast to any list that you have created.