
Schoology and PowerSchool SIS now offer an integration that enables instructors to take attendance in Schoology using PowerSchool SIS Attendance tools. Instead of taking attendance using different sets of tools, instructors can use the same attendance tools they have access to in PowerSchool, all within Schoology courses. This means a deeper and more streamlined experience for instructors so that PowerSchool SIS and Schoology work better together.
PowerSchool SIS Attendance overview
Schoology and PowerSchool SIS have developed an application that enables Schoology to integrate with Attendance via API. Instructors may take attendance using the PowerSchool SIS Attendance tools they are familiar with, directly in their Schoology course. Attendance entered in Schoology is automatically shared with PowerSchool SIS in real time. Instructors do not need to run a sync to send attendance data between the two systems, providing a more seamless experience for instructors and administrators.
-
The PowerSchool SIS Attendance app replaces Schoology Attendance in all SIS-synced courses. Additionally, students and parents do not have access to Attendance after the app is installed.
-
The PowerSchool SIS Attendance app is not supported on the Schoology mobile apps.
PowerSchool SIS Attendance requirements
Organizations are required to complete the following items to use PowerSchool SIS Attendance in Schoology:
-
Upgrade your PowerSchool SIS instance to version 21.4.1 or later.
-
On-premise customers: Additional network changes may be required. Network devices (including load balancers) that use cookies for session persistence must set the cookie attribute to SameSite=None. This will ensure that requests coming from Schoology are routed to the correct application node.
-
-
Provision users, buildings, courses, and terms in Schoology using the PowerSchool SIS app.
-
For macOS and Chrome/Edge users: MacOS Catalina and above are supported only. Users on older macOS versions should upgrade to the latest version or use Firefox/Safari browsers instead.
-
For Safari users: Cross-site tracking (CST) permission must be enabled.
-
View attendance and Manage attendance permissions must be enabled for the organization at the system level in Schoology.
PowerSchool SIS Attendance App limitations
PowerSchool SIS Attendance does not support Schoology cross-listed sections. Instructors administering Schoology courses that contain cross-listed sections may not see all students when taking attendance and may only see students who belong to the target section. However, if two sections are cross-listed from PowerSchool SIS to Schoology, are in the same grading period, and have the same instructor in PowerSchool SIS, instructors can enable Show Multiple Sections in Settings to display students from both sections.
Students who belong to a course section synced from PowerSchool SIS appear in the attendance list even if their school has not been synced to Schoology. These students do not appear elsewhere in the Schoology course until their school is synced or they are manually added to the course.
Only courses that are synced from PowerSchool SIS to Schoology are supported in the PowerSchool SIS Attendance app. Courses that are manually created or imported via CSV file in Schoology are not supported, and instructors will see an error when attempting to access Attendance in their course.
Install PowerSchool SIS Attendance App (system administrators)
The PowerSchool SIS app should already be configured for the district before installing the PowerSchool SIS Attendance app.
-
As a System Admin, click App Center in the header.
-
Locate the PowerSchool SIS Attendance app and click the title.
-
Click Install LTI app.
-
Click I Agree.
-
Click Add to Organization to install for your district.
-
Under Organization Apps, click Configure next to the PowerSchool SIS Attendance app.
-
Fill out the form:
- Custom URL: Enter your PowerSchool SIS URL. You must also add /integrations/attendance/index.html to the end of the domain. For example, if your Custom URL is fairlakes.powerschool.com, then enter: fairlakes.powerschool.com/integrations/attendance/index.html
- Consumer Key and Shared Secret: Copy and paste the Consumer ID and Consumer Secret from the Schoology SIS Adapter. These are the same credentials used to configure the PowerSchool SIS app.
- Custom Parameters: Copy and paste the following into this field:sectiondcid=$CourseSection.sourceSectionId
userdcid=$com.schoology.User.uniqueId -
Click Save settings.
-
Under Organization Apps, click Install/Remove next to the PowerSchool SIS Attendance app.
-
Check All Courses and Course admins only.
-
Click Submit.
The PowerSchool SIS Attendance app can be customized to match your district's PowerSchool Teacher Portal attendance experience. PowerSchool SIS Technical Contacts can find customization resources on the PowerSchool Developer site.
Use PowerSchool SIS Attendance in Schoology
After the system administrator has installed the PowerSchool SIS Attendance app for the organization, instructors can access it from the same area as they previously did for Schoology Attendance, from the navigation menu of the course profile.
After instructors navigate to Attendance in their course, they will be automatically logged in to PowerSchool SIS, and they will have the ability to:
-
Share attendance data bi-directionally with PowerSchool SIS in real-time.
-
Take attendance and enter comments for single-day and multiple days.
-
Review attendance and comments entered by administrators.
-
Review and take attendance on seating charts.
-
Set personalized options such as sorting, grouping, and display options.
-
Review student alerts, absence records, and tardy totals
-
Review multiple sections.
-
Identify student grade level.
Co-teachers must be added as Admins in the Schoology course, in addition to being assigned to the section in PowerSchool SIS, to take attendance.
Take attendance
-
Click the Attendance Code menu and select the attendance code.
-
Click the field next to the desired student(s) to enter the selected attendance code.
-
To take attendance for an entire track or section at once, click Fill Code next to the track to copy the attendance code.
-
Optional: Click the comment icon next to the attendance field to enter a comment.
-
Click OK.
-
Instructors can only take attendance for days based on permissions in PowerSchool SIS as set by the Admin.
-
Students who were recently added to a section in PowerSchool SIS may appear in the attendance list before they appear elsewhere in the Schoology course. Run a re-sync in the PowerSchool SIS app to update course enrollment in Schoology.
-
Any attendance and comments that an administrator has already taken in PowerSchool SIS are displayed as read-only for the instructor and cannot be edited.
When you have completed entering attendance and comments, click Submit. All attendance and comments are automatically shared with PowerSchool SIS.
Change the day or date range for taking attendance
-
Click the calendar icon.
-
The calendar displays the current date by default. Click the desired date for which to take attendance or click the Range toggle on and select a date range.
-
Click Apply.
-
Proceed to take attendance for the selected days.
Click Submit. All attendance and comments are automatically shared with PowerSchool SIS.
For courses that contain linked sections, use the section filter to navigate to the desired section and take attendance for that section.
Sort attendance
Use Settings to sort the attendance list.
Click the gear icon and use the toggle buttons to adjust the following settings:
-
Show Multiple Sections
Display students from multiple PowerSchool SIS sections when the sections share the same instructor and grading period. This setting does not combine Schoology cross-listed sections that are not supported by the Attendance app. -
Group By Track
-
Sort by First Name
-
Show Grade Level
-
Select Language
Any changes made here are automatically saved for the instructor who made the edits and the same settings display as the default the next time that instructor opens the attendance list in Schoology.
Review student alerts
Available alerts display next to students in the attendance list.
Click the alert icon to review more information.
Seating charts
Seating charts created in the PowerSchool SIS Teacher portal are visible from the PowerSchool SIS Attendance app. Instructors may not create new seating charts directly in Schoology but they can take attendance from this area.
Additionally, instructors may wish to open the PowerSchool SIS Teacher portal in a separate tab to make any seating chart changes. After the changes are saved and the Schoology Attendance app is refreshed, the seating chart is updated in Schoology.
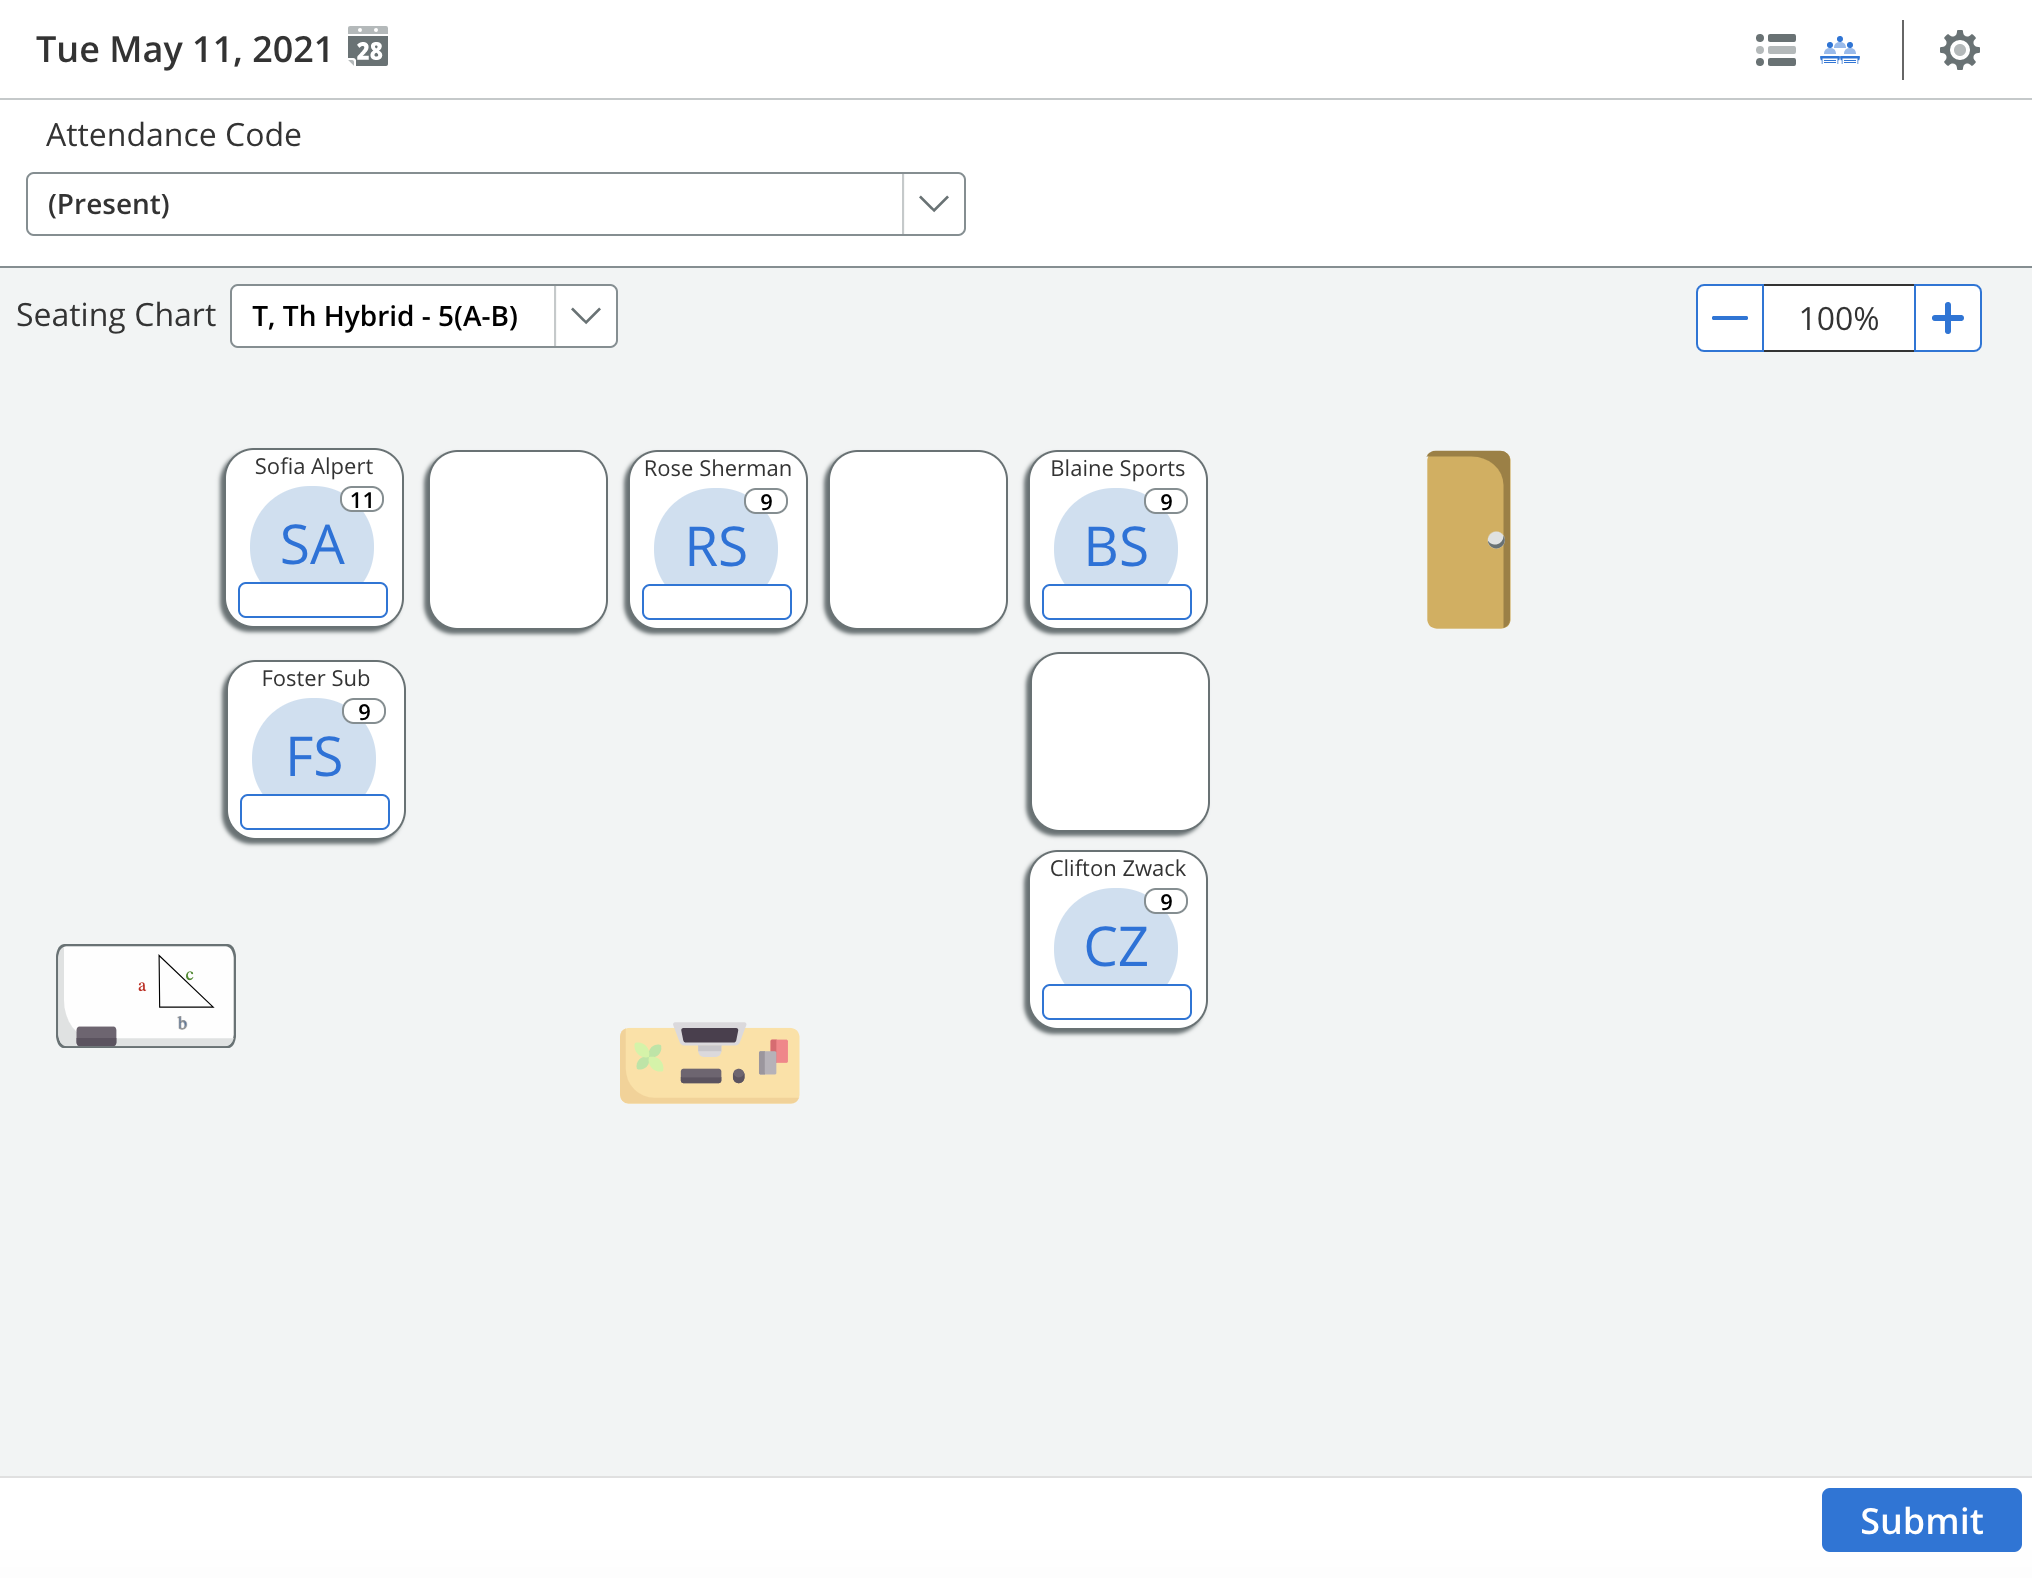
Review seating charts and take attendance
-
Click the Seating Chart icon next to Settings.
-
Click the Attendance Code menu and select the desired attendance code.
-
Click the field under the desired student(s) to enter the selected attendance code.
-
To enter a comment, click the same field under the student to display the attendance pop-up window.
-
Enter your comment and click OK to confirm.
-
Click Submit. All attendance and comments are automatically shared with PowerSchool SIS.
To review different seating charts:
-
Click the Seating Chart menu. This option is available if multiple seating charts have been created for the section.
-
Select the desired seating chart
Edit attendance
-
From the Attendance list view or Seating Chart view, click the attendance field on the desired student to remove the attendance code.
-
To enter a different attendance, click the empty attendance field again and select the correct attendance code.