
Using the Classroom Calendars, teachers can ensure that students and parents are always aware of upcoming assignments and deadlines. This is also a great place to publish notifications about other important events such as field trips, holidays and other school events. Events can also be sent to other calendars, so others are always aware of your important dates.
Key Information
To access your Calendar, you must log into your site using your Username and Password.
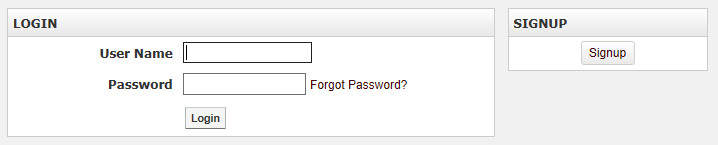
If you have not yet registered with the site you can request access by clicking on the Signup button. This will prompt you to create a profile which will be automatically submitted to an administrator for approval.
If you have already registered but have forgotten your password, click Forgot Password to retrieve it.
Add a Calendar Page
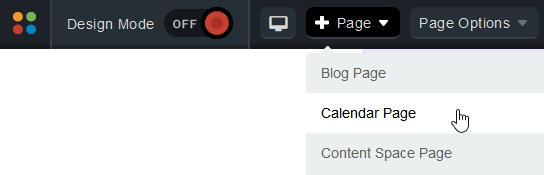
Some calendars (as on a Teacher Page) are added automatically. In some cases, you may want to add to add a new calendar to a page. Hover over Page and click Calendar Page.
Enter a name in the Page Name field for your new page.
The Page URL field will automatically be filled in. The Page URL is used to build the Friendly URL used to access the page. If you wish to make modifications to the Page URL, click the Lock icon and then you can change the text. Keep in mind that only alphanumeric characters, underscores and dashes can be used. Any other characters will be automatically removed.
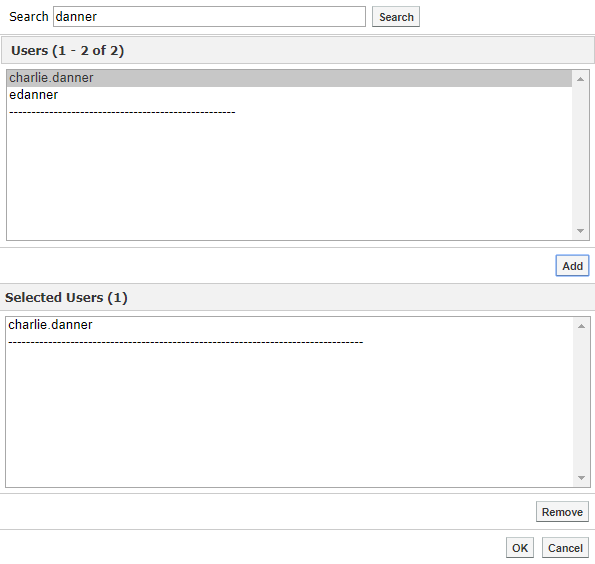
By default, you will be assigned as the Page Owner. If you wish to set someone else as the owner, click the Profile icon.
When the User Picker opens, choose the user you wish to make the owner, and click Add then click OK.
If you want to set the page as the user's homepage in their user profile, select Replace Page Owner's website with this page.
Note: On some sites, you may also have a Category drop-down that you can use to select a category for the page.
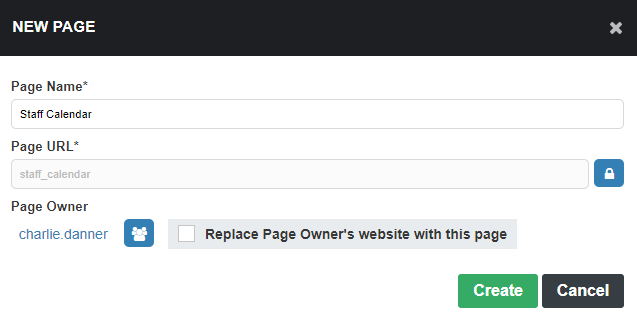
Click Create to create the Calendar page.
Configure a Calendar
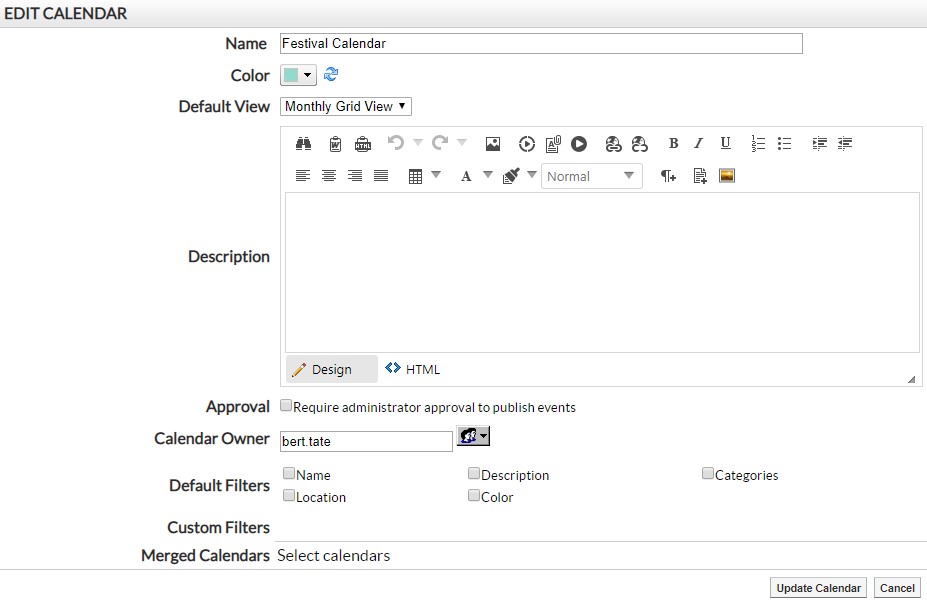
On the Edit tab on your calendar, you can name your calendar, set a calendar color, change the calendar's default view and more.
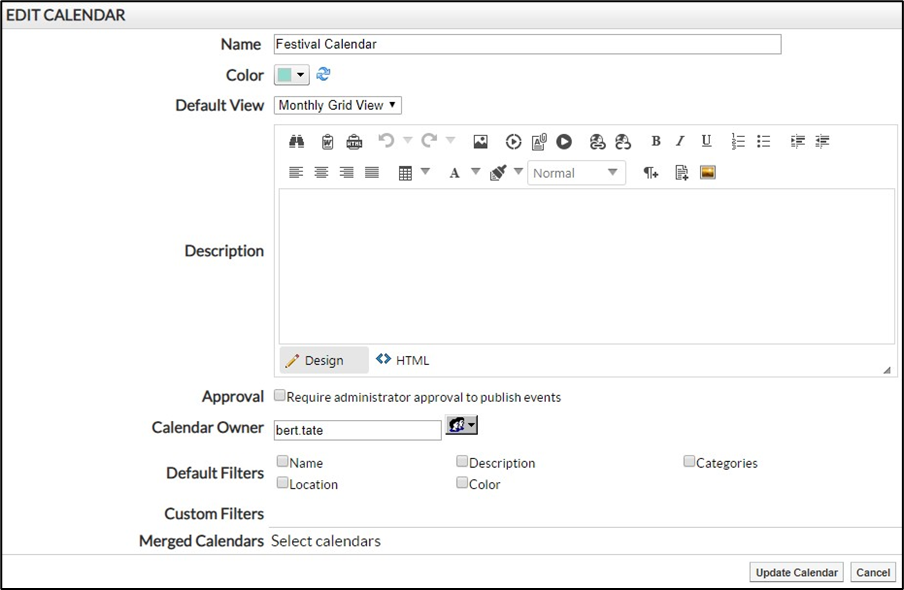
When you click the Edit tab, you will be presented with the following options.
-
Name: The name of your calendar. This will be visible when Sharing an Event to Another Calendar, Merging Calendars or Viewing Events from Other Calendars.
-
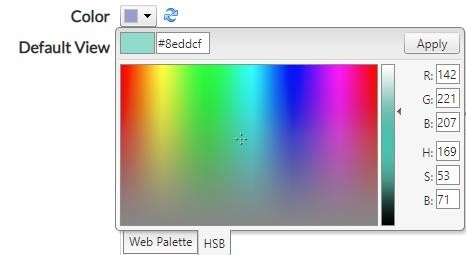
Color: Specify the background color to be used for the calendar. You can choose HSB at the bottom of the color selection pop-up to select from a larger range of colors, or specify a color hex code, or even input a color by its RGB or HSB values.
-
Default View: Specify the default view of the calendar the user will see when the first visit the calendar. You can choose between Day List View, Weekly Grid View, Monthly Grid View, Event List View, or Yearly Grid View.
-
Description: An optional description of the calendar.
-
Approval: If check Require administrator approval to publish events then if the user adding the event to the calendar doesn't have Full Control on the calendar portlet, the event will need to go through the Approval process.
-
Calendar Owner: The owner of the calendar will have Full Control over the calendar. They will also be the default contact person for newly created events and will be the person notified when an event is pending approval. You can change the owner via the Manage Owner icon.
-
Default Filters: You can add the option to Filter Events by Name, Description, Categories, Location and Color.
-
Custom Events: If you have created additional event fields, you can also filter by these fields.
-
Merged Calendars: You can Select calendars to display on the calendar. All events from the selected calendars will be displayed.
To save your changes, click Update Calendar.
Manage Events
To manage events on a calendar, you need to go to your Calendar page.
Add an Event
To create a new event, hover over the icon on the calendar and click New Event.
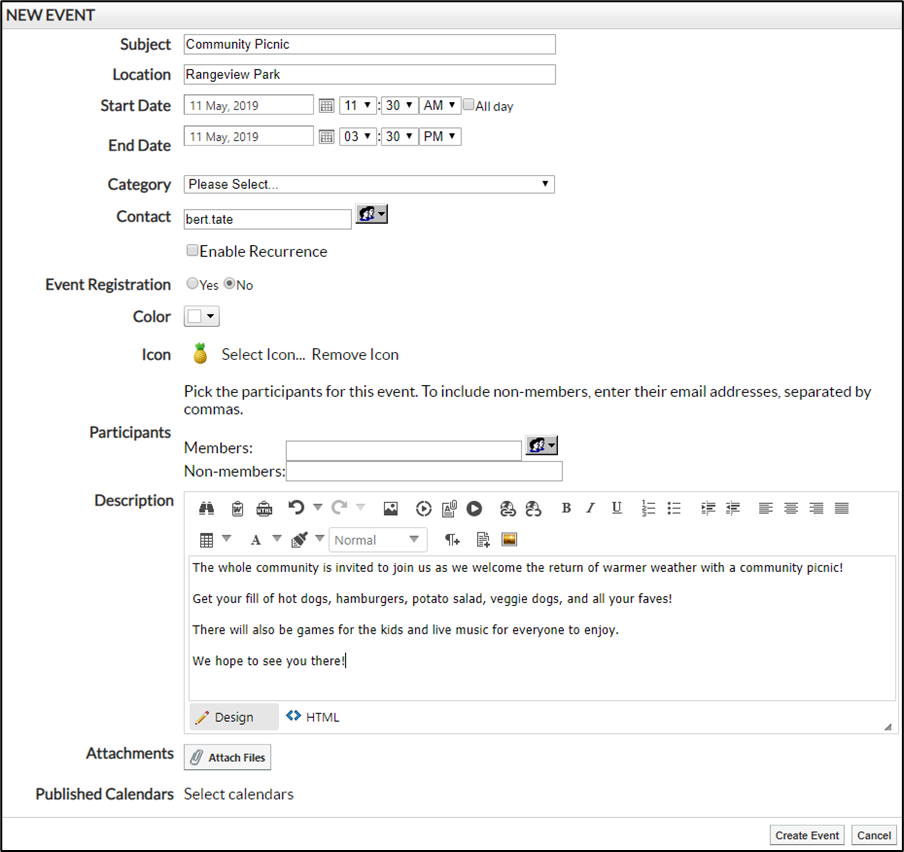
On the ensuing page, add information about the event in the relevant fields and click Create Event.
Note: If you click the date for your event before choosing to add the event, the default date for the new event will be updated accordingly.
-
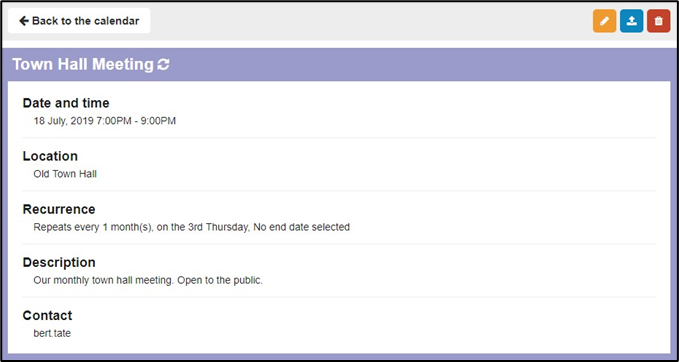
Subject: The name of your event.
-
Location: Where the event is taking place.
-
Start Date: The date and time the event starts. Use the Date Picker button to select the day from a calendar or enter the date manually. By default, this will be set to the highlighted day on your calendar.
-
End Date: The date and time the event ends. Use the Date Picker button to select the day from a calendar or enter the date manually. By default, this will be set to the highlighted day on your calendar.
-
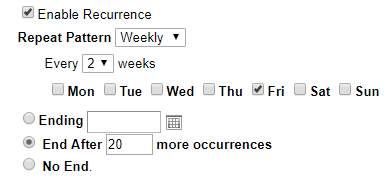
Repeating Events: Check the Enable Recurrence box to have an event occur more than once at regular intervals.
-
Repeat Pattern: This option enables you to decide the frequency with which the event occurs. You can choose between Weekly, Monthly, and Yearly patterns. You will then be presented with further frequency options dependent on which of the patterns you selected.
-
Length of Recurrence: There are three options to choose from when deciding how long you want the recurring event to last. You can choose to have it Ending on a specific date. If you make this choice, the event will continue to repeat, as specified, until the date selected. You can choose to have the event End After a specific number of occurrences or you can choose No End to have the event recur indefinitely.
-
-
Event Registration: To allow people to register for your event, click Yes for the Event Registration field.
-
Registration Deadline: Choose the date and time when users must register for the event you have created. For obvious reasons, the registration deadline must be earlier than the End Date (and time) for the event.
-
Event Capacity: The event capacity allows you to choose how many users may register for the event.
-
Registration Approval: If this option is enabled then a calendar administrator must approve users before they will be able to complete registration for the event.
-
Waiting List: If this option is enabled you can specify a number of users who may be placed on a waiting list. These users will have the option to register even after the event capacity has been reached. They will be told they have been placed on a waiting list and people from this list will be added to the event whenever an event attendee cancels their registration.
-
Administrator Notification: If you enable administrator notification, the event administrator will receive an email any time a user registers for the event.

-
-
Category: Choose from a list of preset categories. Choosing a category for your event allows it to be filtered by that category. It also selects a default color and icon for your event.
-
Color: The color of the text displayed on your calendar for your event. You can choose More Colors at the bottom of the color selection pop-up to select from a larger range of colors, or even input a color by its RGB value.
-
Icon: The image displayed beside your event name on your calendar. This is not a mandatory element.
-
Participants: The individuals that are selected to be part of the event. These participants are notified of the event by email. Be aware that any participants set for your event will be visible to users viewing the event. If you prefer not to show participants, we recommend using the Event Registration option instead.
-
Members: With the User Picker, choose members from your organization’s database.
-
Non-Members: Enroll external individuals by filling in their email address, using a comma to separate them.
-
-
Description: Fill out the details of the event using the WYSIWYG editor.
-
Attachments: Click Attach Files in order to select and upload a file that will be available to users viewing the calendar event.
-
Published Calendars: Publish created events onto other calendars so that others can see your event. Refer to Sharing an Event to Another Calendar for more details on how to publish events.
Approve Events
Other users may wish to publish events to your calendar. If you have enabled Require administrator approval for users to publish events on the Edit tab of your calendar, any events they publish to your calendar will require your approval before they are visible. To view the status of events published to your calendar, click on the Approval tab.
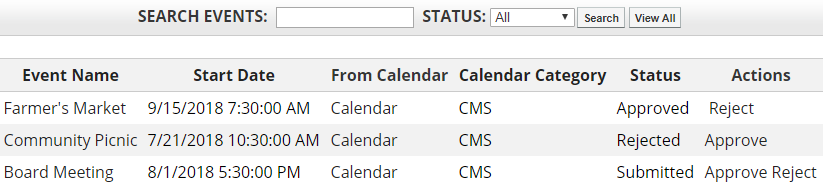
Here you will see all the events that have been published on your calendar, as well as any pending requests. Click Approve to publish an event to your calendar or click Reject if you do not wish to publish the event. You may change this status at any time.
Tip: To view only events that still require approval, change the Status drop-down from All to Submitted and click Search. You will now see only the events that have not yet been approved or rejected.
Import Events
In addition to adding events manually or linking to an external calendar feed, you can import iCal or CSV files directly into your calendar.
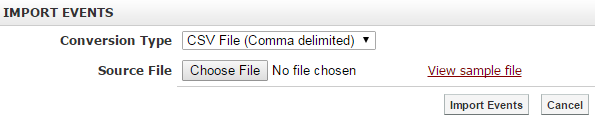
To import events, hover over the icon on the calendar and click Import Events.
Use the Conversion Type drop-down to choose whether you want to import a CSV file or an iCalendar file.

If you are importing a CSV file, we recommend clicking on View sample file. Download and open the sample file in Excel.
You will want to make sure that your CSV file has the same headers, in the same order, as the sample file or else the events will not be imported successfully.
The following fields must be filled out in order for an event to be imported: Event, Start Date, and End Date. If Start Time and End Time are not populated then, the Is All Day field must be set to True. All other fields are optional and can be left blank if you do not wish to use those fields for an event.
Tip: If you do not already have a spreadsheet for your events, it is easiest to turn the sample file into your events' CSV file. Just remove the sample entries and replace them with real data.
After you have finished with your spreadsheet, be sure to save it as a CSV file.
When you have your file ready to import, be it a CSV or an iCal file, click on Choose File. Select the file you wish to import.
Click Import Events to import the events from your spreadsheet.
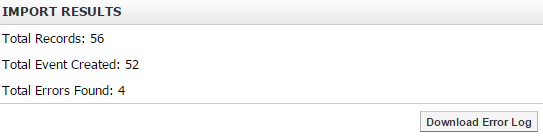
The file will be processed and you will be told how many records were found, how many events were created and how many errors were found.
If any errors were found, you can click Download Error Log to see what the errors were and how you can fix them.
Export Events
In some cases you may wish to export calendar events so that you can then import them to a 3rd-party calendar.
To export your calendar events, first choose the range of events you wish to export. Only the events you are currently viewing will be exported. So, if you are viewing the month of April 2018, then only events from April 2018 will be included in the export.
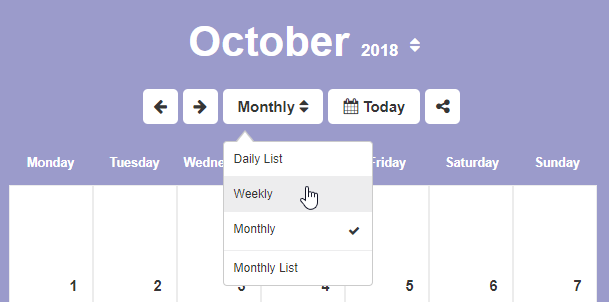
Use the calendar view drop-down to choose between the Daily List, Weekly, Monthly and Monthly List views and then navigate to the desired day, week or month.
Hover over the Share icon and choose Export Events.

Use the Conversion Type drop-down to choose whether you would like to export your events to CSV or iCalendar and click Export Events to download the file.
Note: If there are no events in the view you were looking at, you will get a message telling you that there were no events available. Change your calendar view to one that contains one or more events and try exporting the calendar again.
Edit an Event
To edit an event within your calendar, first click on the event you wish to edit and click the Edit icon.
Click the Edit tab.
You can make updates to the following fields:
-
Subject: The name of your event.
-
Location: Where the event is taking place.
-
Start Date: The date and time the event starts. Use the Date Picker button to select the day from a calendar or enter the date manually. By default, this will be set to the highlighted day on your calendar.
-
End Date: The date and time the event ends. Use the Date Picker button to select the day from a calendar or enter the date manually. By default, this will be set to the highlighted day on your calendar.
-
Repeating Events: Check the Enable Recurrence box to have an event occur more than once at regular intervals.
-
Repeat Pattern: This option enables you to decide the frequency with which the event occurs. You can choose between Weekly, Monthly, and Yearly patterns. You will then be presented with further frequency options dependent on which of the patterns you selected.
-
Length of Recurrence: There are three options to choose from when deciding how long you want the recurring event to last. You can choose to have it Ending on a specific date. If you make this choice, the event will continue to repeat, as specified, until the date selected. You can choose to have the event End After a specific number of occurrences or you can choose No End to have the event recur indefinitely.

-
-
Event Registration: To allow people to register for your event, click Yes for the Event Registration field.
-
Registration Deadline: Choose the date and time when users must register for the event you have created. For obvious reasons, the registration deadline must be earlier than the End Date (and time) for the event.
-
Event Capacity: The event capacity allows you to choose how many users may register for the event.
-
Registration Approval: If this option is enabled then a calendar administrator must approve users before they will be able to complete registration for the event.
-
Waiting List: If this option is enabled you can specify a number of users who may be placed on a waiting list. These users will have the option to register even after the event capacity has been reached. They will be told they have been placed on a waiting list and people from this list will be added to the event whenever an event attendee cancels their registration.
-
Administrator Notification: If you enable administrator notification, the event administrator will receive an email any time a user registers for the event.

-
-
Category: Choose from a list of preset categories. Choosing a category for your event allows it to be filtered by that category. It also selects a default color and icon for your event.
-
Color: The color of the text displayed on your calendar for your event. You can choose More Colors at the bottom of the color selection pop-up to select from a larger range of colors, or even input a color by its RGB value.
-
Icon: The image displayed beside your event name on your calendar. This is not a mandatory element.
-
Participants: The individuals that are selected to be part of the event. These participants are notified of the event by email. Be aware that any participants set for your event will be visible to users viewing the event. If you prefer not to show participants, we recommend using the Event Registration option instead.
-
Members: With the User Picker, choose members from your organization’s database.
-
Non-Members: Enroll external individuals by filling in their email address, using a comma to separate them.
-
-
Description: Fill out the details of the event using the WYSIWYG editor.
-
Attachments: Click Attach Files in order to select and upload a file that will be available to users viewing the calendar event.
-
Published Calendars: Publish created events onto other calendars so that others can see your event. Refer to the Sharing an Event to Another Calendar section for more details on how to publish events.
When you have finished making your changes, click on Update Event.
Delete an Event
To delete an event within your calendar, first click on the event you wish to remove. Click the Delete icon.
Click Delete.
Register for Events
You can register yourself in published events to let others know that you will be attending. You will receive e-mail notifications for events that you have enrolled in. To enroll in an event:
Click on the event you wish to enroll yourself in.
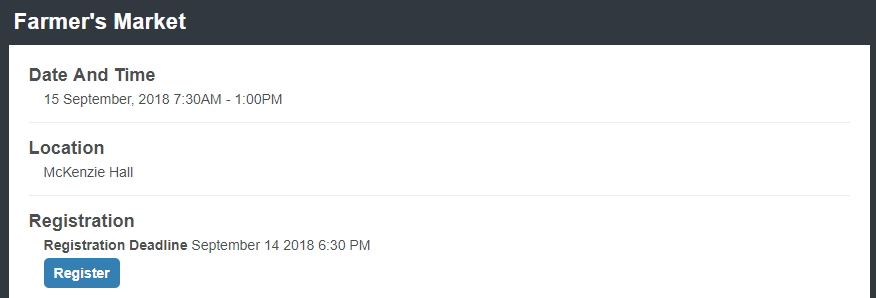
Click Register.
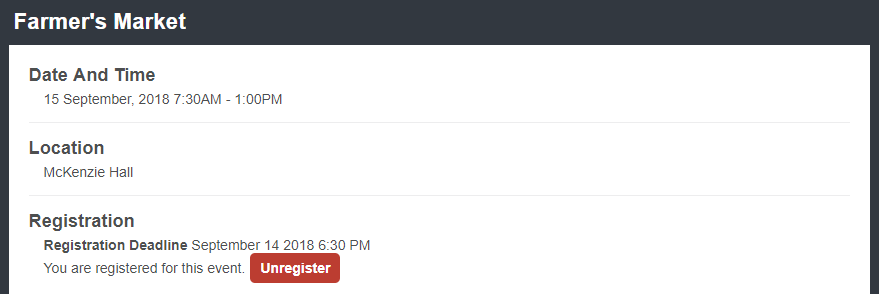
If you are already enrolled in an event, you can remove yourself from the event by clicking Unregister.
Share an Event to Another Calendar
While creating or editing a calendar event, click the Select calendars link in the Published Calendars field.
Within the directory, locate the calendars you wish to have your event published to and click on the checkboxes beside them.
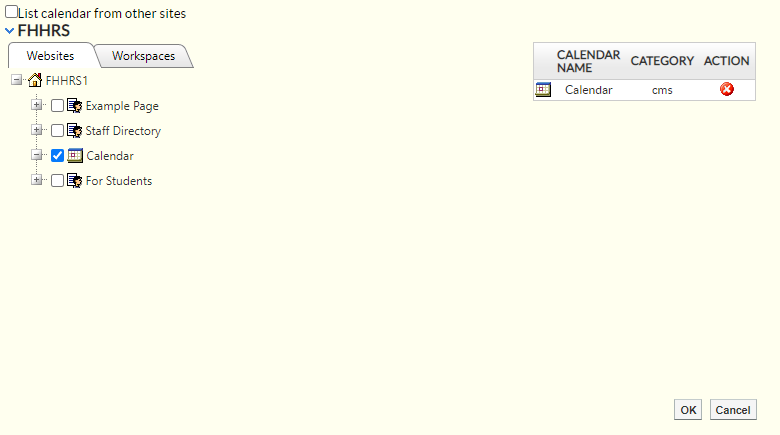
When you have selected all of the calendars you wish to have your event published to, click OK.
Finish creating or updating your event as normal. It will now be visible on the selected calendars.
Note: Unless you have full control on the calendars you published to, the event may not be immediately published on those calendars. If the Require administrator approval to publish events option has been enabled for the calendar, then the event will require approval by someone who has Full Control permissions. See the Permissions section for more information on the security settings.
View Events from Other Calendars
To view events from other calendars, hover over the icon and click View Other Calendars.
Click the + (expand) icon next to the name of the site you wish to view calendars from.
Note: If you are on a standalone site, only the current site will be available. If you are on a district site, then you will also be able to view any calendars on school sites. If you are a school site, you will also be able to view calendars from the district site.
Using the + (expand) signs, expand the directory to locate the calendars you wish to view. Place a check beside each of these calendars.
Note: If you wish to view all the calendars under a given page, click the checkbox beside the page and all visible calendars under that page will be selected.
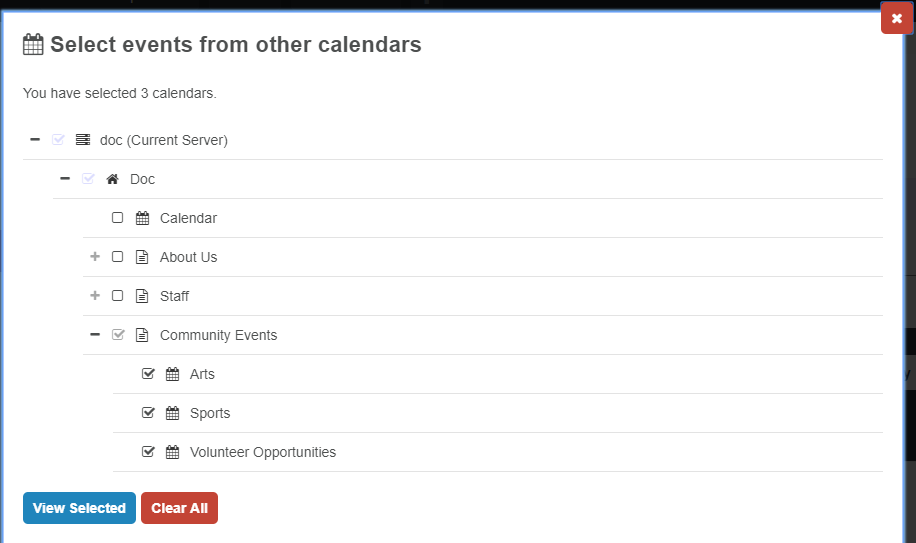
After you have picked all the calendars you wish to view, click View Selected.
Events from all the calendars you have selected will temporarily be visible on the calendar you are currently viewing.
Filter Events
If you have enabled filtering from the Edit tab, you can choose to view only events belonging to specific categories on your calendar. You can also use the filter to search the events by name, description, location or color. The list of available categories is designated by your administrators; contact your system administrator if you wish to edit the list of event categories.
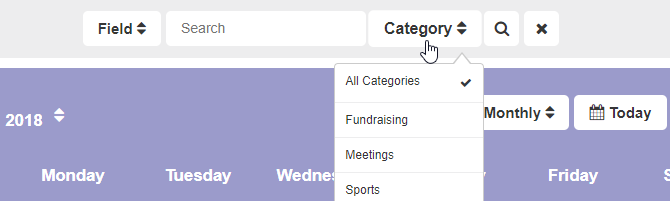
To filter your calendar events by categories, hover over the Category drop-down at the top of your calendar and choose the category you want to view.
Your calendar will now show all events that belong to the selected event categories.
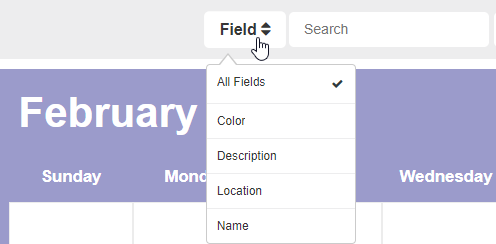
To filter your event by name, description, location or color, use the Search field to type in the text you want to filter by, use the Field drop-down to choose the field you wish to use for your filter and click the Find.
Note: Events are not filtered out as a default setting. If you navigate away from your calendar and the return, your events will return to the default status and be unfiltered.
Calendar Subscriptions
To receive alerts when new events are added to a calendar, first you must navigate to the calendar you wish to subscribe to.
Subscribe to Email Alerts
Hover over the Share icon and click Subscribe to Email Alerts.
Fill out relevant information:
-
Title: The name of your alert.
-
Alert Type: Choose to either get alerts online, or email alerts. If choosing email, please fill in valid email address in the email address field. If you are viewing the page as a guest, the online alert option will not be available; Guests can only choose the email alert option.
-
Select Email Type: Html or Text.
-
Notification Time: Chose to get your alert as soon as an event is added or updated on the calendar, at the end of a day when an event is added or updated, or at the end of the week when an event is added or updated.
-
Security Measure: If you are a guest user, you will also be prompted to fill out a CAPTCHA to verify that you are a real person subscribing to the alert.

After the fields have been filled in, click Add Alert.
Tip: You can unsubscribe from this alert in the future by clicking the unsubscribe link in the footer of each email alert you receive.
Subscribe to Calendar Feeds
You can also keep up to date with changes to the calendar via its RSS and iCal feeds.
To view the feeds, hover over the Share icon and click iCal/RSS Feed.
You can subscribe to a feed by clicking on the name of the calendar page under either iCal Feeds or RSS Feeds.
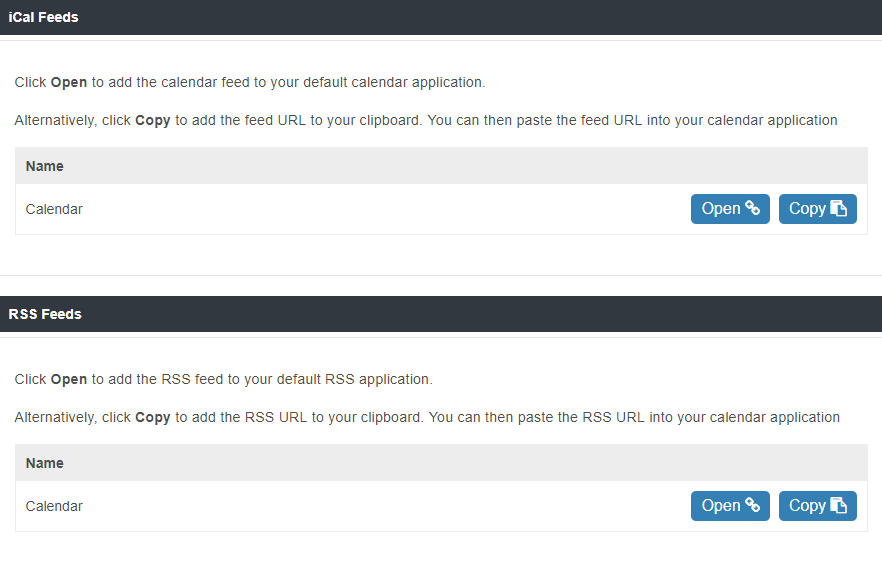
If you click Open for the iCal feed, you can then import it into the calendar program of your choice. Alternatively, you can click Copy to copy the URL for the feed.
Here are links to instructions on how to import an iCal feed to:
-
Outlook (see Subscribe to Calendar section).
-
Google Calendar (While the instructions mention Google Calendars specifically, you can use the same steps to add the URL for any calendar feed).
If you click Open for the RSS feed, the feed will then be opened in your browser, and you can then choose to subscribe to the feed with your RSS reader of choice. Alternatively, you can click Copy to copy the URL for the feed.
Note: Modern browsers no longer support RSS feeds by default. To view the feed as rendered content inside your browser, you will need to install a browser extension.
Merge Calendars
In some cases, you may wish to take all events from another calendar and make them appear on your calendar. For example, you may wish to take all events from the main school calendar and have those events also appear on your teacher page calendar. To setup your calendar so that all events created on another calendar are also published on your calendar:
Click on the Edit tab of your calendar.
Click on the Select calendars link in the Merged Calendars field.
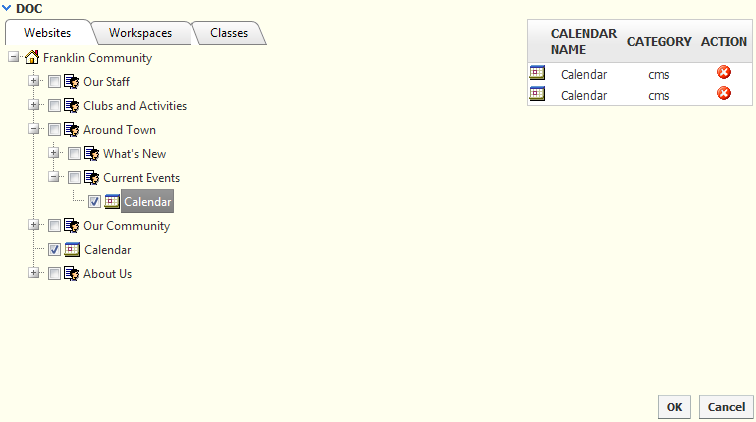
Within the directory, locate the calendars you wish to take events from and click on the checkboxes beside them.
When you have selected all of the calendars you wish to be merged with yours, click OK.
Click Update Calendar to finish merging calendars.
Import a Feed from an External Calendar
With calendar integration, you can take a calendar feed from an external calendar service (such as a Google calendar) and import events from that calendar directly on to your Presence calendar. This allows you to easily bring over events from an existing service you are using. When you add a new event to the external calendar, it will be automatically imported into your Presence calendar based on the interval you choose.
When you import a calendar feed, the events do not appear instantly. Instead they will appear based on the refresh interval you have chosen. So depending on when you add your feed you may be waiting anywhere from up to an hour or up to a week for the events to first appear.
To add an external calendar, you will first need to go to your external calendar and get a URL for the iCal feed. For our example, this manual outlines how you can obtain and use an iCal feed from a Google calendar, but you can add any external calendar that allows you to create an iCal feed.
For more information on how to access or create an iCal feed for the particular external calendar product that you are using, please consult the service’s help documentation, or consult with your calendar service provider.
Get the URL for a Google Calendar Feed
To get the URL for a Google calendar feed, first go to your calendar in Google. Click to the right of your calendar under My Calendar and choose Calendar Settings.
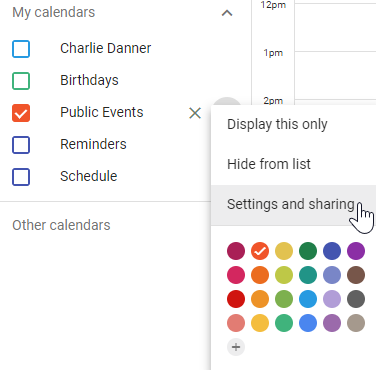
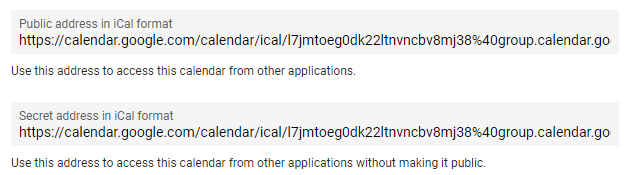
In the Access Permissions section, if you want the calendar to be available to the public, check Make available to public and set it to See all event details. Now scroll down and look for the Public address in iCal format and Secret address in iCal format. If your Google calendar is set to be publicly available, copy the Public address in iCal format URL. If the calendar is private or only partly visible to the public, then you will need to copy the Secret address in iCal format.
Highlight and copy the URL.
Add Your Feed URL to a Calendar
After you have the URL for the iCal feed, go to the calendar page where you wish to add your events. If you are an administrator, a calendar owner or have otherwise been assigned full control on the page the calendar appears, you will see a tab called External Calendars. Click on this tab.
From the External Calendars tab, click Add iCal Feed.
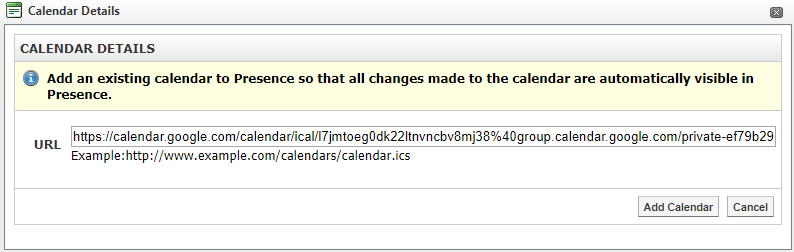
Paste your feed’s URL into the URL field and click Add Calendar.
If this is the first time this particular calendar feed has been added to the site, you will now be prompted to choose your calendar details. These include:
-
Name: The name the feed will display when managing external calendars. As this feed may be listed alongside other external calendar feeds, it is a good idea to give the feed a unique name. So, for example, call your feed “Charlie Danner’s Class Calendar” instead of “Class Calendar.”
-
URL: The URL for the feed. This cannot be edited after you have added the calendar.
-
Color: The text color for events from this calendar. If you want to distinguish the events as coming from a particular calendar, choose a unique color. Otherwise, choose the same color as the calendar is using for other events.
-
Refresh Interval: This setting determines how frequently the feed from your external calendar is refreshed. You can choose to refresh events on an Hourly, Daily or Weekly basis.
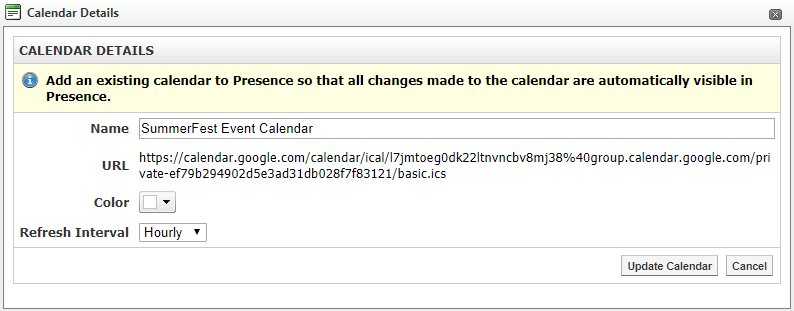
After you have made your configuration choices, click Update Calendar to finish adding the external calendar to your SchoolMessenger calendar.
If the calendar feed is already added to one or more calendars on the site, then it will use the settings that were established when the feed was first added to the site.
Note: When you add a calendar feed to the site, the events will not be immediately visible. They will not appear until the calendar feed refreshes (based on the refresh interval set when adding the calendar feed). If you chose Hourly, the events will appear within the hour. If you chose Daily, the events will refresh overnight. If you chose Weekly, the events will refresh on Saturday night/Sunday morning.
Edit a Calendar Feed
After you have added one or more calendar feeds to your calendar, you can edit the feed by clicking on the Name of the feed in the External Calendars tab or by clicking the Edit icon.
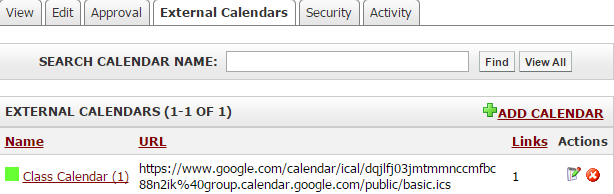
If this is the only calendar using the feed, you will see the same interface as when you added the calendar feed. You can then reconfigure the following options:
-
Name: The name the feed will display when managing external calendars. As this feed may be listed alongside other external calendar feeds, it is a good idea to give the feed a unique name. So, for example, call your feed, “Charlie Danner’s Class Calendar” instead of “Class Calendar.”
-
URL: The URL for the feed. This cannot be edited after you have added the calendar.
-
Color: The text color for events from this calendar. If you want to distinguish the events as coming from a particular calendar, choose a unique color. Otherwise, choose the same color as the calendar is using for other events.
-
Refresh Interval: This setting determines how frequently the feed from your external calendar is refreshed. You can choose to refresh events on an Hourly, Daily or Weekly basis.
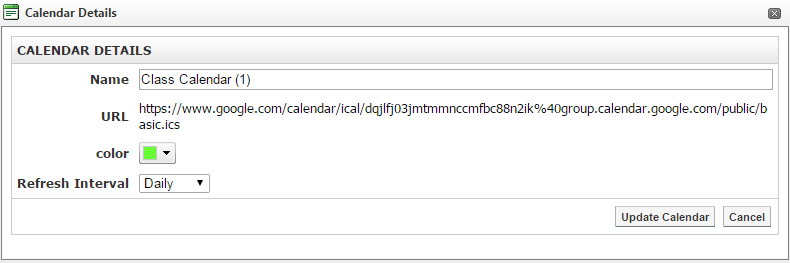
After you have made your configuration choices, click Update Calendar to save your changes.
However, if the feed has been added to more than one calendar, you will not be able to make any edits and you will be directed to contact your system administrator for any desired edits. Later in this guide, we will cover how administrators can manage external calendar feeds from the System Administration area of the site.
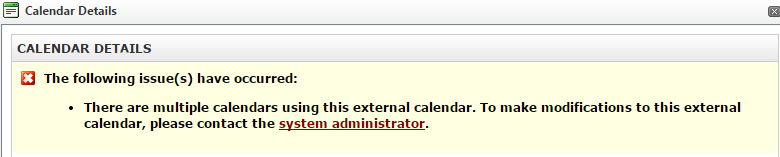
Note: You can tell how many calendars the feed has been added to by looking in the Links column under the External Calendars tab.
Delete a Calendar Feed
To remove a calendar feed from your site, click on the X (Delete) icon next to the calendar Name in the External Calendars tab.

Note: When you delete a calendar feed from your Presence calendar, all the events that are associated with that feed will be immediately removed from the Presence calendar.
Manage External Calendar Feeds
In addition to accessing calendar feeds from the External Calendars tab of a calendar, there is also an administrative interface available. This section of the manual is intended for Administrators only.
To access the feed management interface, go to System Administration and click on Manage External Calendars under the Collaboration Server Administration.
From the management interface, you can see the Name and URL of each calendar. The Links column allows you to see how many calendars each feed has been added to.
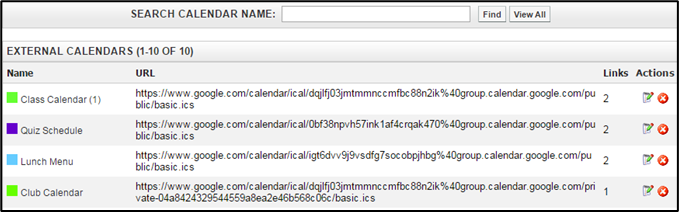
If you have a large number of calendars on the site, you can use the Search Calendar Name field to search for a calendar with a specific name.
Edit an External Calendar Feed
To edit an external calendar feed, click on the Name of the feed or click the Edit icon. This will bring up the calendar details interface. This is the same interface that appears when first adding a feed. From here you can view or change the following items:
-
Name: The name the feed will display when managing external calendars.
-
URL: The URL for the feed. This cannot be edited after you have added the calendar.
-
Color: The text color for events from this calendar. If you want to distinguish the events as coming from a particular calendar, choose a unique color. Otherwise, choose the same color as the calendar is using for other events.
-
Refresh Interval: This setting determines how frequently the feed from your external calendar is refreshed. You can choose to refresh events on an Hourly, Daily or Weekly basis.

After you have made your configuration choices, click Update Calendar to save your changes.
The calendar settings for a given feed are the same for each calendar the feed appears on. This is why after a feed appears on more than one calendar it can only be edited from the Manage External Calendars interface.
Delete an External Calendar Feed
From the Manage External Calendars interface you can delete a feed by clicking on the X (Delete) icon next to the feed under the Actions column.
Note: If you delete an external calendar feed then all events that are coming from that feed, on every calendar that is displaying the feed, will be immediately removed.
Changing Permissions
You can designate which users can see, create, edit or delete events within your calendar. To do so, click on the Security tab.
Direct Permissions
Within Direct Permissions you can assign security permissions on your calendar to other users.
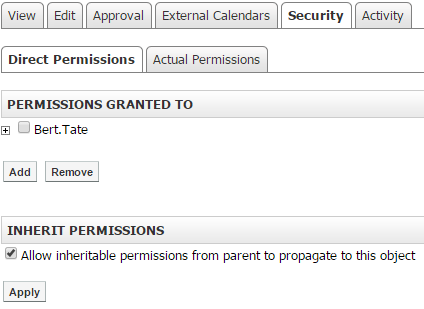
First, click Add to select the users to grant permissions to. A window will pop up.
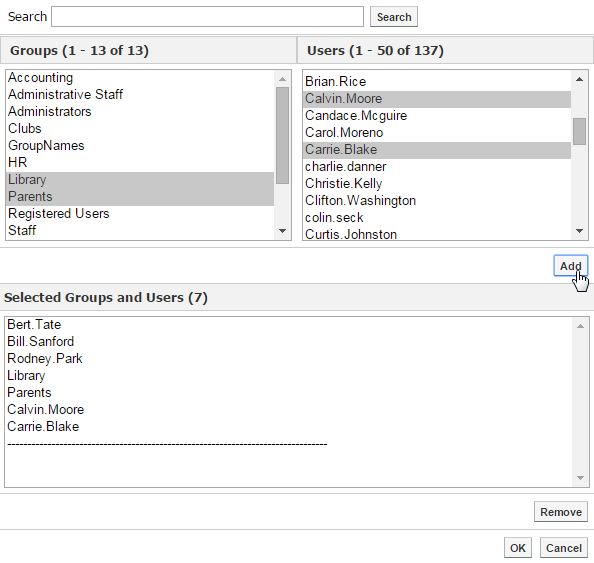
From this window select the users or groups you’d like to grant permissions to by clicking their name and clicking Add. When you have selected your users, click OK.
To individually assign permissions to each user, click on the + (Add) icon beside their name to assign specific permissions.
|
Permission |
What it allows you to do |
|
Create |
Can create events |
|
Delete |
Can delete events |
|
Read |
Can view the calendar |
|
Write |
Can make changes to events |
|
Full Control |
All of the above, as well as the ability to approve submitted events, and the ability to assign permissions to others |
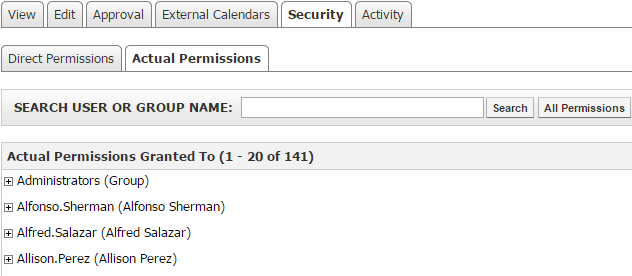
Actual Permissions
Actual Permissions allows you to view what permissions specific users have on your calendar. Users higher up the security hierarchy may already have permissions for your calendar. Users with entire site permissions (or higher tiers of security hierarchy) may have permissions to your calendar if you have the Allow Inheritable Permissions From Parent to Propagate to This Object checkbox selected on the Direct Permissions tab. System Administrators will always have full control permissions for your calendar.
Activity
You can track all changes made to your calendar or the events within. To do so, simply click on the Activity tab.
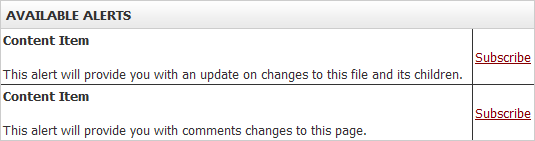
Here it will tell you what changes were made, when they were made and by whom. If you wish to receive e-mail alerts about changes made to your calendar, click on the Subscribe link.
Calendar Portlets
There are two other portlets that can be paired with the calendar, the Mini Calendar and the Upcoming Events portlets. These portlets can be added to the homepage or other pages on your site and allow users to see specific elements of a calendar.
Add Portlets
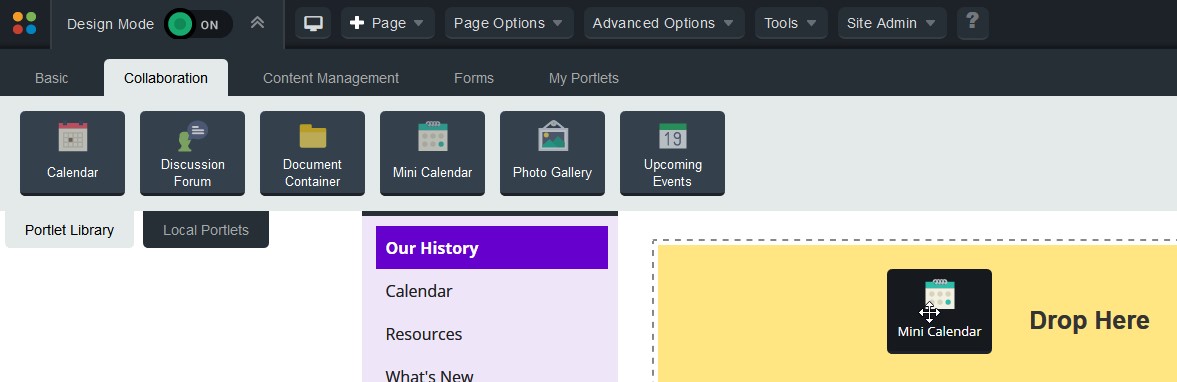
To add a Mini Calendar or Upcoming Events portlet to a page, you will first need switch Design Mode to On.
In the Portlet Library, click on the Collaboration Category. Drag and drop the portlet you wish to add (in this case, the Mini Calendar or Upcoming Events) into a region on the page.
Configure Mini Calendars
To configure the Mini Calendar portlet, switch to Design Mode, hover over the Mini Calendar portlet and click the Configure icon.
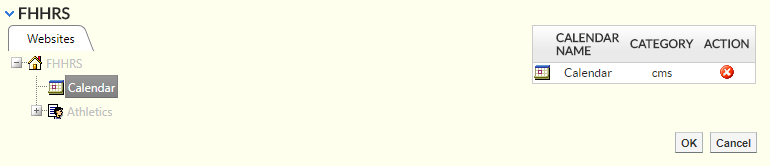
To select a calendar to display via the Mini Calendar, click Browse on the Calendar field.

In the window that pops up, drill down to find the calendar you wish to display.
After you find the calendar, click on it and click OK.
For the Header Background Color, click the drop-down menu to open a color picker window.
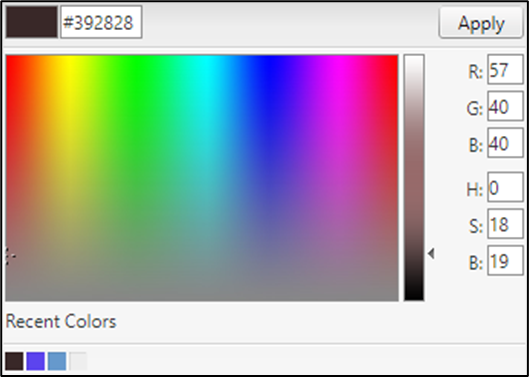
You can click anywhere in the color grid to select the color you wish to use. Alternatively, you can type in the hex code for a color or enter in the color values.
After you are satisfied with your color, click Apply. If you wish to revert to the default Header Background Color, click the Revert icon.
You can also choose if you would like the Header Text Color to be Light or Dark.
You will be presented with a Contrast Example which will preview your chosen header background and text colors to let you know the contrast ratio.
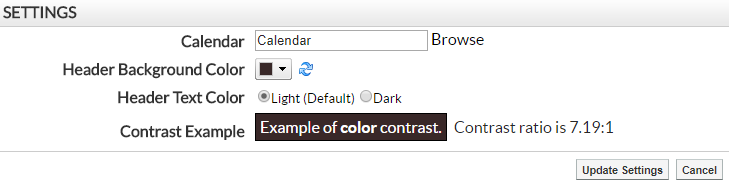
Note: If the ratio for your selection is less than 4.5:1, the text will be hard for some users to read, and you will receive a warning letting you know that the contrast does not meet WCAG 2.1 AA accessibility requirements.
After configuring the portlet, click Update Settings to save your selected options.
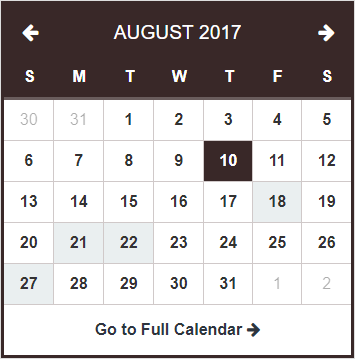
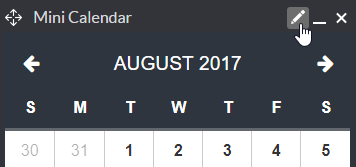
After your portlet has been configured, you should be able to tell what days have events on them at a glance.
To view the events for a specific date, double-click the date on the calendar.
You can also use the Go to Full Calendar link to jump to the calendar page with its default view.
Configure Upcoming Events
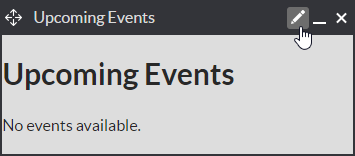
The Upcoming Events portlet is often paired with the Mini Calendar portlet. This allows users to see events that are coming up in the immediate future. To configure the Upcoming Events portlet, switch to Design Mode, hover over the Upcoming Events portlet and click the Configure icon.
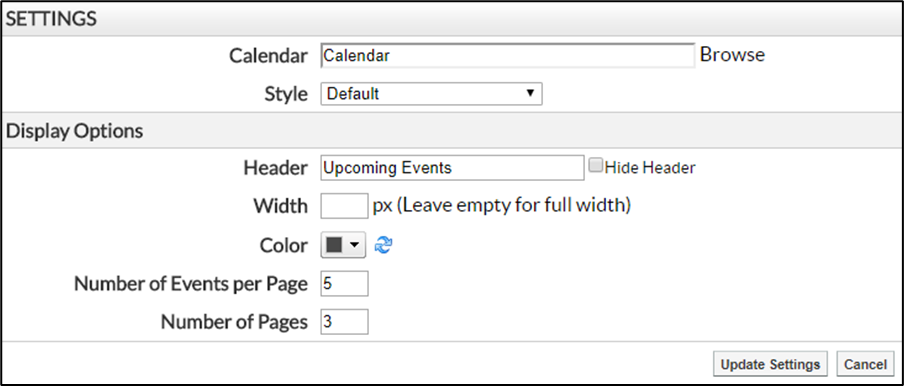
To select a calendar to display via the Upcoming Events, click Browse on the Calendar field.
In the window that pops up, drill down to find the calendar you wish to display. After you find the calendar, click on it and click OK.
For the Style of your Upcoming Events portlet, you can choose between Default, Custom Render Template, Legacy – Default or Legacy – Blue.
The Default option will give you the default look and feel for the portlet.
If you choose Custom Render Template, you will be able to use the Select a Template… drop-down to select a custom render template for the portlet.
If you choose Legacy – Default or Legacy – Blue, you will get the old look and feel for the portlet.
After choosing a style, you can then configure the Display Options.
Note: If you choose Custom Render Template, Legacy – Default or Legacy – Blue, some of the display options will not be available. When using a custom render template, these options are controlled by the template. When using a legacy display option, your ability to customize the look and feel is limited.
You can set a Header name for your portlet. Alternatively, you can choose to Hide Header if you do not wish to have a header appear.
If you wish, you can set a static Width for the portlet in px (pixels). If you leave this blank, then the portlet will take up the width of the region.
For the Color, click the drop-down menu to open a color picker window.

You can click anywhere in the color grid to select the color you wish to use. For a fuller range of colors, click the HSB tab. From the HSB tab you can also type in the hex code for a color or enter in the color values.
After you are satisfied with your color, click Apply. If you wish rollback to the default Color, click the Revert icon.
You can specify the Number of Events per Page as well as the Number of Pages. If you have more than one page of events, arrows will appear on the portlet that allow the user to navigate between each page of upcoming events.
After you have finished configuring the portlet, click Update Settings to save your changes.

When viewing the portlet, users can use the left navigation and right navigation icons to navigate between pages of upcoming events. Keep in mind that they will only be able to view as many pages of events as was set in the Number of Pages field.
Users can view the full calendar by clicking More Events.