
The Staff Directory portlet allows you to automatically generate a searchable list of users. You can choose which groups are included in the directory as well as what fields you wish to share with people viewing the directory.
Adding a Staff Directory Portlet
The process for adding a staff directory portlet is the same basic process as for adding any other portlet to a page.
-
Set Design Mode to On.
-
Find the region where you wish to display your staff directory. In the Portlet Library, click on the Content Management category.
-
Drag and drop the Staff Directory portlet on to the page.
Setting up the Staff Directory
To set up the staff directory:
-
Set Design Mode to On.
-
Click the pencil icon in the top-right corner of the Staff Directory portlet.
Groups to Include
When you first add a staff directory portlet, it will display all users in three default groups, Administrative Staff, Staff, and Teachers. Uncheck the ones that you do not wish include in your staff directory. Each group that is checked will be included in the directory portlet.
You also choose additional groups by checking the Selected Groups checkbox and clicking on the user group icon to the right of the Selected Groups field. Click on the group or groups you wish to add and then click Add and OK. Each of those groups will now also have their own tab.
Excluded Users
If you wish to exclude users from the staff directory portlet, even though they are part of one of the groups you have selected to display, click on the user group icon for Excluded Users. Click the user(s) you wish to exclude and click Add. Once you have added all the users you wish to exclude, click OK.
Email Privacy
With the Email Privacy setting, you can choose whether the user’s email address will be shared or whether it will be hidden. If you choose to enable email privacy the portlet will display an envelope icon instead of the email address.
If you disable the email privacy, then you have the option to Enable mailto to use external email application. If this feature is enabled, then when a user clicks on an email address, the browser will attempt to open the user’s default email client to send an email. If the option is not checked, it will use the Presence Send Email control instead.
Default Sort Order
By default, the displayed sort order is by Last Name in Ascending order. However, you can choose between First Name and Last Name for the default item to sort by and specify whether to display the results in Ascending or Descending order.
Only Show Initial
If you wish, you can choose to only show the first initial of the users being displayed in the staff directory (in place of showing their first name). To do so, check the Only Show Initial option and click Update.
Attributes to Display
You can also control which elements are shown from the user profile. The elements you can turn off or on are Position, Room, Grades Taught, Subject Taught, Office Hours, Phone, Email, Social Media, Biography, and Personal Message. Most of these attributes are configured directly from within a user’s profile.
When you have finished selecting your Attributes click Update to save your changes. To return to the normal view of the Staff Directory, click View Mode at the top right of the portlet.
Setting up Grades Taught
To set up the Grades Taught field and allow members of your teacher group to specify which grades they teach, go to System Administration and under eLearning Server in the right-hand column, click on Manage Course Levels.
By default, the course levels (or grades) will be Grades 1 through 12.
You can add new course levels by typing in the Level Name and clicking Add. You can also remove unwanted course levels by clicking on the X icon and clicking OK to confirm that you wish to delete the level.
Setting up Subjects Taught
To set up the Subjects Taught field and allow members of your teacher group to specify which subjects they teach, go to System Administration. Under General Administration on the left-hand column, click on Manage Organization Structure and then click on Departments.
You can also remove unwanted departments by clicking on the X icon that you wish to remove then click OK to confirm.
Using the Staff Directory Portlet
To search for a user:
-
Type in the full or partial first name, last name, or job title and click Search.
-
If Email Privacy is disabled, then you can also search by email address.
-
If you wish to only view the users for a specific group, click on the All dropdown and choose the group you desire. You can view all members from that tab by clicking Search. Or you can enter additional search criteria and use the Search button.
-
Once you click Search your results will be displayed.
-
If there are more than 10 results, you can use the page controls found at the bottom of the results to navigate.
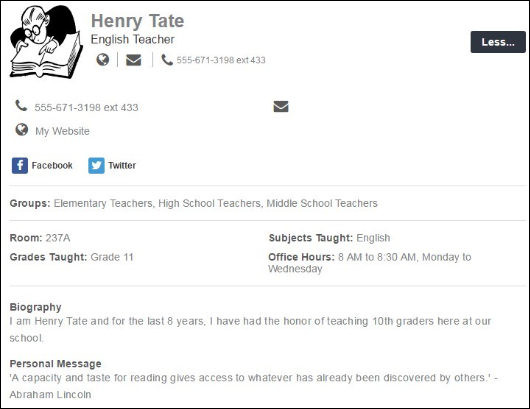
Example Staff Directory Profile
Setting up Your Profile
After looking at how easy it is to set up the staff directory portlet, you may be wondering how exactly you go about setting your user photo, putting in links to your teacher page and other personal information. The process is quite simple.
To set up your profile:
-
Click on your username when you are signed in to the site. The exact placement of the username will vary depending on your site, but usually it is found on the top right, top left, or bottom middle of the page.
-
Click on the Edit User tab.
-
Enter the necessary information.
-
Click Save.
Note: With the exception of the Home Address and the Work Address all elements from this user profile screen can be set to display on your user profile. If any of the fields are left blank, they will not be displayed as part of your profile.
Setting a Photo
To set a user photo:
-
Click the Edit User tab.
-
Click on User Photo.
-
Click Choose File to select a photo. You can choose a jpg, gif, png or bmp photo file for your profile image.
-
Once you have selected it, click Upload.
You can also remove your current profile picture by clicking the X icon to delete the image.
Modifying your User Profile
To make changes to your user profile:
-
Click the Edit User tab.
-
Enter the information for the following fields:
-
Job Title
-
Gender: To keep this field private, check the Keep Private box.
-
Self Description: This will display as your biography in the Staff Directory.
-
Website: This will generally be your teacher page, but can be set to any website.
-
Blog: This can be pointed at your Presence blog or any other blog.
-
Personal Message
-
Room: This field is only available for users in the Teachers group.
-
Grades Taught: This field is only available for users in the Teachers group.
-
Subjects Taught: This field is only available for users in the Teachers group.
-
Office Hours: This field is only available for users in the Teachers group.
-
Facebook
-
LinkedIn
-
Twitter
-
YouTube
-
Telephone Numbers: Only the Work number will be displayed with in the Staff Directory portlet. If you wish to keep your phone number hidden, click the Keep Private option.
-
-
When you have finished with your profile, click Update User to save your changes.
Setting Website and Blog Fields
In addition to going to the profile and typing in the URL for the user’s website or blog, there is another way to populate this field that can be used when creating new pages.
Whenever you create a new blog page, you will have the option to replace your profile’s blog link with a link to the blog page you are creating. Simply check Replace my profile blog link with this blog when you create the blog page.
Similarly, whenever you create any other type of page (with the exception of an External Link Page) you will have the option to Replace Page Owner’s website with this page. If you utilize this option, be sure that you set the Page Owner or else you will replace your own profile’s website field instead.