
This guide covers how to accept ownership of your application into your Google Play and iTunes accounts. It presumes that you have already granted SchoolMessenger access to your accounts through the Creating Developer Accounts guide.
Transfer Google Play App
It will take up to two business days from when your SchoolMessenger Project Coordinator or Support Technician submits a transfer request to Google for your transfer to be completed. When the transfer has completed, you will receive a confirmation email like the following example email:
Hi there,
Thanks for contacting Google Play Developer Support. I’m happy to let you know that your app transfer is complete!
To learn more about using the Play Console, you can always visit our help center. Thanks for supporting Google Play.
Regards,
Google Play Developer Support
Transfer iTunes App
Accept an App Transfer
After the SchoolMessenger Project Coordinator or Support Technician informs you that the application transfer has begun, go to https://appstoreconnect.apple.com/login.
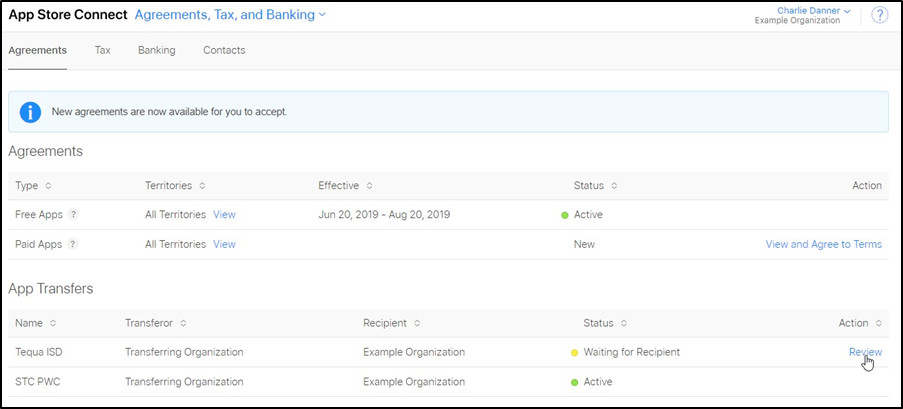
Log in to your iTunes developer account. Click on Agreements, Tax, and Banking.
In the Agreements tab, look in the App Transfers section and click Review on the contract you are transferring.
Fill in the following fields:
-
Company Name: Name of your organization
-
Support URL: https://www.schoolmessenger.com/support
-
Privacy Policy: https://www.west.com/legal-privacy/
-
App Review Contact Information
-
First Name: SchoolMessenger
-
Last Name: CustomApp
-
Phone: 800-920-3897
-
Email Address: customapp@mobileapp.schoolmessenger.com
-
-
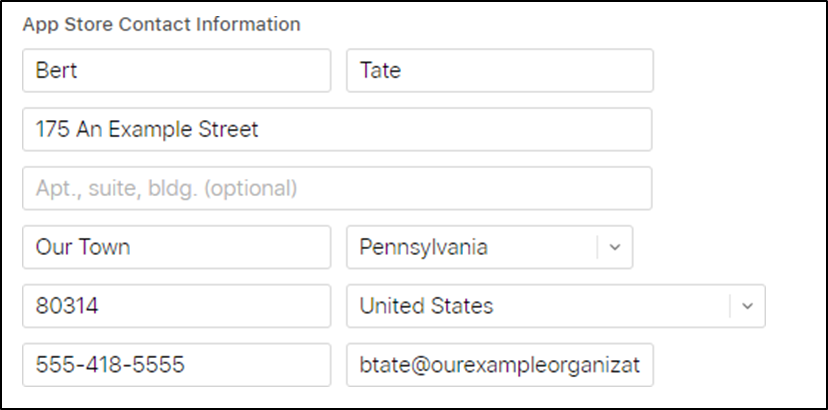
App Store Contact Information
-
First Name and Last Name: Name of the contact person at your organization.
-
Address: Street Address of your organization. If applicable, you can also add further information in the Apt, Suite or Bldg field.
-
City
-
State
-
Zip Code
-
Country
-
Phone Number: Phone number of the contact person at your organization
-
Email: Email address of the contact person at your organization.
-
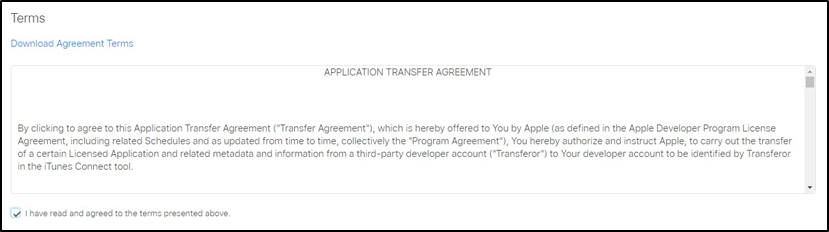
After filling out the data, read the terms of service and click I have read and agree to the terms presented above.
After agreeing to the terms, click Accept at the top of the page.

Once you have accepted the app, it can take two business days for the application to be transferred to your account. Once the transfer is complete, you will receive an email like the one below letting you know that you now have ownership of the application.
Dear [Your Account Name],
The app transfer for the app Your App Name (Apple ID: XXXXXXXX) has been completed.
For additional information, see the Agreements, Tax, and Banking module on App Store Connect. If you have any questions, use the Contact Us module on App Store Connect.
Regards,
The App Store team
Channel Push Notifications Temporarily Unavailable
At this point the Project Coordinator or Support Technician will need to make some configuration changes to re- enable the push notifications for specific channels within your application. They will contact you when these changes have been completed.
Once the changes have been made by the project coordinator or support representative, you will need to tell your users to open their application in order to update the channels they have subscribed to. You can find instructions on notifying your users in the Re-Enable Push Notification Channels guide.
Until the users re-open the application, they will only be able to see push notifications that have been sent to all users. They will not be able to see a notification if it has only been sent to a specific group or channel (for example, if you have notification groups set up for individual schools within the district, the user will not see a notification sent to just one specific school until they have re-opened the application.
Once your application has been transferred, until you receive word that the configuration changes have been made we recommend you only send push notifications to all users of the application. Because of the configuration changes required by vendors after you have taken ownership of your application, the channel specific push notifications will not be delivered until the application has been reconfigured.
Next Steps
Once you have taken ownership of your application, your Project Coordinator or Technical Support agent will make the necessary configuration changes to allow for channel specific notifications. Once they notify you that the necessary changes have been made, see the Re-Enable Push Notification Channels guide.