SafeArrival Guide for School Staff
You must have a SchoolMessenger Communicate account to use SafeArrival. In addition, your account must have the Use SafeArrival permission enabled.
If you already have a login and password for SchoolMessenger Communicate, you can use them with SafeArrival if your District Administrator has added the Use SafeArrival permission to your account.
If you have not already been provided with the SafeArrival website URL, a login and password, then you will need to request this information from your SafeArrival District Administrator or your SchoolMessenger Communicate District Administrator.
You can sign in to SafeArrival directly using the SafeArrival URL provided to you. The URL will be in the below format with mydistrictabbrev being specific to your district:
https://admin.safearrival.schoolmessenger.com/mydistrictabbrev (for school districts in the US)
https://admin.safearrival.schoolmessenger.ca/mydistrictabbrev (for school districts in Canada)
If you are already signed into SchoolMessenger Communicate, you can also access SafeArrival by clicking SafeArrival under the System tab. SafeArrival should appear as a submenu option. If it does not, you will have to request that the Use SafeArrival permission be added to your account.

SafeArrival Menu
The Daily Attendance Process
The daily SafeArrival process is used as soon as possible after attendance is taken to:
Send notifications to parents/guardians of unexplained absences,
Confirm parent/guardian awareness of absences and,
Obtain the reasons for the absence reasons
Depending on how your district/school has chosen to employ SafeArrival, you may do this first thing in the morning and/or after lunch as well. Also, your daily attendance procedures depend on how your SafeArrival system is configured; that is, whether it is set up to work manually or whether it is set up with SIS Integration.
Manual Imports, SIS Integration, and Auto Notification
SIS Integration refers to the ability to have SafeArrival configured so that attendance files from your Student Information system are imported directly through an automated process into SafeArrival. This eliminates the need for you or other school staff to export the Attendance file from the Student Information System, save it on your computer, and then manually import it into SafeArrival – tasks that are required in a manually configured system.
The manner in which absence notifications are sent out depends on the Auto Notification setting for your school. It can be one of these three:
Manual Auto Notification: Notifications will only go out after you click on the Import Attendance Data, (which pulls the attendance data from your SIS) and then click on Send Notifications.
Trigger Auto Notification: The arrival of the imported attendance file from the Student Information System will automatically start the process of sending notifications to parents and guardians.
Schedule Auto Notification: Notifications will be started automatically at the scheduled times. Schedule differs from Trigger in that notifications are set to go out at a specific time automatically, whereas Trigger will automatically start notifications whenever attendance data arrives from the SIS.
Recognizing Your SafeArrival Setup
Your SafeArrival system is configured for manual operation if:
When you start SafeArrival, the instructions on the Home page tell you that you haven’t started the SafeArrival process for today and that you will need to import your attendance data. The Import Your Attendance Data button is active.
The Auto Notification tab does not appear on the Settings page.
Your SafeArrival system is configured with SIS Integration if:
The Auto Notification tab appears and is active on the Settings page. Clicking on it will reveal the type of notification that your school is configured for – Manual, Trigger, or Schedule.
If you are still unsure, you can ask your SafeArrival District Administrator.
Daily Attendance Procedures for Manual Imports
Follow these steps on a daily basis:
Record classroom attendance in your Student Information System. This is usually a task performed by teachers in the classrooms and updated in your Student Information System.
Export the absences data from your Student Information System to a file in the format and manner that has been specified to you separately from this document and save it. Consult with your SafeArrival Administrator for information on this step if such information has not been made available to you already. (Each district—and sometimes even individual schools—will have unique instructions depending on a slew of different factors: e.g. the Student Information System being used; the school network setup; how data is consolidated, etc.)
Log into SafeArrival. Go to the Home page.
Click Import Attendance Data. Select the file you saved. You will soon see your screen updated with data imported from the day’s attendance-taking data.
Click Send Notifications to begin the parent/guardian notifications.
Note: If there are zero unexplained absences, click Send Notifications anyway so that the SafeArrival report will be generated.
Continue with the Follow-up Steps described as follows.
Daily Attendance Procedures: SIS Integration is Implemented
The daily attendance procedures in an SIS Integrated system can vary from one school to another, depending on the auto notification type settings. Follow the appropriate steps depending on that setting on a daily basis:
Record classroom attendance in your Student Information System. (This is usually a task performed by teachers in the classrooms and updated in your Student Information System.)
If you are required to initiate the upload of your attendance file, do so as soon as attendance-taking is complete.
Follow one of the following set of instructions depending on your Auto Notification setting:
If your school uses the Manual auto notification option:
Sign in to SafeArrival. Go to the Home page.
If the attendance data file from your Student Information System is uploaded at scheduled intervals (e.g. at ten-minute intervals for the first hour after bell time), provide enough time for the transfer to complete. This will depend on the anticipated size of the file. The Data last updated at time shows when the current attendance file was last uploaded.
Click Import Attendance Data.
Click Send Notifications to begin the parent/guardian notifications. If there are zero unexplained absences, click Send Notifications anyway so that the SafeArrival report will be generated.
Monitor its progress, and update records as required.
If your school uses the Trigger notification option:
As soon as the SafeArrival system receives your attendance file, the attendance file will be imported and notifications will begin automatically.
Sign in to SafeArrival, monitor its progress, and update records as required.
If your school uses the Schedule notification option:
At the scheduled time, the most recently-uploaded attendance file will be imported and notifications will begin automatically.
Sign in to SafeArrival, monitor its progress, and update records as required.
Once you have determined the option being used, continue with the Follow-up Steps described as follows.
Follow-up Steps
After the notification process has ended, the SafeArrival Summary on the SafeArrival Home Page shows the results. Click any category to see the list of students and details pertaining to their current status. That list will appear in the table below the summary. You can also click Download Summary to download a copy of the SafeArrival Report. This SafeArrival Report will also be emailed to everyone on the Report Recipients list for the school.
If you have a high number of Unexplained absences after the notifications are complete, you may want to click the Send Notifications button. This will re-send all notifications for students who are still on the unexplained absences list.

SafeArrival Summary
Click the Unexplained Absences option to view the corresponding list of students in the table beneath the summary. This is the list of students whose absences are still unexplained. You need to follow-up with parents/guardians/emergency contacts to ensure that these students are safe!
Click Explained Absences to view the list corresponding to it. Each record will show the absence reason that have been provided for today’s absence. Enter this information into your Student Information System as needed.
In general, you should enter the absence reasons for Full Day Absences. For Late Arrivals, monitor the student arrivals and enter the reason provided. See the All Absences list for Early Departures and Leave & Return absences. Wait for the student’s actual departure (which makes it factual), and only then enter the absence reason.
If your school is configured for automatic absence reason write-back to your Student Information System, the absence reasons for Full Day and Multi-Day absences will be automatically written to the Student Information System only if the same reason appears both in your Student Information System and in SafeArrival.
If your school allows parents/guardians to continue to report/explain absences after the notification period is over (e.g. your cut-off time is later in the day), another report will be emailed at the cut-off time. This report will contain all the absences that were reported/explained for that day, including those after the cut-off time. This report should be used the next morning to complete the transfer of absence reasons to your student information system.
The Home Page
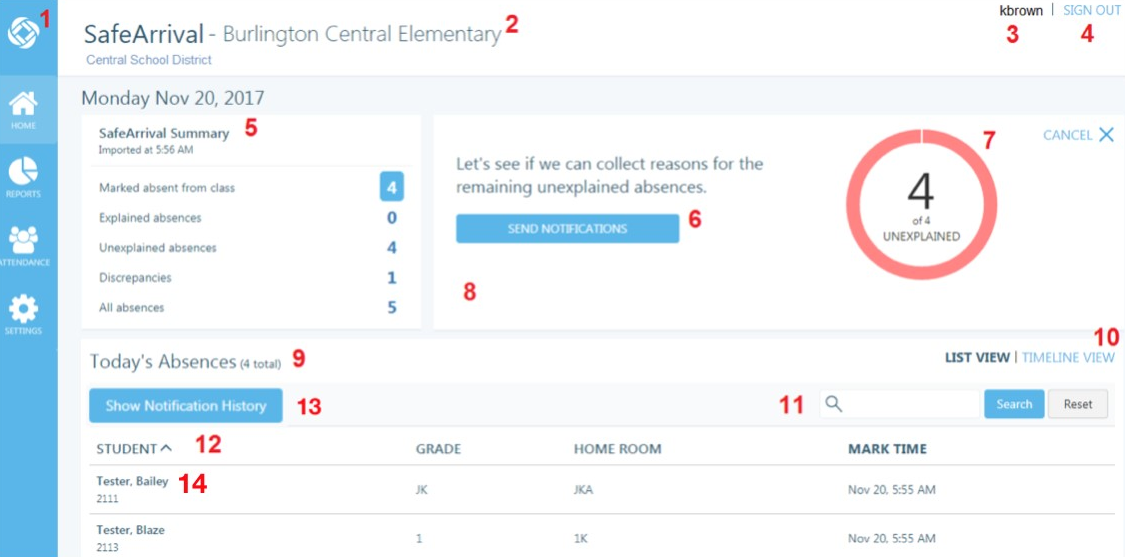
SafeArrival Home page
Menu
SchoolMessenger icon: Takes you to SchoolMessenger Communicate.
Home: The main dashboard for the daily attendance process.
Reports: View and schedule attendance reports.
Attendance: View and edit reported and marked absences.
Settings: View the SafeArrival settings and view/edit report recipients.
Currently Selected School (if your account has access to more than 1 school)
The account name that you logged in with.
Click Sign Out to log out of SafeArrival.
SafeArrival Summary: Shown after Notifications have been sent. Click the name or number for each list to see the individual absences listed in the table.
This is the area where the Import Attendance Data and Send Notifications buttons can be found. If your district uses SIS Integration to upload attendance files and your school uses the Trigger or Schedule auto-notification options, you will not see the Import Attendance Data or Send Notifications buttons. These steps will be automated.The current number of unexplained absences appears here once the attendance data is imported from your Student Information System. This is updated on an ongoing basis throughout the notification cycle as parents/guardians report and explain absences. Also, the totals for each of the categories in the SafeArrival Summary panel will be updated.
Any warnings related to the content of the absence file are shown here. If your District uses SIS Integration, these warnings will also be included in the SafeArrival report.
If the absences were marked more than an hour ago, you will be given the option to upload a more recent file.
If there are invalid student IDs in the file, they will be ignored. All invalid student IDs will be listed in the report, which should then be checked in the Student Information System.
If there are students for whom notifications have already been sent for this marked absence, you will be given the options to ignore or re-send notifications for these students.)
If the attendance data import file is in the wrong format, an error message will appear here. Try recreating the file if you are doing manual imports, and if the problem persists, or if your system uses SIS Integration, contact your SafeArrival District Administrator.
Depending on the option selected in the SafeArrival Summary, the name of the listing is shown here.
Click List View or Timeline View to have the absences displayed in different formats. Here is an example of the Timeline View. It shows two Late Arrivals, students expected to arrive at around 12:00 PM, and three Full Day absences.

Explained Absences view
Enter text in the Search text box then click Search to locate and individual absence record. You can enter a Confirmation Number in the Search text box to find the absence for which that Confirmation Number was provided.
Clicking on any of the column headings will sort the listing based on that heading. A caret symbol (^) next to the active sort heading will indicate that the sort order is ascending (A to Z; 0 to 9), while an inverted caret symbol (v) will indicate that the sort order is descending (Z to A; 9 to 0).
Show Notification History: Once enabled for your district (by SchoolMessenger staff), this button will be available. For each unexplained absence, a list of contact points (email, SMS text message, phone calls) and the results will be shown below the absence.
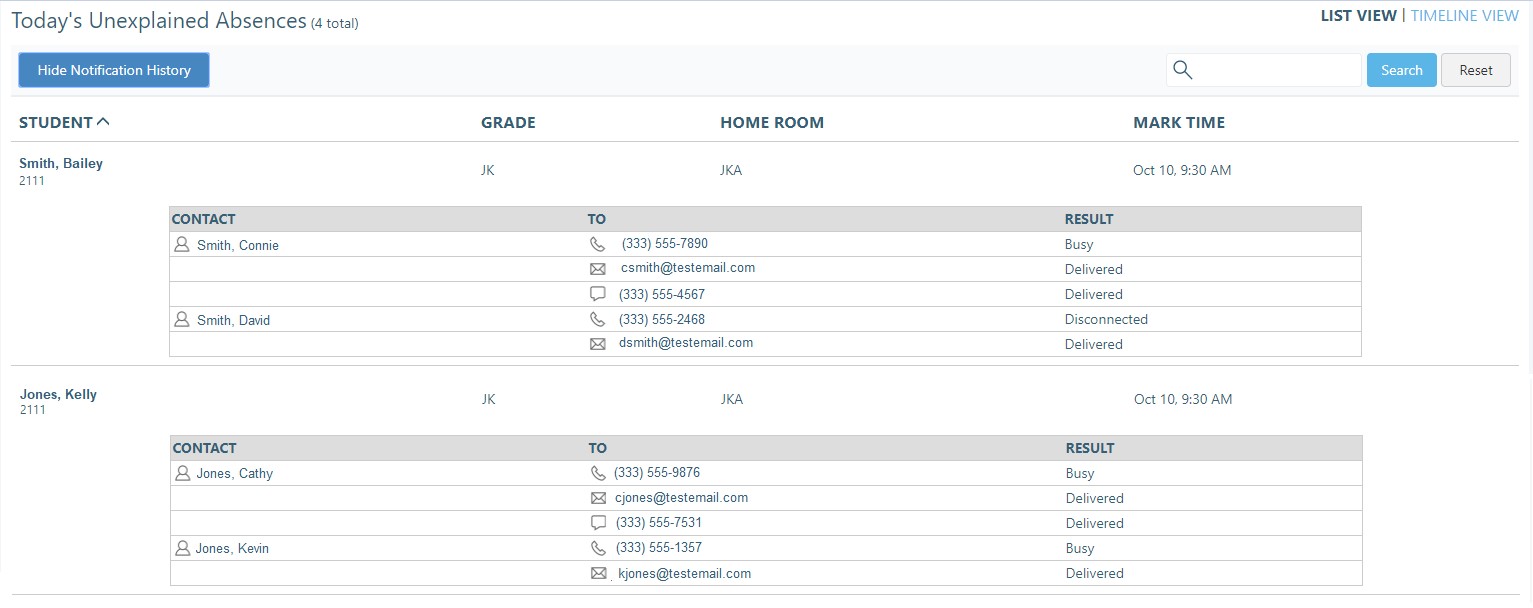
Today’s Unexplained Absences view
Click on an absence row to view the Notification History of a specific student. If there have been made any outbound calls/sms/emails, you’ll be able to click Notification History.
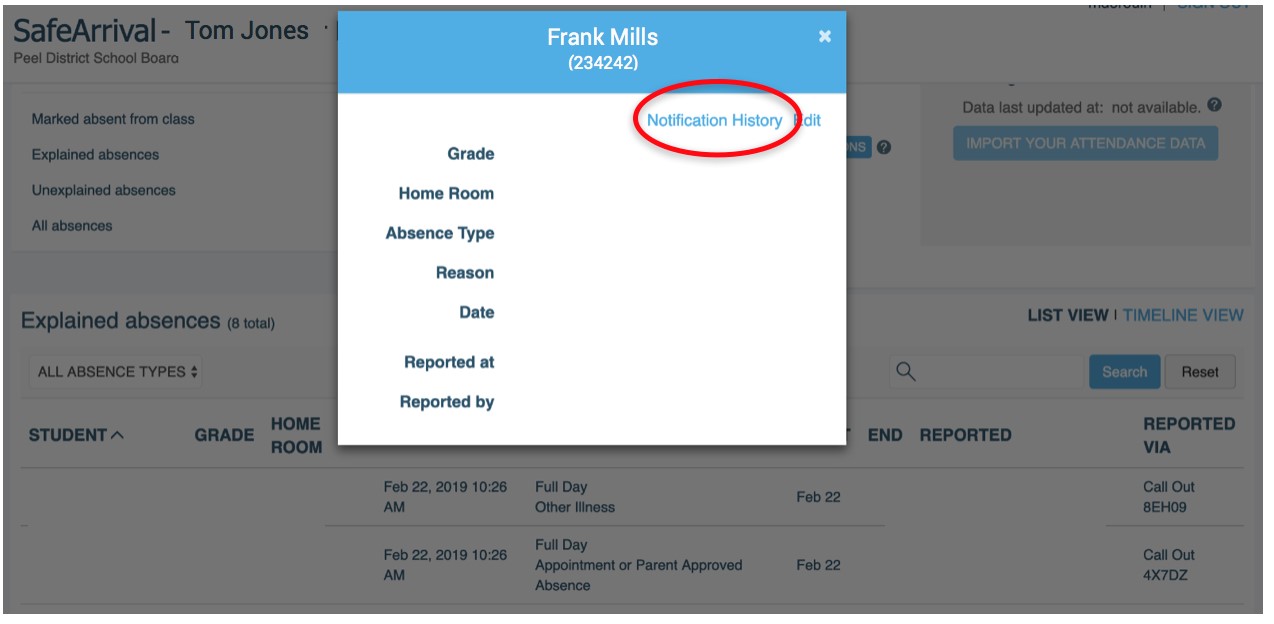
Notification History window
The SafeArrival Report
This is an example of the two-page SafeArrival Report, which can be downloaded as a PDF file. The summary numbers are shown in the top right of the first page. This same report will be emailed to all recipients who are set up to receive the SafeArrival Reports. Who the current recipients are and how to set up additional recipients is discussed in the next section, Report Recipients.
The SafeArrival Report provides you with a snapshot of the status at the time that it is generated. Hence, only day-end reports should be considered “final” reports. Throughout the SafeArrival cycle, current information will always be reflected on the screen in real time. Finally, each notification cycle (e.g. a three-cast notification cycle consisting of an original “send” notification and two “re-send” notifications) generates a report for each of the notifications within that cycle (i.e., three reports in this case, any of which can be retrieved).
The SafeArrival Report is also available as a CSV download. The CSV version of the report contains only information on Explained absences, including the absence reasons.
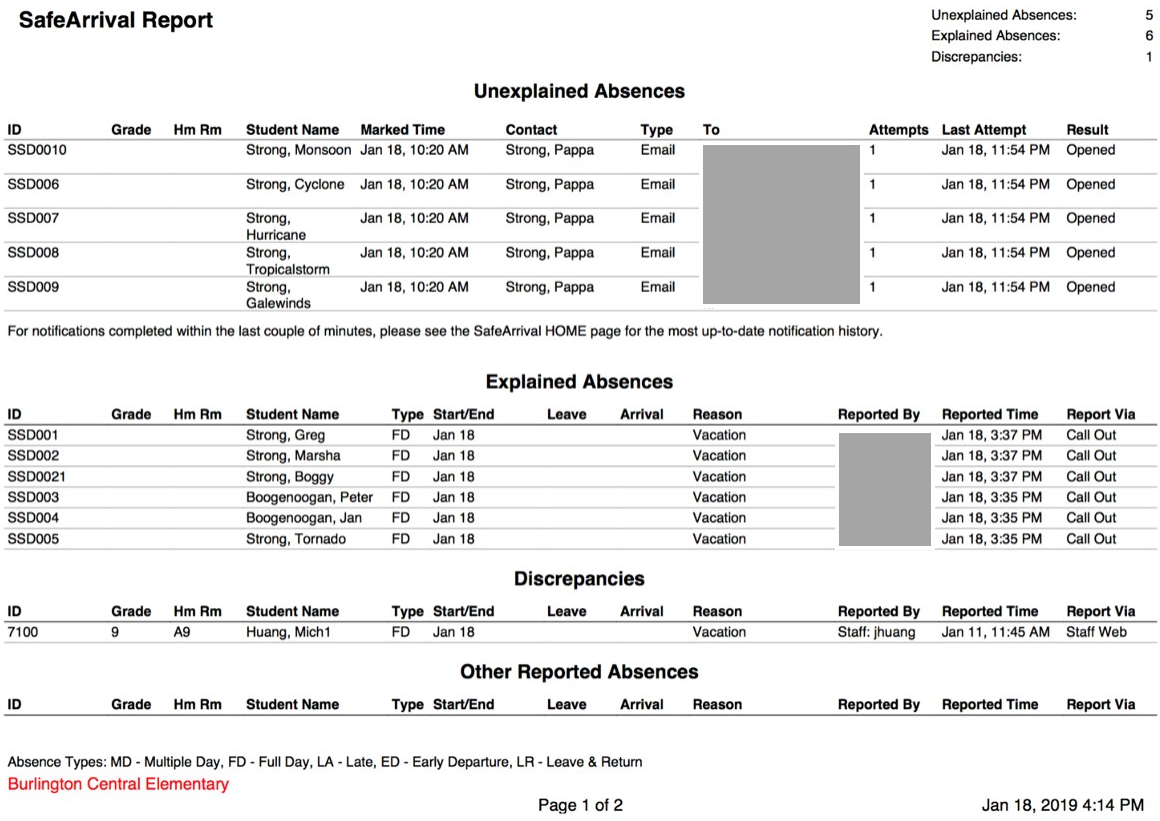
SafeArrival Report page-1
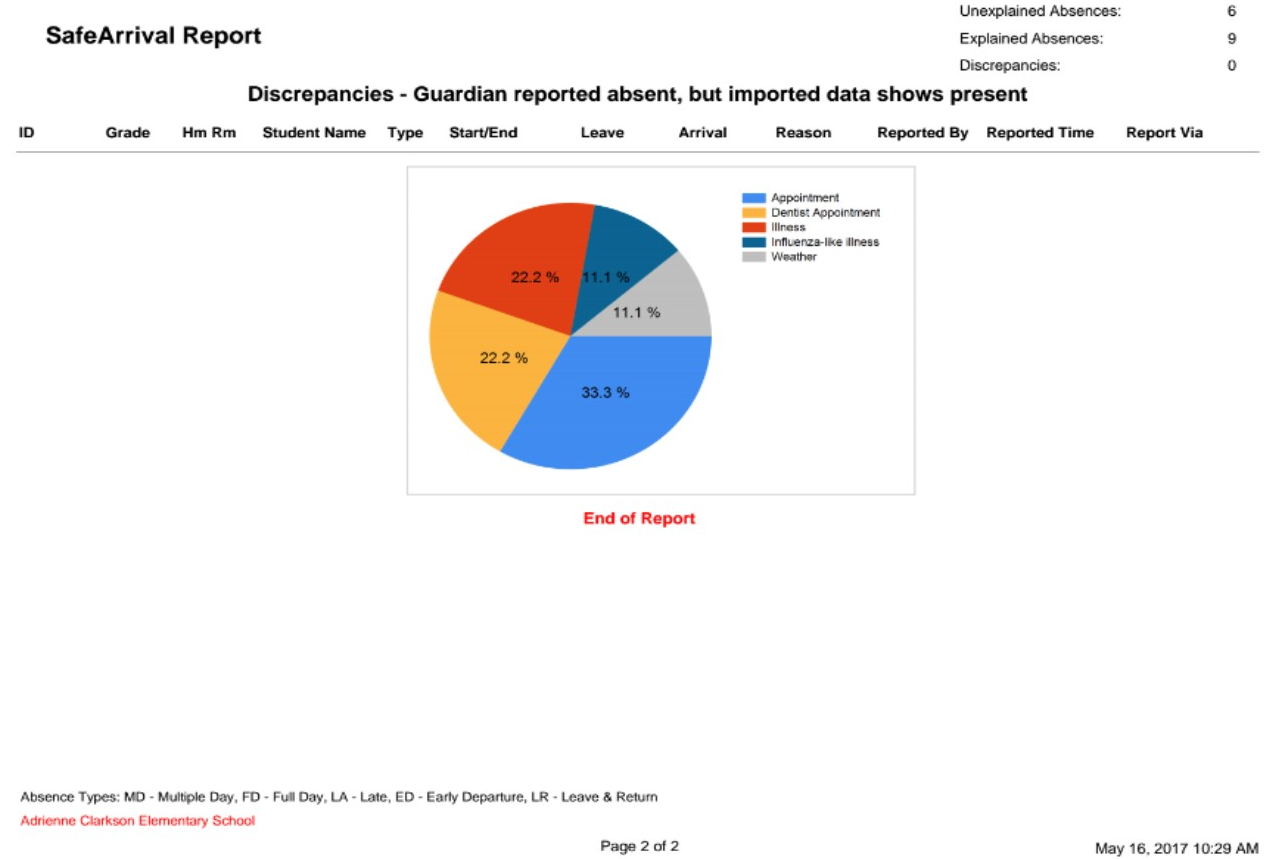
SafeArrival Report page-2
The final section of the report contains a chart that shows the break-down of the absence reasons provided.
The Reports Page
Select the type of reports you would like displayed on this page.
Absence Reports are SafeArrival reports that are created (and emailed to Recipients of the SafeArrival Reports) when Notifications are sent.
Manual Reports are SafeArrival reports that you generate on an as-needed basis for a specific timeframe. When you create a Manual Report, you can click the Send Email checkbox if you want the report to be emailed to Recipients of the SafeArrival Report.
Scheduled Reports are SafeArrival reports that you set up to be sent via email at a specific time every school day to Recipients of the SafeArrival Reports.
Absence Reports
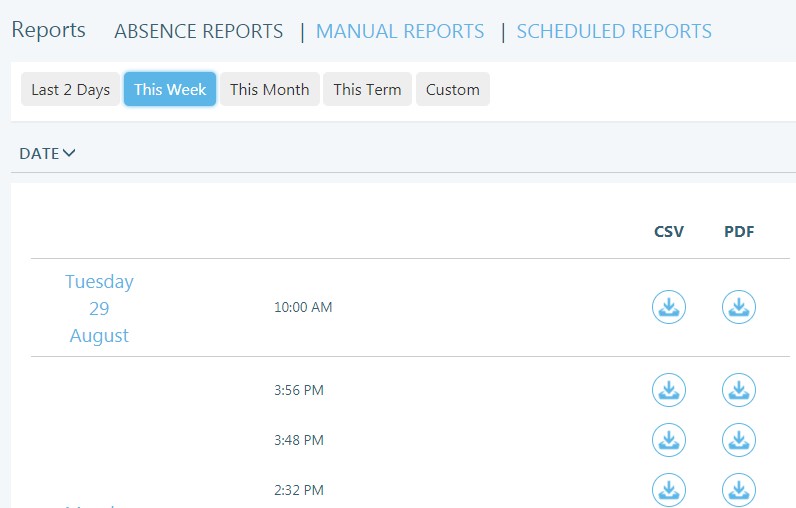
Absence Reports tab
This list shows the SafeArrival reports that have already been created after notifications have been sent to parents/guardians.
Select a timeframe you would like your reports to display: Last 2 Days, This Week, This Month, This Term, or a Custom timeframe that you specify.
Click the Date heading to sort the listing in a chronological or reverse-chronological order.
The SafeArrival Report can be downloaded in a PDF or a CSV format. The CSV format contains only information on Explained absences, including the absence reasons. Click the Download icon to download the report in the desired format.
Manual Reports
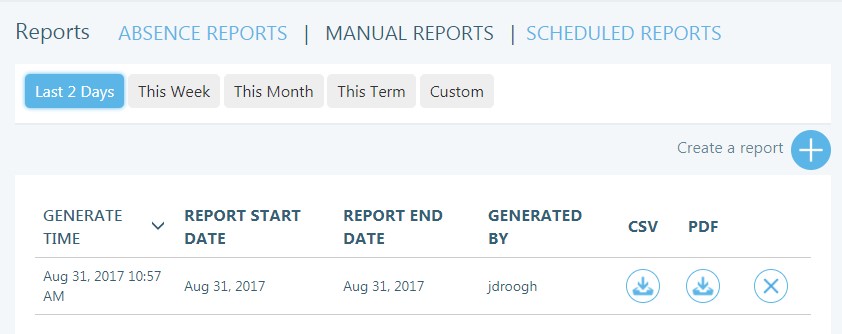
Manual Reports tab
This list shows the SafeArrival reports that you generate on an as-needed basis for a specific timeframe.
Select a timeframe according to which reports you would like to display: Last 2 Days, This Week, This Month, This Term, or a Custom timeframe that you specify.
Click Create a Manual Report + to generate a report for a specific timeframe. Enter the Start and End dates for the period you would like the report to cover. If you would like the report to be emailed to the list of SafeArrival report recipients, check the Send Email setting; otherwise, leave it unchecked.
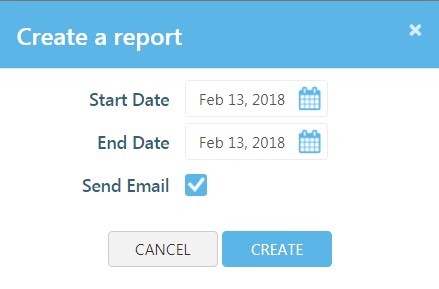
Create a report window
Click the Generate Time heading to sort the list in either a chronological or reverse-chronological order.
Click the X (Delete) icon to delete a report.
The SafeArrival Report can be downloaded in a PDF or in a CSV format. The CSV format of the report only contains information on Explained absences, including the absence reasons. Click the Download icon to download the report in the desired format.
Notification History for Unexplained Absences on Manual Reports
If enabled, when a Manual Report is created, you can choose whether or not to Include Notification History for unexplained absences.
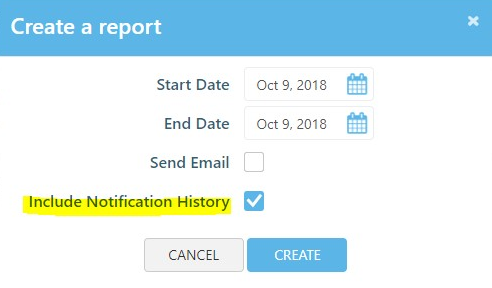
Create a report window with Include Notification History
Scheduled Reports
The Schedule List
The Schedule List shows the times at which SafeArrival reports are scheduled to be emailed to the designated Recipients.
If the scheduled cut-off time for this school is set to later in the day, a report will automatically be generated at the specified time. This scheduled time cannot be edited.
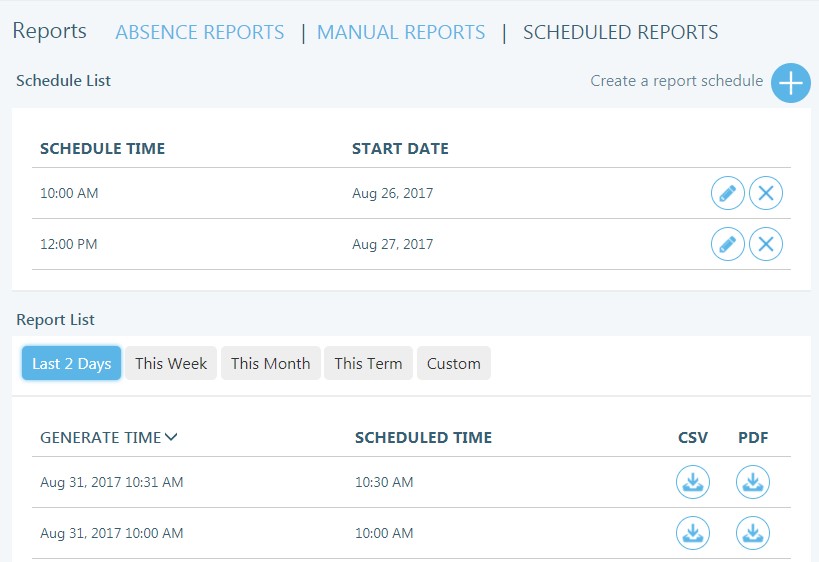
Scheduled Reports tab
Click Create a Report Schedule + to add a new item to the Schedule List. Specify the time of day that the report will be sent and the Start Date, which is the date when you would like to start sending the daily reports.
Click the Edit icon on the line of the item you with to edit.
Click the X (Delete) icon on the line of the item you wish to delete.
A maximum of 10 scheduled report times can be created.
The SafeArrival Report can be downloaded in PDF or CSV format. The CSV format of the report only contains information on Explained absences, including the absence reasons. Click the Download icon to download the report in the desired format.
The Report List
The Report List shows the reports that have been sent via email at specific times every school day. Click the Download icon to download the report.
Notification History for Unexplained Absences on Scheduled Reports
If enabled, when a Manual Report is created, you can choose whether or not to include the notification history for unexplained absences.
Report Recipients
This list shows the people and their email accounts to whom the SafeArrival reports should be sent by email. This includes the reports created when notifications are sent, manual reports, and scheduled reports.

Report Recipients tab
You can specify who should be emailed your reports by clicking the Add a recipient ![]() icon.
icon.
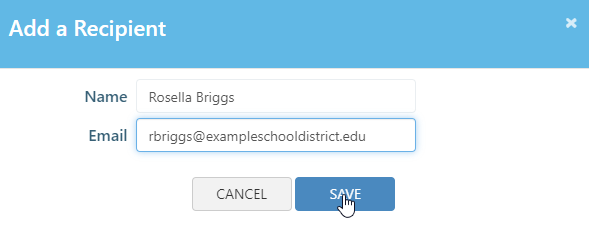
Add a Recipient window
Specify the Name and Email Address for your recipient and click Save.
Click the Actions menu beside a recipient to Delete or Edit the recipient.
Customize Reports
To customize your reports for your school, click Customize.
You will now be able to configure the following settings:
Show Horizontal Lines
Show Notification History
Preferred Sort Order: Choose which fields to sort your reports by
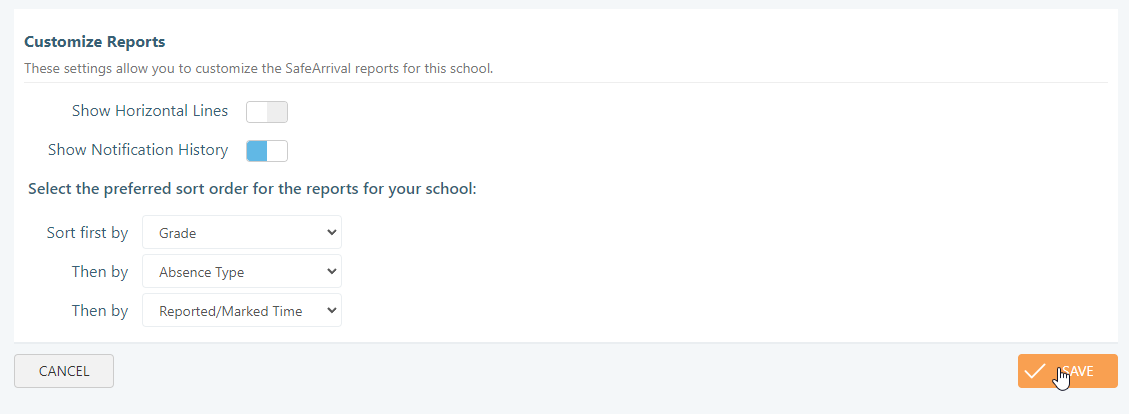
Customize Reports tab
After making your changes, click Save.
The Attendance Page
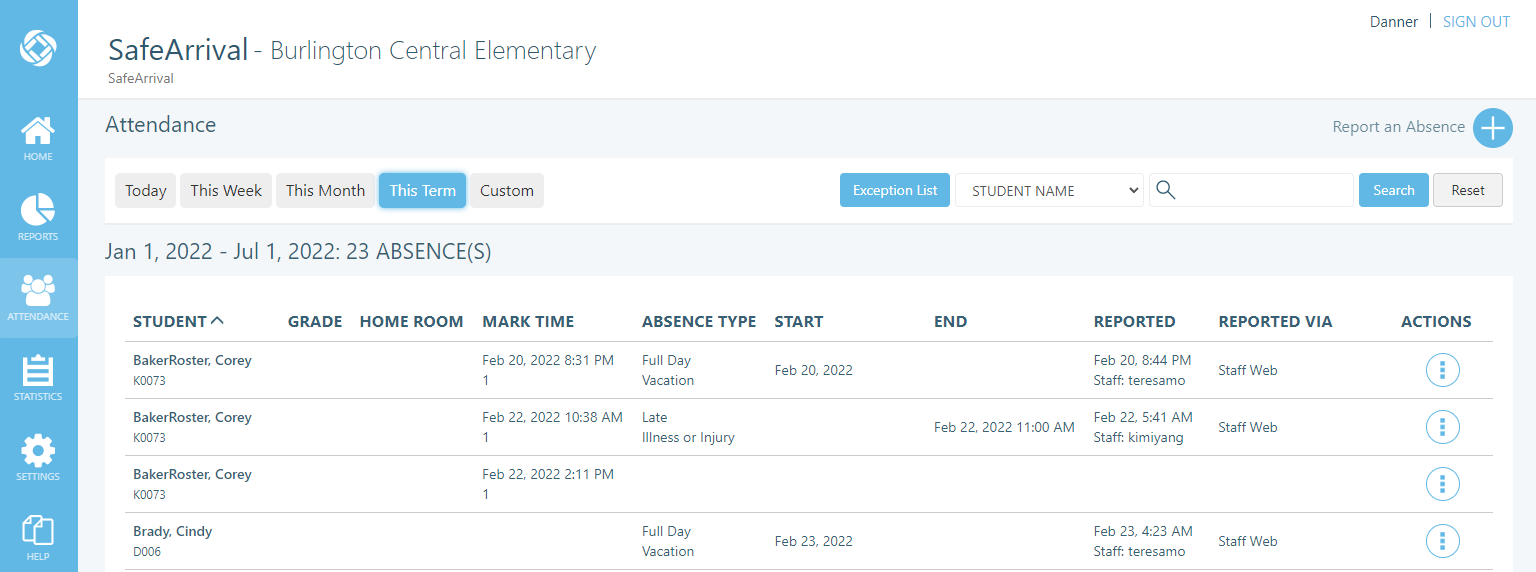
Attendance page
Select a timeframe according to which absences you would like to display: Today, This Week, This Month, This Term, or a Custom timeframe that you specify.
Use the Search function to find absences that match selected criteria. Select the criterion from the drop-down list:
Student Name
Confirmation Number: Provided to callers when they report an absence by phone
Student ID
Absence Reason
Home Room
Grade
Absence Type
Absence Reason
Then enter the text or number you would like to search for. Click Search (or press Enter) to display the absences according to your selections.
Click any of the headings to sort the data in an ascending or descending order in accordance with the selected heading.
If the absence has a comment, it will show a new line under the absence record.
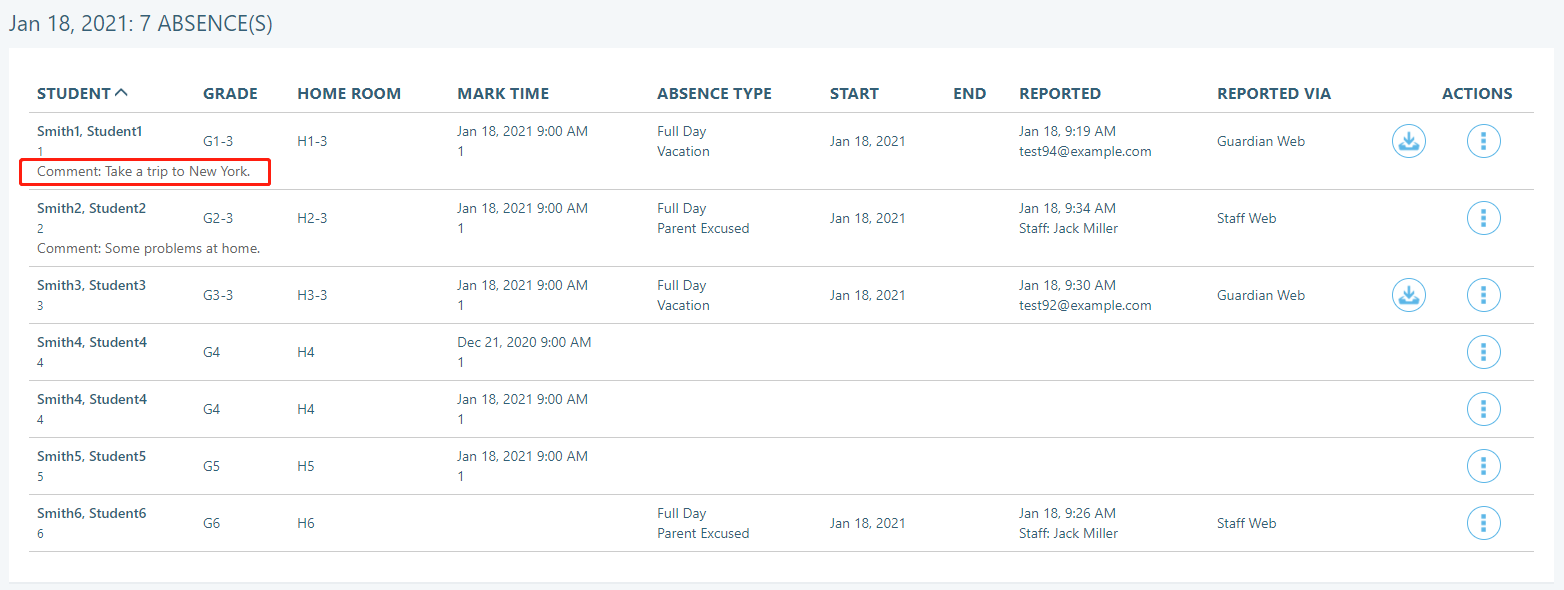
Absences Record
Note: If you wish to allow guardians to add comments when reporting an absence and they are currently unable to do so, please contact our Support Team so we can enable this feature.
If an attachment was added along with the absence, you can download the attachment by clicking the Download icon for the reported absence.
Note: If you wish to allow guardians to add attachments when reporting an absence and they are currently unable to do so, please contact our Support Team so we can enable this feature.
Absences that have been deleted are shown in light grey text.
Click the Actions menu to see further options for this absence.
Edit this Absence: Allows you to change the absence type and the absence reason. Changing the absence type will allow for the editing of related data (e.g. changing a Full Day absence to a Late absence prompts you to enter the time or the late arrival, and changing a Full Day absence to a Multiple Day absence will prompt you for the End Date.) If enabled for your school, you are also able to add comments or attach files for the absence.
Delete: Delete the absence.
Show History: This allows you to see if the absence was edited at any time after it was first created in the system.
Notification History: If notifications have been sent for this absence, this option will allow you to see the phone number(s), email address(es), text message phone number(s) of all the notifications and their results.
Note: If you edit an absence, an email and/or text message will be sent to the guardians associated with this student. If you delete a Marked absence for which a reason has not been provided by parents/ guardians, an email/text message will NOT be sent.
Report an Absence
If you wish to manually log an absence, click the Report an Absence ![]() icon on the Attendance page.
icon on the Attendance page.
In the Student Name field, type all or part of the student’s name.

Student Search window
Select the appropriate student from the dropdown list.
Fill in the following absence details:
Absence Type: Choose the type of absence that is being logged.
Reason: Choose a reason for the absence.
Date (and Time): Choose the day(s) and time(s) for the absence.
Comment: If you wish, you can add a comment with additional details about the absence.
Attachment: If you wish, you can attach a file for the absence.
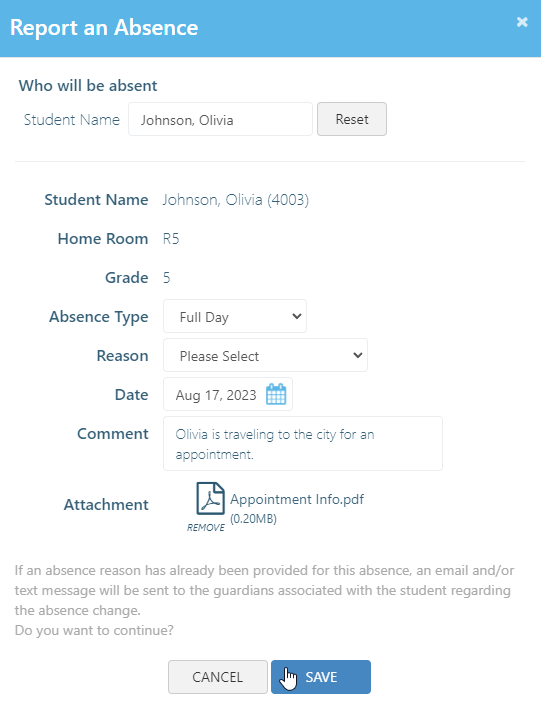
Report an Absence window
Click Save to log the absence.
Exceptions for Attendance
If you need to handle a specific student’s absences differently you can add the student to your Exception List.
To access the list, click the Exception List button on the Attendance page.

Exception List button
Note: If you do not see the Exception List button, please ask your district to contact our Support Team so we can enable this feature.

Exception List window
If a student is on the exception list, then their guardians will not be able to report or explain an absence through SafeArrival. The guardian will still be notified of any absences that have been imported, but they will need to contact the school directly to report or explain an absence.
When you look at absences reported on the Dashboard and the Attendance page, any absences for users on the Exception List will be highlighted in yellow.

Attendance page with an Exception list
When viewing the SafeArrival Absence Reports any student that requires attention will have an asterisk next to their student ID in the table.
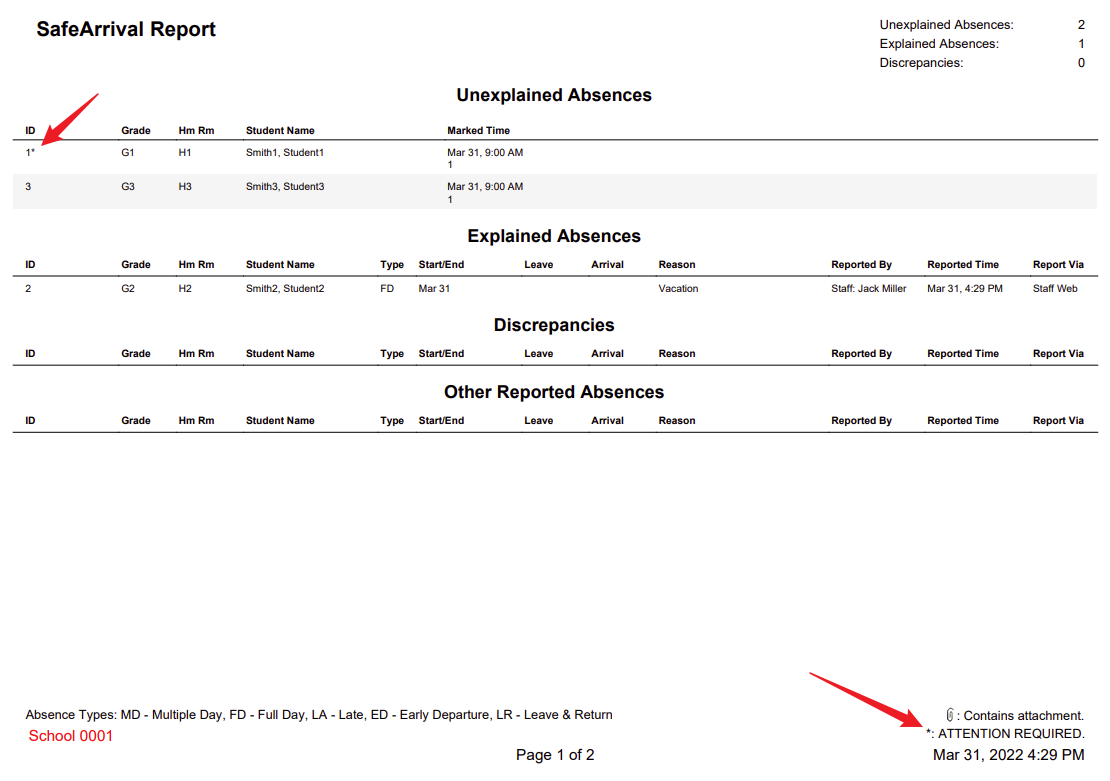
SafeArrival Report page-1
Adding an Exception
To add a student to the exception list, click the Add a Student ![]() icon.
icon.
You can use the dropdown to choose whether to add the user by Student Name or Student ID.
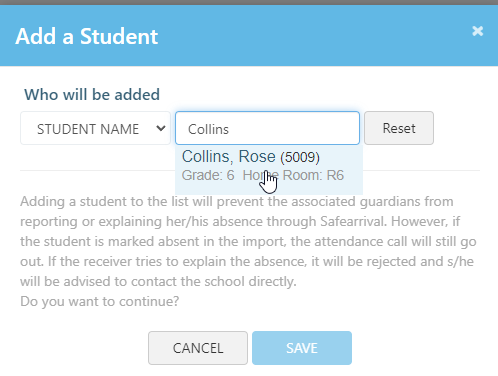
Add a Student window
Type in all or part of the name/ID and choose the user you wish to add.
Click Save.
Removing or Disabling an Exception
If you wish to keep a user on the Exception List, but want their absences to be treated like the absences of other students (i.e. once again allow guardians to report and explain absences through SafeArrival) you can click the Toggle switch in the Attention Required column to toggle it off.

Attention Required Toggle switch
This will allow you to easily re-enable the feature in the future by toggling Attention Required back on for the user.
If you wish to permanently remove a student from the Exception List, you can instead click the X (Delete) icon.
Click OK to confirm your deletion.
The Statistics Page
You can generate many different insights into how SafeArrival is being used in your school. These analyses can be crucial, in that SafeArrival, whose main purpose is to ensure student safety, will show how well this purpose is being served. It will show, for example, how long after bell time the notifications go out (the shorter the time span, the better). It can also reveal how parents and guardians use SafeArrival, suggesting potential ways in which that use can be improved and optimized. It can reveal how often parents/guardians respond to initial notifications, and, on average, how quickly this occurs. Running these statistics will provide you with the intelligence that you can use to improve use of your SafeArrival system and its integration into the school community.
This is the Statistics screen, broken down into its functional elements:
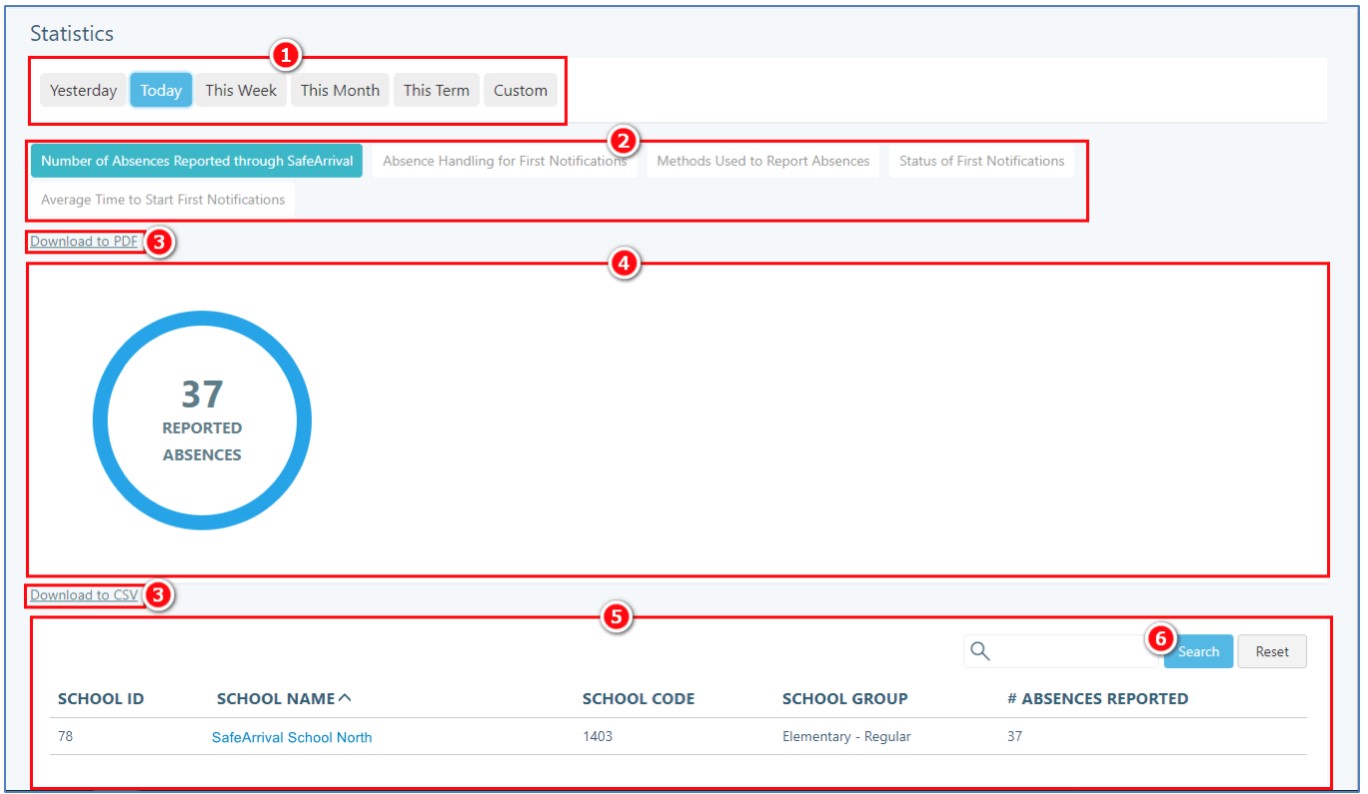
Statistics page
Date Scope: Select the date range for which you would like to see statistics.
Report Selection: These are all the various types of reports that you can generate a statistical overview for. The scope of the reports depends on the time frame. Graphs and summary statements will appear in Summary section, and the details for each school will appear in the Details section.
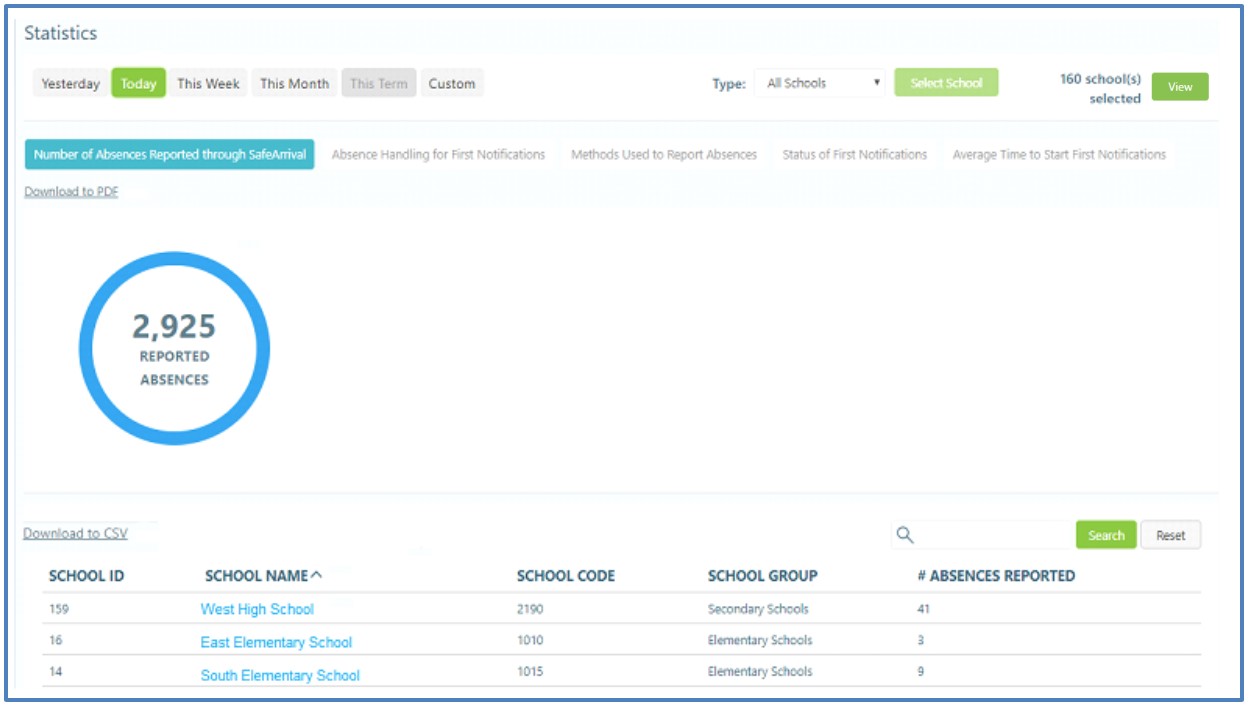
Number of Absences Reported through SafeArrival: This report shows you the total number of absences reported using the SafeArrival system and the details for each school.
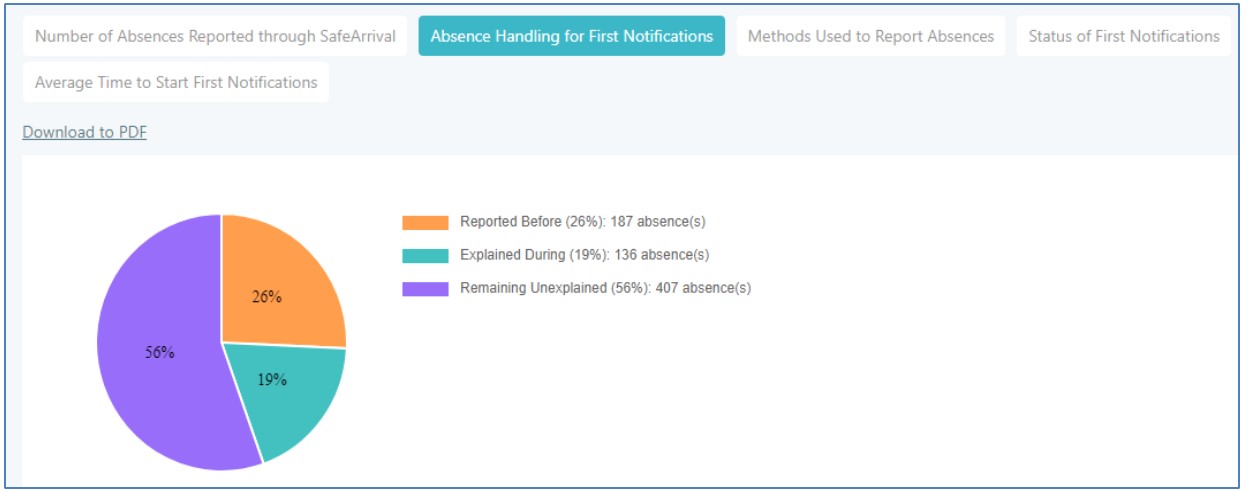
Absence Handling for First Notifications: This report shows i) the number of absences reported before the first pass of notifications go out, ii) those that are reported during the first pass of notifications, and iii) those that remain unexplained after the first pass.
Monitoring these statistics provides you with an indication of how responsive parents/ guardians are to the use of the system. Obviously, the best-case scenario is to have all absences reported through the SafeArrival system before any notifications might go out. Seeing the actual numbers will give you an indication of what needs to be done, if anything, to improve cooperation from parents/guardians. You might 1) check to see if all necessary contract information for all parents/guardians appears in school records; 2) if parents/guardians have been thoroughly apprised of the various means available to them to report absences and how to use each of those means.Where remaining unexplained absences remain high, you should think about resending notifications at least one more time.
Methods Used to Report Absences: This report shows you the various means parents/ guardians are using to report absences.
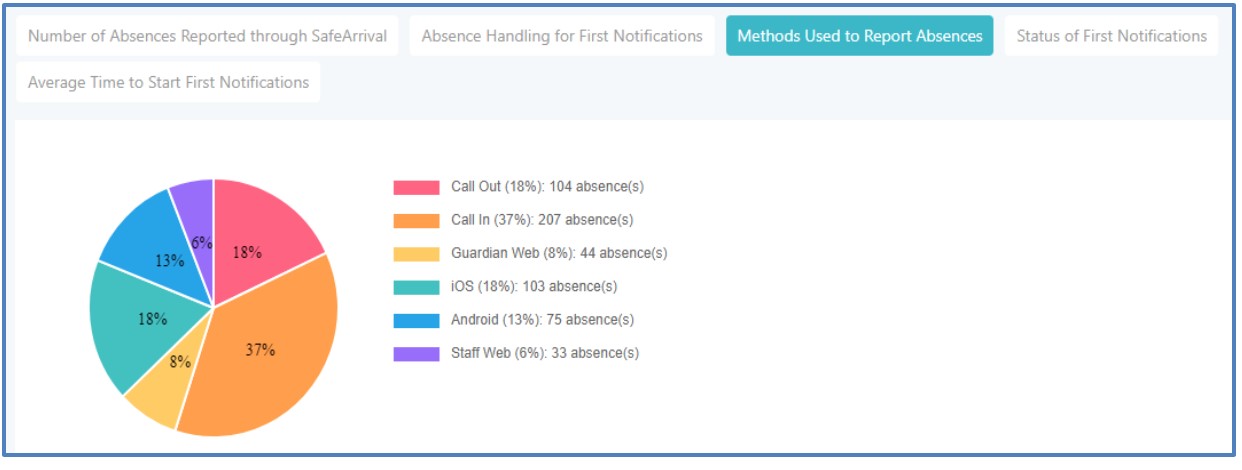
This report lets you get a sense of which reporting methods are most popular with your users.
Status of First Notifications: This report shows the status of first notifications in terms of i) those not been started; ii) those that have not been completed, and iii) those completed.
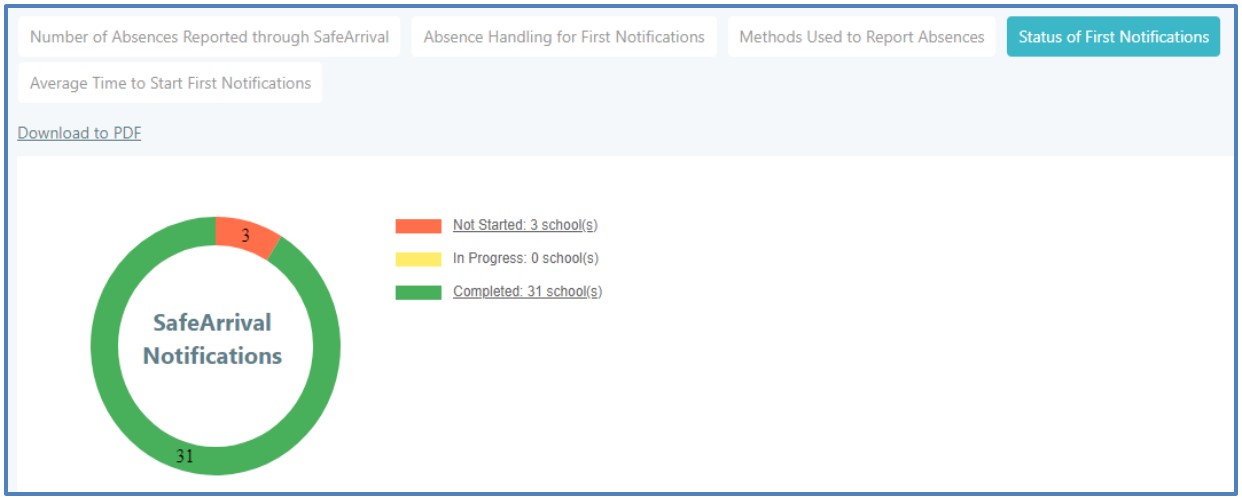
Obviously, the highest number here should be for the completed group. It is, however, important to investigate all those cases (which will show up in the Details section) in which SafeArrival is not even being started.
Average Time to Start First Notifications: This report shows the average time it takes in minutes before the notification process begins. The “time to start” is based on the difference in time between your school’s bell time and the actual time notifications were initiated. It is especially important to study and analyze these statistics in cases where the notifications are initiated manually by school staff.
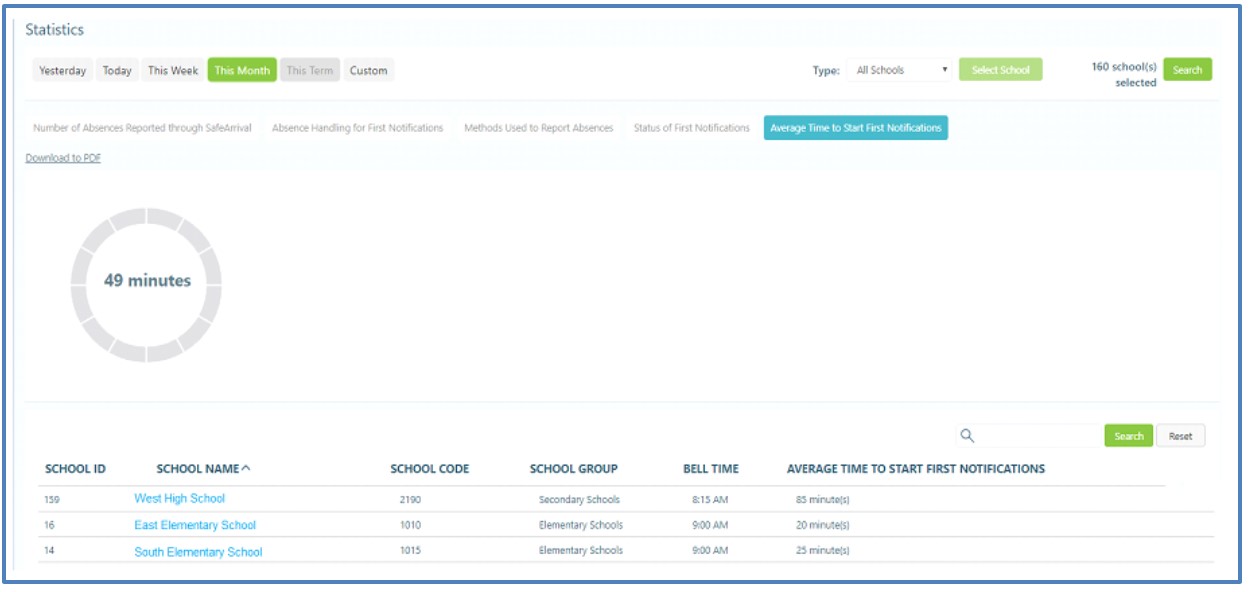
The statistics in this report may prove to be crucial from the standpoint of student safety. SafeArrival’s highest priority is student safety. Hence, the sooner notifications go out for unexplained absences, the sooner the school can i) expect to receive assurances of the student’s safety, OR ii) take to appropriate actions to secure the student’s safety. Lag times decrease such assurances by degrees. The longer the lag times are, the less is known about the status of the student’s absence. Corrective action should be taken in all cases where these lag times are unacceptably long.
Downloads: Statistics reports can be downloaded in either a PDF file format or a CSV file format. PDFs are suitable for archiving and sharing information with others; whereas, CSV files can be used for various types of analyses. CSV files can be imported into Microsoft Excel or another external analytical tool, combined with others types of data (generated from any number of other sources), and the tools inherent in Excel, etc. can be used to perform additional analyses. For example, a district may be able to determine that an unusually high number of students reported as “late” are being caused by delays in transportation when they correlated data from SafeArrival with data from their Transportation system database.
Summary Section: Displays graphs or summary statements concerning the statistical data.
Details Section: Displays the details for each of the different statistical reports.
Click Search to locate and display data for one or more schools which will be sought out according to the text entered in the text box next to it. Click Reset to restore the full list.
The Settings Page

Setting page
Settings are configured by your SafeArrival District Administrator. Clicking on the appropriate tab will allow you to see those settings for your school. Contact your SafeArrival District Administrator to discuss these settings if necessary. The only setting that you can edit is Recipients of the SafeArrival Report.
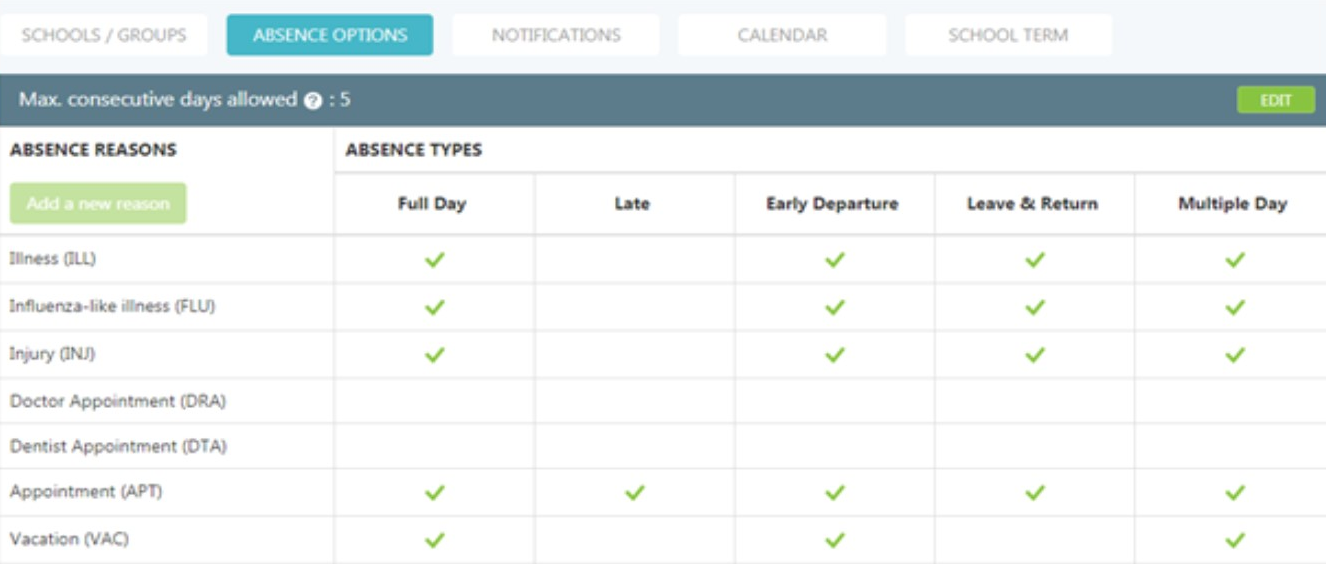
Absence Options tab
Absence Options
Absence Types
SafeArrival allows five types of absences to be reported: Full Day, Late Arrival, Early Departure, Leave & Return and Multiple Days.
The District decides which of these absence types are offered to parents. Yes indicates that guardians will be given the ability to report the absence type.
Absence Reasons
Your SafeArrival District Administrator decides which absence reasons will be presented for each absence type. The text and reason code are shown in this list.
Maximum Consecutive Days Allowed
The maximum number of consecutive days for which guardians can report absences through the system is set by your SafeArrival District Administrator. If guardians try to report a single absence that exceeds this limit, or if they try to report multiple absences that are consecutive and that exceed this limit, they will be asked to contact the school to report the absence. This allows you to discuss the extended absence with the parent.
Maximum Cumulative Days Allowed
The maximum number of cumulative days for which guardians can report absences through the system is also set by your SafeArrival District Administrator. If guardians try to report a single absence that exceeds this limit, or if they try to report multiple absences that exceed this limit, they will be asked to contact the school to report the absence. This allows you to discuss the number of absences with the parent.
Translations
If Multi-Language support has been configured for your District, the SEE ALL TRANSLATIONS button will be shown. Clicking this button allows you to review the translations for the Absence Types and Absence Reasons.

Absence Options tab - SEE ALL TRANSLATIONS option
Notifications

Notifications tab
The first two fields show your school’s start and end times.

School Bell Time option
The next setting indicates the length of time each notification cycle will take to complete. Clicking on Re-Send notifications will initiate a new, complete cycle.

Absence Notifications option
This setting indicates the minimum number of minutes that the system should wait before redialing the same phone number.
Note: This setting should not be confused with the intermittent delays between email/push —> SMS —> phone cascade that the notifications are sent out in. This delay applies only to the interval between phone calls.

Phone Number setting
This setting indicates the how many minutes the system should wait after sending email/push and SMS.

Email and SMS retries option
This setting specifies the maximum number of times an individual phone number may be called. Keep in mind that SafeArrival will stop calling a phone number if a message is left on an answering machine or voice mail, but it will continue calling parents/guardians at other phone numbers until such time as a person is contacted. It will make up to four attempts for each such phone number.

Phone Number retries
These are three different settings concerning how late arrivals and leave and return absences are to be handled. This one shows that the Strict option is in force. The other two are described below:
Strict will always send a notification message whenever the student arrives after the reported time of arrival, treating it as an unexplained absence.
Loose will always ignore the time of arrival, no matter how much after the reported time the student actually arrives. As long as the student arrives, the interim absence is treated as an explained absence.
Grace Period will treat late arrivals that occur within the configured grace period reported by parents/ guardians as explained absences and no notifications will be sent; whereas, late arrivals that occur after the grace period will be treated as unexplained absences, and an absence notification message will be sent. Grace Period might be considered “strict, with a measure of leniency deemed tolerable by the district.”

Late Arrivals Notifications
This setting indicates when the cut-off time will be for SafeArrival notifications. The cutoff time is the time after which absences for the current day can no longer be reported through the SafeArrival system.

Cut-off Time Notifications
Calendar
Each school’s calendar is set up by your SafeArrival District Administrator. It should show all Holidays and may show Exam Days.
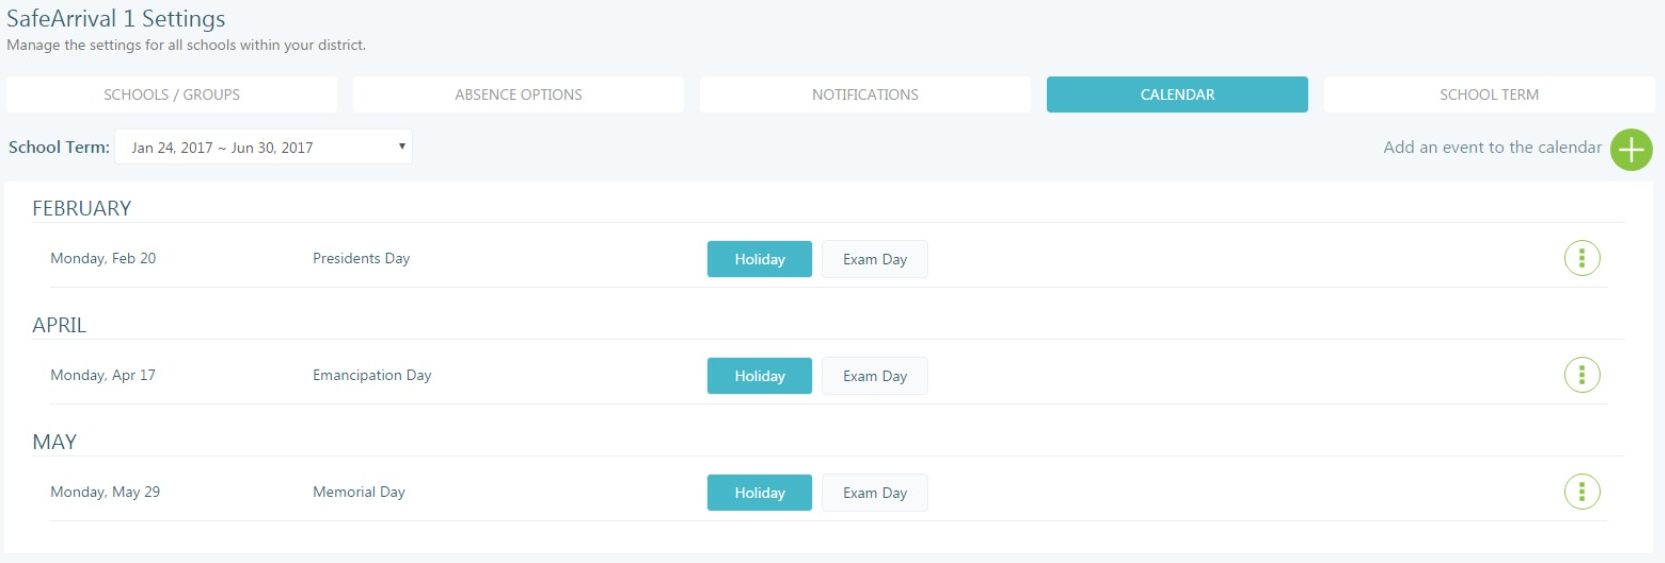
Calendar tab
Absences are not allowed to be reported through SafeArrival on Holidays. Guardians are told that school is not in session that day.
Absences are not allowed to be reported through SafeArrival on Exam Days. Guardians are told that they need to contact the school directly to report absences on exam days. This gives you the opportunity to discuss why the child will be absent and how the exam will be dealt with.
School Term
The school terms are set up by your SafeArrival District Administrator.

School Term tab
Absences are not allowed to be reported for days outside the current school term. If such attempts are made, then guardians are told that school is not in session.
Your SafeArrival District Administrator may set the start date for the school term a week or two before the actual first day of school and set those pre-school days as Holidays. This is done so that parents can begin reporting absences before the first day of school.
Add a School term
To add a new school term:
Click Add new school term.
Use the date picker to select the First Day. Refer to Hijri calendar for more information about hijri calendar options.
Use the date picker to select the Last Day.
Select Add to Group, if needed.
Click Save.
Hijri calendar
SafeArrival now supports the Hijri calendar along with the Gregorian calendar. Many regions use the Hijri calendar for school schedules, holidays, and reports. This update makes it easier for users in certain regions to select dates in the format they are most familiar with and ensures a smoother experience for users who rely on the Hijri date system.
If you set your language to one of the following, you will see an option to toggle on the Hijri calendar:
Arabic (ar)
Urdu (ur)
Persian (fa)
Malay (ms)
Indonesian (id)
Turkish (tr)
English (en)
Even if your language is set to English, you can still choose to see Hijri dates.
Enable Hijri calendar
Go to your language settings and choose a language that supports Hijri dates.
A toggle switch will appear, allowing you to turn on the Hijri calendar.
Once enabled, Hijri dates will be shown alongside Gregorian dates in calendars, reports, holidays, and other date pickers.
To switch back, toggle off the Hijri calendar.
Languages
On this tab you can see which, if any, additional languages have been set up for your district to be used when sending absence messages to parents/guardians. If you wish to change these settings, please speak with your district administrator.

Languages tab
SIS Integration and Auto Notification
The Auto Notification tab will appear on the Settings page only if SIS Integration is active for your school.

Auto Notification tab
SIS Integration automates the process of transferring attendance data from your Student Information System to SafeArrival, eliminating the need to export the Attendance file from your SIS, saving it on your computer, and then having to browse to it, select it, and to Import it into SafeArrival.
If your District uses SIS Integration:
Your SafeArrival District Administrator will let you know whether you need to initiate the transfer of the attendance file when attendance-taking is complete or whether the file is uploaded based on a schedule.
Your school will be set up for one of three types of Auto Notifications:
Manual: Notifications are started by school staff.
Trigger: Notifications are triggered by attendance file uploads.
Schedule: Notifications are automatically started at scheduled times. Schedule times can be throughout the school hours but must be at least 45 minutes apart.
If there are any problems with the attendance file, an email will be sent to the Recipients of the SafeArrival Report.
If there is already a notification process in progress when a scheduled time is reached, the scheduled notification will be started but the system will set it to conflict status and stop it. The process that was in progress will continue to run. The scheduled notification will NOT be run when the first process ends.
Absence Type Notifications
If this feature has been enabled for your district, school staff can be sent an email alert or push notification if an Early Departure or Leave & Return absence is logged. You can enable that through this interface.
In the Absence Type Notifications tab, you can enable the alerts through this interface.

Absence Type Notifications tab
In the Notification Absence Types section, enable on the switch for Enable sending alerts to school staff for selected absence type(s) for the current day and click OK.
Choose the alert type(s) you wish to trigger a notification. The alerts can be sent for Early Departure or Leave & Return absences.
Note: When you first enable this feature, you will already be in the editing interface but if you want to enable or disable elements in the future, click Edit at the top of the tab.

Notification Absence Types section
Enable the email alerts for your desired Notification Absence Types.
In the Notification Types section, you are able to choose how your staff is notified.

Notification Types section
You can Enable Notification By Email or Enable Notification on Dashboard.
If you choose to enable notifications for the SafeArrival dashboard then staff will be able to view the push notifications for these absences on their dashboard.
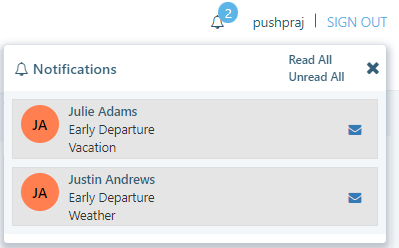
Push Notifications window
To determine who should be sent the email alerts go to the Recipients of the Absence Type Alert section of the page.
If you want the email alerts to be sent to the user(s) that are already set up to be emailed SafeArrival reports enable the switch for Include the Recipients from SafeArrival Report Setting and click OK.

Recipients of the Absence Type Alert section
If you wish to have additional staff notified other than those already included on the SafeArrival report, click Add a Recipient.
Type in the Name and Email of your recipient.
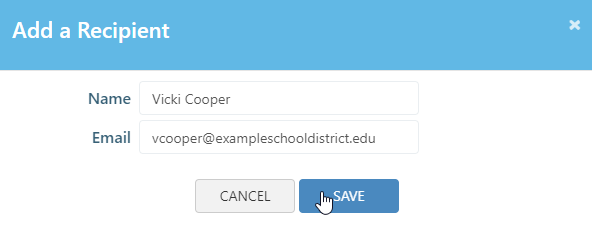
Add a Recipient window
Click Save. Repeat this process to add all your desired additional recipients.
Any contacts added as Additional Recipients will also be emailed when an alert is triggered.

Additional Recipients options
After you have finished configuring your notification settings, click Save.
The Help Page
Click the Help option in the menu on the left side of the screen to open a new window containing the online help. You can search this document, print it, etc.
Import Attendance Warnings
When you import your attendance file, there are several warnings that may be displayed. This section contains an explanation. If your district uses SIS Integration, these warnings will be shown in your SafeArrival Report.
Warning: The imported attendance information was created at date/time. If you have more recent data, import a new file.
This warning is shown when the marked time of absences is not within a short enough time period after the arrival of the attendance data. To ensure student safety, the absence notifications should be sent as soon as possible after attendance has been taken. If you imported an old file, click Cancel and import a more recent file.Warning: The imported attendance information contains invalid student IDS. These will be ignored.
Click the Invalid Student IDs link. This will show you a list of student IDs that were recorded in the imported attendance file but are not in your SchoolMessenger Communicate database. These student IDs need to be investigated. In the meantime, they will be ignored by the notification process, so you can go ahead and Send Notifications.Warning: This file contains attendance data that is not for today. Please import attendance for today.
Click the Attendance Data link. This will show you the list of dates in the attendance file that are not for today. Re-export your attendance file from the student information system, ensuring you are exporting today’s absences. Return to SafeArrival and click Cancel to terminate the original import, then Import Attendance using the new file.Warning: There are no marked absences in the file.
If there are no marked absences in the file, you will receive this warning. In order to generate your SafeArrival report for the day, go ahead and click Send Notifications. No notifications will be sent, but a report will be generated.Warning: There seems to be a timezone mismatch between Student Information System and SafeArrival. Please report this issue to SafeArrival support staff. You can continue to send notifications. Note that the student’s marked time will be shown as date/time.
This warning is shown when there is a significant time difference between the current time and the marked time of absences in the file. If you have timely attendance data, try exporting the attendance file and import it again.
The SchoolMessenger App and SafeArrival
This section contains a simplified overview of the SchoolMessenger app (mobile apps and website) that parents/guardians can use.
Parents/guardians can Sign Up for the SchoolMessenger app and use the website or the mobile apps (available for iOS and Android through the Apple App Store and Google Play Store respectively). If the parent/guardian’s email address is associated with at least one child in a school that is active for SafeArrival AND their guardian category is one that has been enabled for use with SafeArrival, they will see the Attendance menu item and their students listed.
Student Absences
Select the Attendance menu option from the main menu.
The Attendance screen shows student absences.
Student absences can be viewed in Calendar view (click the Calendar icon) or in List view (click the List icon).
Report an Absence
To report an absence, select the Report an Absence ![]() icon.
icon.
Select an entry from each of the drop-down lists, calendar or time selectors then select Send.
Explain an Absence
When there are absences to be explained, they will be highlighted in red. Select the absence then explain it by selecting entries from the drop-down lists, calendar and time selectors, then select Send.
Edit/Delete an Absence
Reported absences that will occur in the future can be edited or deleted. Select the absence then Edit or Delete as needed.
SchoolMessenger App - Mobile Apps
Manage PIN Settings (Android example)
Parents/guardians can require that a Personal Identification Number (PIN) be entered before absences can be reported or explained for their student using the SafeArrival phone system. PIN settings can be updated by parents from the Attendance page of the SchoolMessenger app OR by school or district staff that have edit access to the SchoolMessenger Communicate Contacts page.
Using the mobile apps, parents click the gear (Settings) icon in the upper right-hand corner of the Attendance page. They will be shown a brief description of PIN settings. Click Manage PIN Settings to continue.
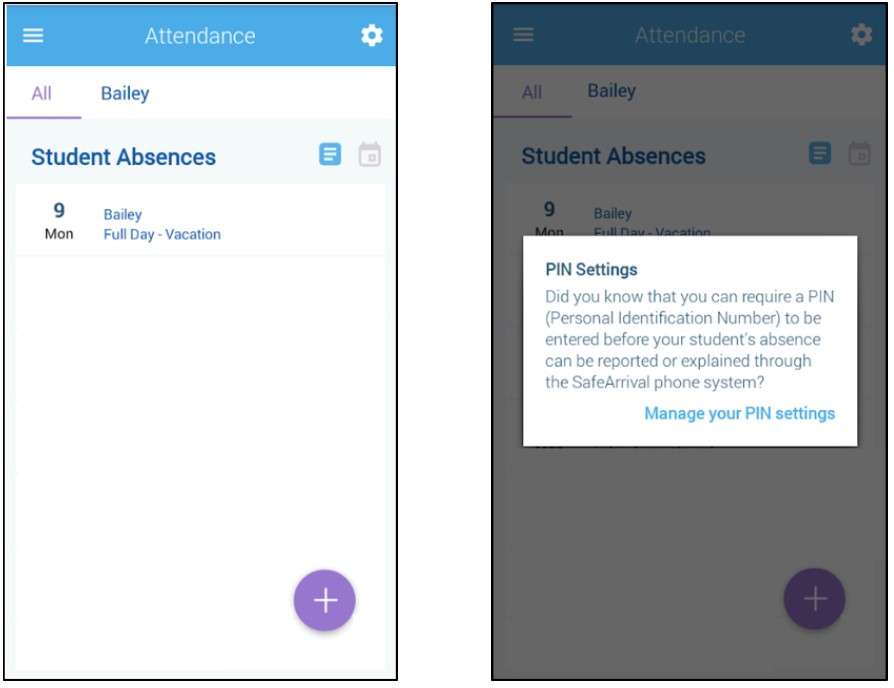
SchoolMessenger App - Manage PIN settings
On the Manage your PIN Settings screen, the parent can choose the district in which the student is enrolled (if the parent has students enrolled in more than 1 district). The parent will see a list of his/her students and will be able to tap the checkbox to request that a PIN be required for when reporting and explaining absences for this student by phone. A 4-digit PIN can then be entered. Changes made on this screen will be saved automatically. Tap the eye icon to see the PIN. Tap the edit icon to modify the PIN.
This screen will be slightly different for Districts who do not use the Guardian Data Model. In that case, a separate PIN is required for each student.
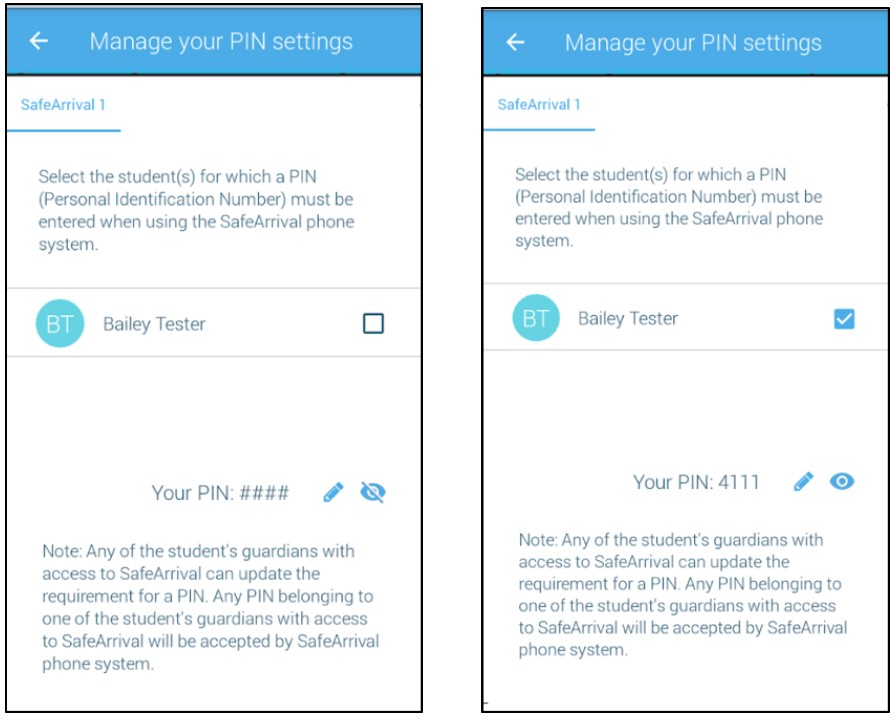
SafeArrival App - Manage PIN settings continued
SchoolMessenger App – Website
Manage PIN Settings
Parents/guardians can require that a Personal Identification Number (PIN) be entered before absences can be reported or explained for their student using the SafeArrival phone system. PIN settings can be updated by parents from the Attendance page of the SchoolMessenger app OR by school or district staff that have edit access to the SchoolMessenger Communicate Contacts page.
Using the SchoolMessenger app website, parents click the Manage your PIN settings link at the bottom of the Attendance page.

SchoolMessenger Website - Manage PIN settings
On the SafeArrival PIN Settings screen, the parent can choose the district in which the student is enrolled (if the parent has students enrolled in more than 1 district). The parent will see a list of his/her students and will be able to tap the checkbox to request that a PIN be required for when reporting and explaining absences for this student by phone. A 4-digit PIN can then be entered. Tap the eye icon to see the PIN. Tap the PIN to modify the it. Click Save to save any changes.
This screen will be slightly different for Districts who do not use the Guardian Data Model. In that case, a separate PIN is required for each student.
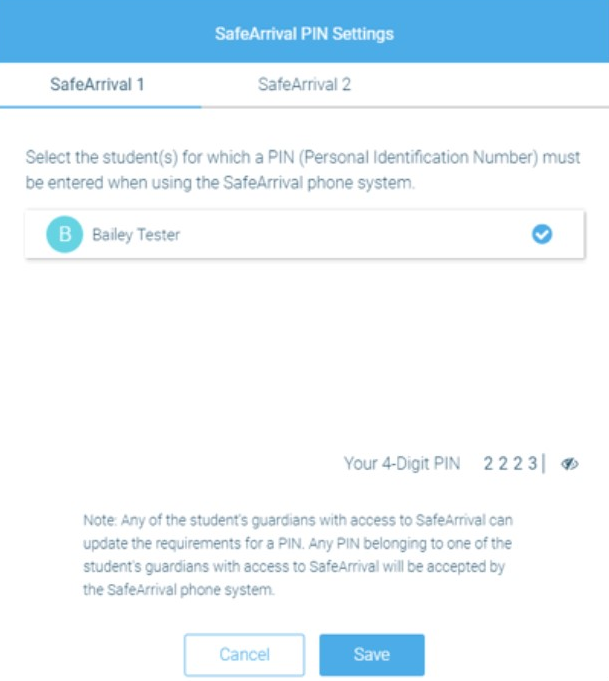
SafeArrival App - Manage PIN settings
Supporting Parents/ Guardians
Here are some questions that parents/guardians may ask, and information to help you answer their questions.
SchoolMessenger App Accounts
How do I access my SchoolMessenger app account?
In the United States, go.schoolmessenger.com; in Canada, go.schoolmessenger.ca.
Parents/guardians must Sign Up using an email address that appears in each student record for whom they wish to report absences. That email address is usually imported from your Student Information System; so make sure that it is up to date and entered accurately.
Once signed up, parents can use the Forgot Password link if needed.
Why cannot I sign up for an account?
Setting up an account requires that the email address being used to sign up appears in at least one of the student record’s in SchoolMessenger Communicate. The prospective user is validated with reference to the email address in the student record. If the email address does not appear anywhere in
SchoolMessenger Communicate, no validation can occur, and therefore no account can be created.
If the parent/guardian email address appears in your Student Information System but not in
SchoolMessenger Communicate, then this is an issue that you will have to bring to the attention of your SafeArrival Administrator. They will have to arrange to have the additional email addresses in your Student Information System transferred to SchoolMessenger Communicate.
Why cannot I log in to my App account? I used to be able to, but I no longer can.
This will normally occur if the parent/guardian has changed their email address, notified the school of the change, but they are still trying to log in with the original email address. The previous email address cannot now be validated. Only current email addresses can be validated.
Hence, the user will have to sign up for a new account using the new email address.
Automated Phone System
What if I am not calling from my home phone number?
You will still be able to report an absence, but you will be asked to enter a phone number that is registered for your student.
What if my caller ID is not passed to the system?
You will be asked to enter a phone number that is registered for your student.
What do I do if I get a busy signal?
Try again in a few minutes or use the app/web. (To School Staff: This is a very rare situation since SchoolMessenger has large phone capacity. It the situation persists for more than 5 minutes, please contact SchoolMessenger support services).
Why does it keep playing the menu options then hang up on me?
The touch-tone sounds are not being received by the automated system. This problem is usually caused by using a cell phone with a weak signal. Sometimes it is the cell phone itself, where the duration of the tone is too brief to be recognized by our system.
Try calling again or use the app/web if this problem persists.
Can anyone who knows my phone number report an absence using the phone system? Including my child?
Yes, only if you have not set up a PIN code for your account. With no PIN code, anyone who uses a phone that is registered for your student or anyone who can enter a phone number that is registered for your student can report an absence for your student.
If a parent/guardian for whatever reason cannot create and associate a PIN code for their account, school staff who can access contact information in SchoolMessenger Communicate can do so for them.
My child(ren) is/are not listed. What can I do?
Children will not be listed if their school is not actively using SafeArrival. Thus, a parent may have one child attending a school in which SafeArrival has been activated, and another child at a different school in which SafeArrival has not (yet) been activated. Not seeing the latter student in this case would be normal.
To School Staff: Check to see that the parent’s email address appears in each of the student records in SchoolMessenger Communicate for which the parent wishes to report absences and receive notifications. This email address is normally entered in your Student Information System and exported to SchoolMessenger Communicate. Children will not be listed if their school is not actively using SafeArrival.
If the parent/guardian email address appears in your Student Information System but not in SchoolMessenger Communicate, then this is an issue that you will have to bring to the attention of your SafeArrival Administrator. He/she will have to arrange to have the additional email addresses in your Student Information System transferred to SchoolMessenger Communicate.
What is a Confirmation Code?
If you report an absence by calling the SafeArrival toll-free number or if you explain an absence when the SafeArrival system calls you, you will receive a confirmation number before the end of the phone call. The Confirmation Number confirms that the absence was reported/explained and can be provided to the school if you reported the absence but still received SafeArrival notifications. Staff can use the confirmation number to investigate why you received notifications.
Reporting Absences
Why cannot I see attendance options in my SchoolMessenger app account?
To School Staff: Check the parent/guardian’s email address in the SIS for the student(s). In order for the Attendance option to be shown, there must be at least one student associated with the parent’s email address in a SafeArrival-active school. In addition, the guardian category to which the parent belongs must be enabled for SafeArrival access.
Why cannot I see my child(ren) in my account?
To School Staff: Check the parent/guardian’s email address in the SIS for the missing student(s) and that the parent is associated with a guardian category that is SafeArrival-enabled).
Can I report absence when we are away on vacation?
Yes, but only if the reporting is being done during the School Term.
The toll-free phone line can be used from anywhere in Canada or the continental US. The website and app can be used anywhere you have Internet access.
Can absences be reported for days when school is not in session? Exam days?
To School Staff: Parents/guardians will not be allowed to report absences on Holidays and exam days that have been configured as such in the SafeArrival calendar. For exam days, parents will be asked to contact the school directly to discuss exam rescheduling or other arrangements.
Can extended absences be reported through the system?
Absences longer than the Maximum number of consecutive days that your system is configured for cannot be reported through SafeArrival and must be reported directly to school staff. Consecutive days may include two or more abutting reported absence spans which collectively exceed your maximum. Thus, if the maximum number of consecutive days is set to 5 days and parents try to report 7 days of consecutive absence, they will be asked to contact the school. Also, trying to report two absences for this 7-day period (5 and 2 days each) represents a 7-day consecutive absence, which, once again will be disallowed, and parents/guardians will be asked to contact the school.
What is the cut-off time? Why won’t the system let me edit/explain/delete an absence?
Absences for dates in the past cannot be edited, explained or deleted through the system. Parents/ guardians must contact the school.
On the day of the absence, absences can be edited, explained or deleted up to the cut-off time. Absences can always be explained during the school’s notification process.
An absence that was not reported in advance, but was marked by the school cannot be deleted by parents/guardians.
To School Staff: The cut-off time is configured by the District. See the Settings page, under Notifications, to find the cut-off time for your school. If the cut-off schedule is set to “At the time the first SafeArrival notifications are completed each day”, then the cut-off time will depend on when you start the notifications on a particular day and when they are finished.
Plans changed and my child went to school. How do I delete the reported absence?
You can delete a reported absence up to the cut-off time.
After the cut-off time, the absence cannot be deleted. If the child is at school, the reported absence is ignored. The final student attendance record is in the Student Information System.
To School Staff: If parents insist that a reported absence be deleted, you can do this on the Attendance screen.
How do I report a half-day absence?
If the student will be away for the morning, report a Late Arrival, with the arrival time being the start of afternoon classes.
If the student will be away for the afternoon, report an Early Departure, with the departure time being the end of morning classes.
Absence Confirmations
I reported my child’s absence but I did not receive a confirmation notice.
To School Staff: Check that the parent’s email address is correctly associated with the student in the Student Information System.
To School Staff: Check the parent’s communication preferences to ensure they have allowed for the delivery of attendance emails.
I received a confirmation notice but I did not report an absence.
First, check with other guardians of the student and the student (if it’s possible/likely they may have reported the absence).
To School Staff: Check the reported absence REPORTED BY and REPORTED VIA information on the Attendance page to see who reported the absence. NOTE: For privacy reasons, do not give out phone numbers or email addresses to parents/guardians.
Absence Notifications
I reported my child’s absence. Why did I still get notified of the absence?
If the absence was reported after the time class attendance was taken, you will be notified of the absence. For example, if you reported a Late Arrival with the expected arrival time of 9:30 and attendance was taken at 9:45, you will be notified of the absence, but not the other way around.
Why does the system keep calling me about the same absence?
If no one provides information concerning the absence type and the reason for the absence, the system will keep calling about the same absence until that information is provided, and it will only stop after a pre-configured length of time (which varies from district to another).
Why is the system using this phone number/email to send notifications?
SafeArrival uses the information provided to the school and stored in the Student Information System and any communication Preferences that message recipients have set up in their SchoolMessenger App account.
