
This page contains documentation for both the redesigned Ingestion tool within the Admin portal and the legacy Bulk Upload tool within the Library portal
Overview
ContentNav supports multiple ingestion methods, including CSV upload, Thin Common Cartridge (ThinCC), and API integration. This allows flexibility in how content is added to catalogs.
Administrators can:
-
Create content catalogs to group learning materials by content area, grade level, or any preferred classification.
-
Upload content in bulk using standardized CSV templates or industry-supported formats like Thin Common Cartridge.
-
Use secure APIs for scalable, automated ingestion and integration with other systems.
-
Download sample templates to ensure proper formatting and data validation.
Each content material is assigned a unique ID and can be enriched with metadata, ensuring discoverability and alignment with curriculum standards. Monitoring tools are also built-in to track ingestion status, identify errors, and confirm successful uploads.
Ingestion Tool
This section guides you through the redesigned Ingestion tool within the Admin portal.
After ingestion, it may take a few minutes to a couple of hours for the content to appear on the search page, depending on the volume of materials submitted.
Create content
You can create content within ContentNav through the Admin portal by uploading via CSV, ThinCC, or API. Refer to the section titled Upload content for more information.
Generate partner access token
A partner is created within ContentNav as part of the tenant onboarding process. Administrators can generate partner authentication tokens.
To generate a partner access token:
-
Log in to the Admin portal.
-
Click Partner Registry.
-
Select the Partner.
-
From the Technical tenant details section, click Generate Details to generate a Client ID and Secret code.
-
Enter the API documentation URL in a new tab.
-
Enter the Client ID and Secret code.
-
Click Execute to generate the access token.
Download templates
To make uploading easier and error-free, ContentNav provides downloadable templates for both CSV and Thin Common Cartridge formats.
To download:
-
Log in to the Admin portal.
-
Click Ingestion Tool.
-
Click Download Templates, and then select from:
-
CSV ingestion template
-
Sample thin common cartridge file
-
Save the file to your local device to use it as a starting point for uploading content.
CSV templates
CSV templates help you structure your content metadata correctly for ingestion and include the following mandatory fields:
-
UniqueId
-
ResourceFormat: Acceptable values are video_resource, webpage_resource, interactive_resource, image_resource, text_resource, audio_resource, file_download, instructional_strategy, lesson_plan, presentation, or html_resource.
-
Title
-
Description
-
URL
-
Operation
Use Excel or Google Sheets to fill the template, then export it as a .csv before uploading. Refer to Upload using CSV for more information.
Thin Common Cartridge template
A sample ThinCC file in .imscc format is available for users unfamiliar with packaging their content and includes the following:
-
A valid imsmanifest.xml file
-
LTI links or web links as materials
-
Metadata aligned with supported taxonomies (e.g., grade, subject, standards)
Use the sample as a reference to create your cartridges.
Refer to Upload using Thin Common Cartridge for more information.
Upload content
When uploading through CSV or API, if a partner or customer attempts to insert a material that already exists, the existing material will be updated.
Conversely, if a partner or customer tries to update a material that does not exist, a new material will be created in the specified catalog.
If a partner or customer tries to change the catalog ID of an existing material to a different catalog, the system will treat it as a new entry and create a material in the new catalog. The original material can be deleted manually if needed.
Upload using CSV
You can upload multiple digital learning materials into ContentNav using a CSV file. This method is ideal for bulk uploads when managing large libraries of content, especially if metadata such as title, subject, grade, and standards are pre-organized in a spreadsheet.
The maximum number of materials per CSV for ingestion is 100k.
The following fields must be included in your CSV:
-
UniqueId
-
ResourceFormat: Acceptable values are video_resource, webpage_resource, interactive_resource, image_resource, text_resource, audio_resource, file_download, instructional_strategy, lesson_plan, presentation, or html_resource.
-
Title
-
Description
-
URL
-
Operation
You can upload the CSV file in two ways:
-
Catalog registry
-
Ingestion tool
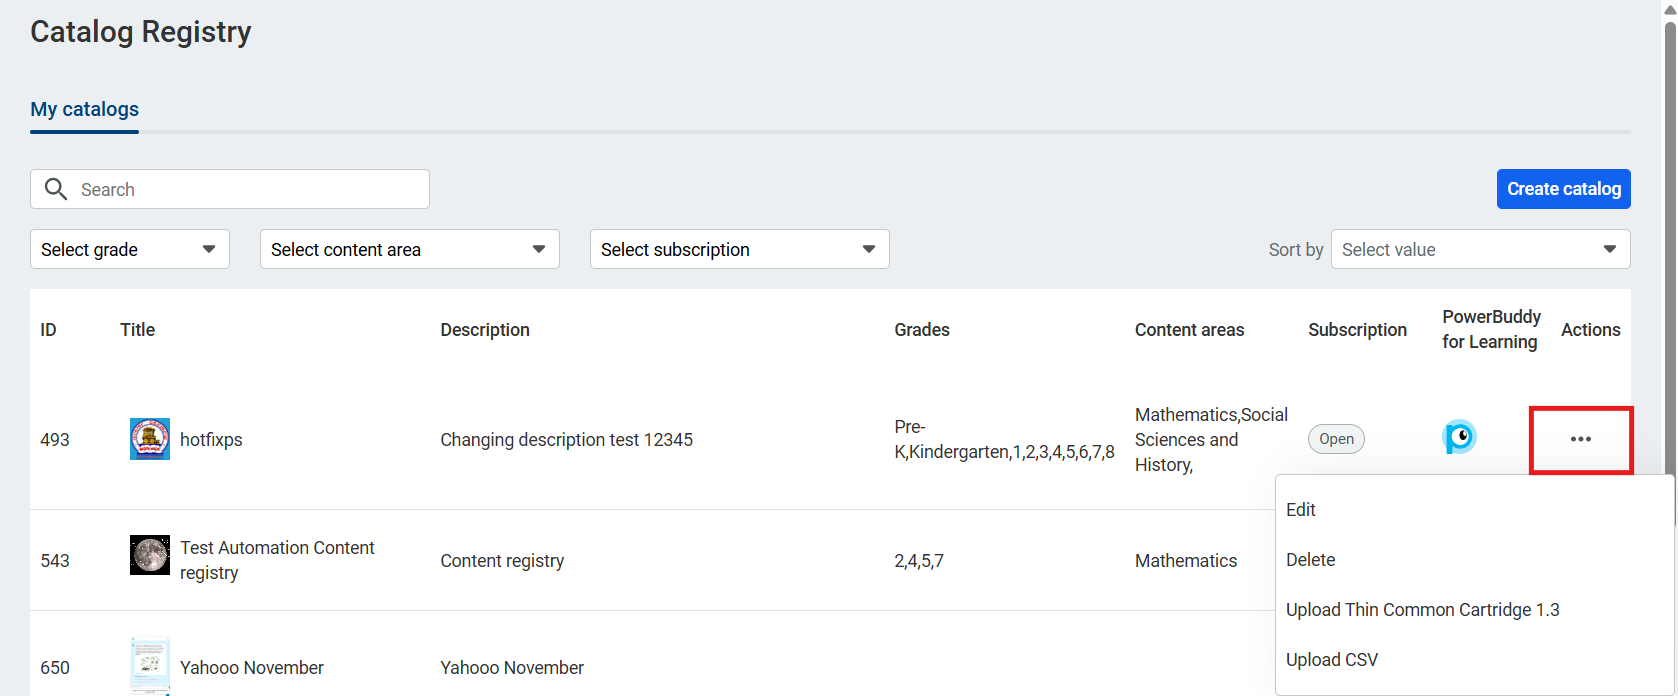
To upload through the Catalog registry:
-
From the menu, click Catalog Registry.
-
Click the ellipsis (⋮) icon for the catalog, then select “Upload CSV.” A modal appears.
-
Drag and drop the CSV file or click browse to upload.
-
Click Upload.
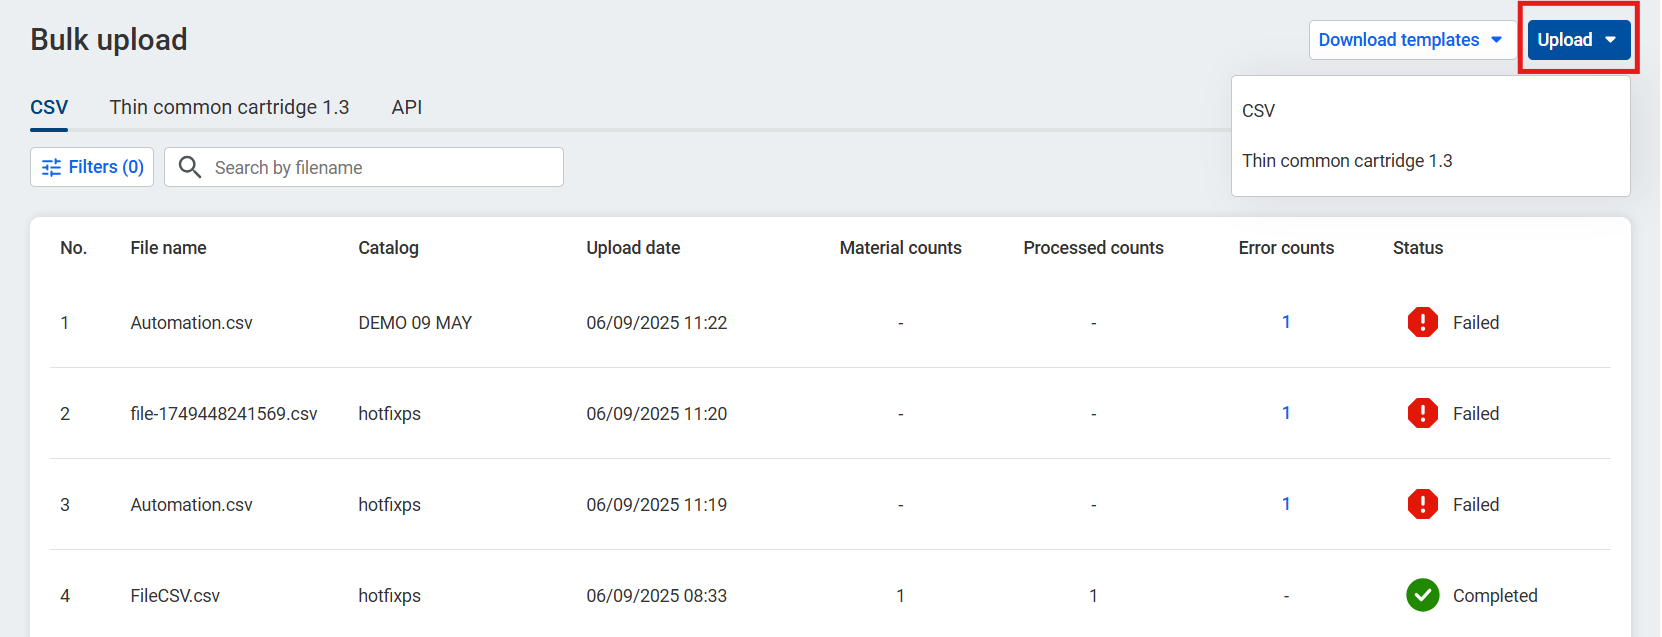
To upload through the Ingestion tool:
-
From the menu, click Ingestion Tool.
-
Click Upload and select CSV. A modal appears.
-
Select Catalog to choose the destination catalog.
-
Drag and drop the CSV file or click to add.
-
Click Upload.
You will receive a confirmation message once the content has been successfully processed.
To monitor the status of your CSV ingestion:
-
From the menu, click Ingestion Tool.
-
Monitor the progress of specific uploads in the Status field of the CSV file.
-
The Status field in the CSV List indicates the status of your CSV ingestion.
-
Use the Search bar to search for a specific file.
-
Click Processed Count or Error Count for details of uploaded material and details for each material’s ID.
-
Click Filters to narrow the list by Uploaded date range and Catalog.
-
-
Click Refresh to view the updated status.
Upload using Thin Common Cartridge
ContentNAV supports the ingestion of learning materials using the IMS Thin Common Cartridge (ThinCC) 1.3 format. This enables the streamlined integration of external learning materials via LTI links and metadata, eliminating the need to upload full content packages.
The Thin Common Cartridge (ThinCC) is a lightweight packaging format defined by 1EdTech (formerly IMS Global). It contains metadata and links (typically LTI launch URLs) to external learning tools, enabling seamless integration into platforms like ContentNAV.
Prerequisite for ingestion
A Unique ID is mandatory for every resource uploaded.
When uploading content using ThinCC, each resource must include a Unique ID to ensure successful ingestion and accurate tracking within the system.
Upload location
For each resource in your ThinCC package, the Unique ID must be included in the resource metadata tag, within the <lomr:identifier> element of the manifest file.
-
The <lomr:entry> field must contain the Unique ID.
-
The Unique ID should be unique within your organization (school district or publisher account) to avoid conflicts during ingestion.
-
The Unique ID can be any value you choose, as long as it is unique within your organization. Some examples are:
-
math-content-grade5-lesson01
-
ENG-2025-ModuleA-Resource3
-
123e4567-e89b-12d3-a456-426614174000 (UUID format if preferred)
-
To upload using ThinCC:
Ensure your .imscc ThinCC file meets the prerequisite format.
-
From the menu, click Ingestion Tool.
-
Click Thin common cartridge 1.3.
-
Click Upload, and select Thin common cartridge 1.3. A modal appears.
-
Select the catalog you want to upload to. LTI catalogs are prefixed .lti.
-
Drag and drop or browse to select the .imscc file.
-
Click Upload.
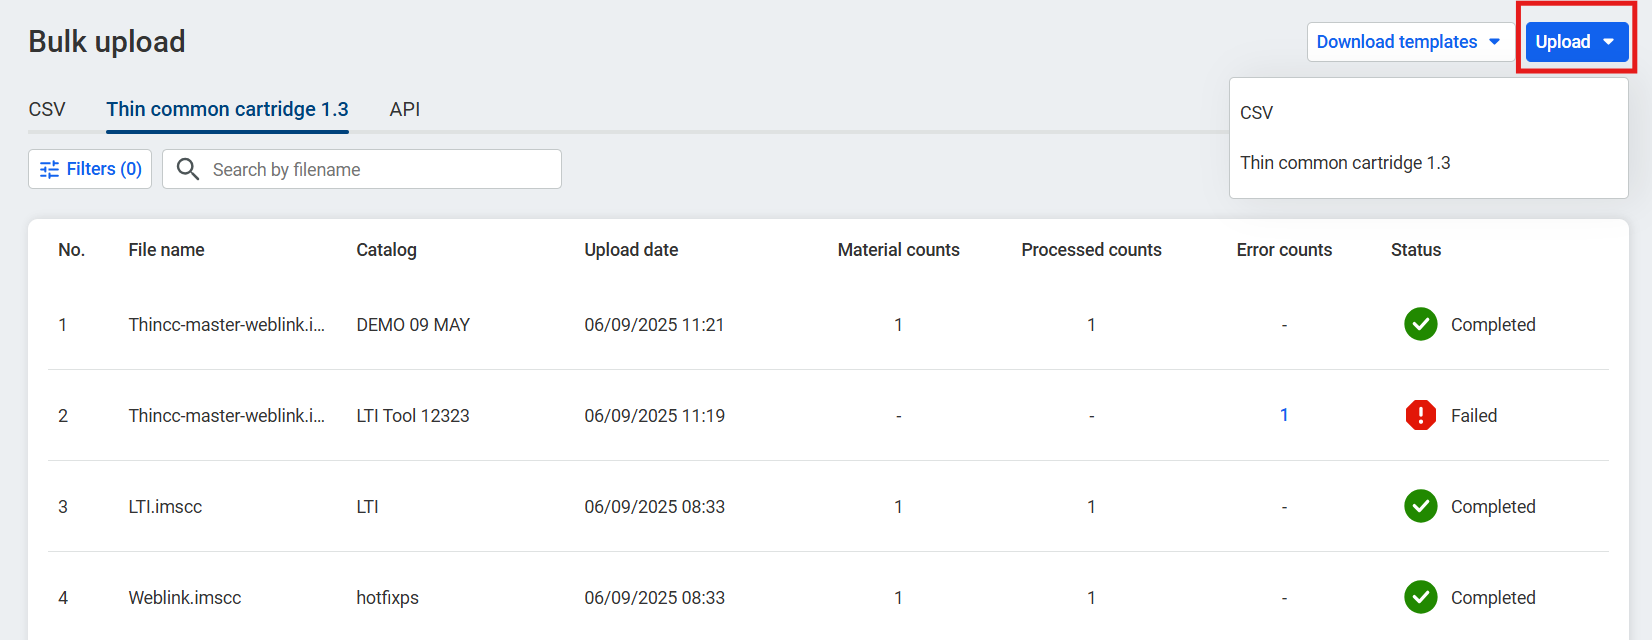
To monitor the status of a ThinCC ingestion:
-
Click Ingestion Tool.
-
Click Thin Common Cartridge 1.3.
-
Monitor the progress of specific uploads in the Status field.
-
The Status field in the Thin common cartridge list indicates the status of your data ingestion.
-
Use the Search bar to search for a specific file.
-
Click Processed Count or Error Count for details of uploaded materials and details for each material’s ID.
-
Click Filters to narrow the list by Uploaded date range and Catalog.
-
-
Click Refresh to view the updated status.
Upload using API
ContentNav also supports programmatic uploads using secure APIs. This is ideal for automated content publishing from other platforms or internal content systems.
Contact your PowerSchool representative to establish your API connection and begin uploading content via API.
The maximum allowed materials per API request is 100.
To access a list of API request uploads:
-
From the menu, click Ingestion Tool.
-
Click API.
The Request upload date lists the timestamp of the upload.
Required fields
|
Field |
Type |
Example |
Required for |
|---|---|---|---|
|
Id |
UUID |
652b9d9e-14e3-11ee-be56-0242aac120002 |
All |
|
operation |
string |
insert, update, or delete |
All |
|
title |
string |
Title of content |
Insert, Update |
|
description |
string |
Description of content |
Insert, Update |
|
url |
string |
Insert, Update |
|
|
contentFormat |
string |
webpage_resource, etc. |
Insert, Update |
|
productId |
integer |
123 |
All |
Optional Fields
To monitor the status of an API ingestion:
-
Click Ingestion Tool.
-
Click API.
-
Monitor the progress of specific uploads in the Status field.
-
The Status field in the API List indicates the status of your API ingestion.
-
Click Processed Count or Error Count for details of uploaded materials and details for each material’s ID.
-
Click Filters to narrow the list by Uploaded date range. To reset, click Clear All.
-
-
Click Refresh to view the updated status.
Manage data (Legacy system)
This section provides information on managing data ingestion within the legacy Library portal.
Download a sample CSV
You can download a sample CSV file from the Bulk Upload page.
To download and access the sample file:
-
Log in to the Library portal.
-
Click Catalog.
-
From the ContentNav Catalog dropdown, click My Content.
-
Click the Create menu and select Bulk Upload.
-
From the Upload List, click Download Ingestion Template.
Upload files via CSV
You can add content to the Library through a CSV upload. You can upload one file or upload several in a bulk upload.
To upload content via CSV files:
-
Log in to the Library portal.
-
Click Catalog.
-
From the ContentNav Catalog dropdown, click My Content.
-
Click the Create menu and select Bulk Upload.
-
Click Browse.
-
Select the appropriate CSV file on your device.
-
Click Upload.
Required fields
The following fields are required for ingesting content via CSV upload:
-
UniqueId
-
ResourceFormat: Can be video_resource, webpage_resource, interactive_resource, image_resource, text_resource, or audio_resource.
-
Title
-
Description
-
Url
-
Operation
-
isCurated
-
ProductId
You can also access a list of previous uploads from the Bulk Upload page.
Each previous upload will display the:
-
File Name
-
Uploaded Date
-
Material Count
-
Processed Count
-
Error Count
-
Status
Click on the Error Count cell to access a list of reasons why an upload failed.
Monitor the status of CSV ingestion
After you upload a CSV file, or multiple files, you can monitor the status of the job from the Bulk Upload page.
To access this list:
-
Log in to the Library portal.
-
Click Catalog.
-
From the ContentNav Catalog dropdown, click My Content.
-
Click the Create menu and select Bulk Upload.
-
The Status field in the CSV List indicates the status of your CSV ingestion.
-
Use the Search bar to search for a specific file.
-
Click Processed Count or Error Count for details of uploaded materials and details for each material’s ID.
-
-
Click Refresh to view the updated status.
API content ingestion
Contact your PowerSchool representative to establish your API connection and begin uploading content via API.
To access a list of API request uploads:
-
Log in to the Library portal.
-
Click Catalog.
-
From the ContentNav Catalog dropdown, click My Content.
-
Click the Create menu and select API. You can view requests by Requested Uploaded date.
-
Click Refresh to view updated status.
There is no limit on the number of API calls that can be made in one day.
Required API fields
The following fields are required when making a content ingestion API call:
|
Field |
Supported Value |
Example |
|---|---|---|
|
Id |
UUID |
652b9d9e-14e3-11ee-be56-0242aac120002 |
|
operation |
insert update delete |
insert |
|
title |
String |
Title of Content |
|
description |
String |
Description of Content |
|
url |
String |
|
|
contentFormat |
String |
webpage_resource |
|
productid |
Integer |
123 |
|
isCurated |
Boolean |
true |
-
The Id must be a unique UUID for that tenant.
-
contentFormat values can be video_resource, webpage_resource, interactive_resource, image_resource, text_resource, audio_resource, html_resource, file_download, lesson_plan, instructional_strategy, or presentation.
-
webpage_resource can be used for Microsoft Word, PDF, PowerPoint, XLS, etc. files if they are hosted as a URL.
-
isCurated should be marked as 'false.’
The ProductId associates content with the corresponding catalog. You can find the ProductId in the Admin Portal. Navigate to the Learning Registry tab and select Catalog Registry. The Product Id is displayed in the first column.
Monitor the status of API ingestion
After you upload an API file, or multiple files, you can monitor the status of the job from the Request API List page.
To access this list:
-
Log in to the Library portal.
-
Click Catalog.
-
From the ContentNav Catalog dropdown, click My Content.
-
Click the Create menu and select Bulk Upload.
-
Select Thin Common Cartridge 1.3.
-
The Status field in the CSV List indicates the status of your API ingestion.
-
Use the Search bar to search for a specific file.
-
Click Processed Count or Error Count for details of uploaded materials and details for each material’s ID.
-
-
Click Refresh to view the updated status.
Create a content catalog
Administrators can create one or more content catalogs. Catalogs are groupings of content that administrators manage from the Content Registry.
-
Log in to the Admin portal.
-
Click Catalog Registry, and click Create catalog.
-
In the Catalog registry, provide the following catalog details:
-
Name
-
Logo
-
Partner Name
-
Description
-
Website
-
Content Access
-
-
Select PS (PowerSchool) users can move content from My Content to this catalog, if applicable.
-
Select Catalog content can be used for PowerBuddy for Learning, if applicable.
-
In the Additional details, select the Content Areas.
-
Select Grade Level.
-
Select Audience.
-
Click Save.
Your saved content material will be assigned a Product ID, which is essential for the content ingestion process when uploading via CSV or API.