Courses: Attendance
Course Admins can navigate to the Attendance area of courses they administer in order to record whether course members are present, absent, late, or excused for class. Attendance-related comments can also be added for students on individual days.
Taking Attendance
- From your course, select Attendance.
- Click Start, or click into a cell within a column to make attendance adjustments as needed.
- Click an icon to mark the student either Present, Absent, Late, or Excused.
Click Save Changes to complete.
No changes will be saved and no attendance data will be stored if a course admin navigates away from the Attendance page or switches weeks or sections in the Attendance page while the attendance status is Not Saved.
Class Attendance Status
The Class Attendance Status row serves as an indication of whether or not attendance has been taken for a specific date.
Only 4 statuses can display in this row:

Start
- Start displays on the current day and any days in the past when the course was scheduled to meet.
- Course admins can click Start to fill that day’s attendance column with present icons.
- Course admins can also click directly into cells to start attendance. After doing so, course admins will notice that the Class Attendance Status for that day changes from Start to Not Saved even though they didn’t click Start.
Not Saved
Not Saved displays on columns in which a course admin has made changes or clicked Start, but hasn’t clicked Save Changes.
No changes will be saved and no attendance data will be stored if you navigate away from the Attendance page or switch weeks or sections on the Attendance page while the attendance status is Not Saved.
Saved
- Saved displays on columns where attendance has been updated and the course admin has clicked Save Changes.
Saved only displays for current or past days where attendance has been taken and saved.
Days in the future will never show Saved, even if a teacher has already added comments or attendance exceptions. That may seem counterintuitive at first, but remember that the attendance really hasn’t been taken for that day. We don’t want to confuse course admins on current days regarding whether or not attendance has been fully taken.
Blank
- The attendance taken status will be blank when the day is in the future and the course admin isn’t currently making changes to that day.
- The status will be blank for days in the past when a class wasn't scheduled to meet.
Comments
You can use the attendance area to leave a comment about a student on a particular date. To leave a comment, follow these steps:
- Select Attendance from the Course Profile.
- Move the pointer over a cell to edit the student’s attendance for that day.
- Click the comment bubble icon from the student's cell.
- Enter your comment into the pop-up.
- Check the box to Display to Student (optional).
Click Save Changes to complete.
If Display to Student is checked, Comments made in the Attendance area will display in the student attendance report. If the box is unchecked, comments will be accessible to Course Admins and System Admins.
Change Date View
Click the calendar icon to select a specific date, or use the navigation arrows to display the previous or next week, respectively.
Meeting Days
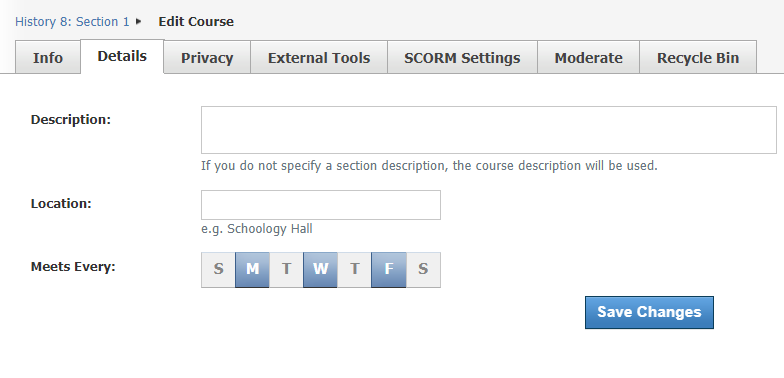
Attendance reflects the Meetings Days configured in the Course Info area. Course Admins can assign meeting days in the Course Information area with the following steps:
- Click Course Info from the menu.
- Select Edit Info in the drop-down menu.
- Toggle into the Details tab.
- Click the day(s) of the week on which your course meets.
- Click Save Changes to complete.

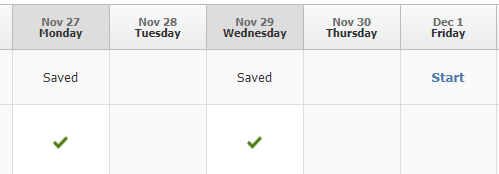
When entering attendance, the Start option will display by default for the days on which your course meets. However, you can still enter attendance for the other days by clicking directly into the cell.
For example, a course that meets on Mondays, Wednesdays, and Fridays will see the following in the Attendance chart:
View Attendance Reports
Move the pointer over the student’s cell in the Attendance chart to review the number of Absent, Late, and Excused markings and comments the student has received while in your course.
Click the bar graph icon in the Attendance view to see a summary of their attendance and any comments.
Print Attendance Reports
You can print Attendance Reports for students in your course by clicking on the Print icon.
Select individual or multiple students and print the reports from the browser.
