Creating a Course
Courses are the structure of your online classroom. They are the space where students and teachers interact; the space where all the course materials will be housed, viewed, and completed. Through your courses, every message, update, assignment, etc. is specific to course members only. Your online course contains all the necessary tools for building materials designed to engage students and facilitate interaction.
- Enterprise instructors may not see some of the options below, depending on the settings in place at your school or organization. Contact your Support Contact with any questions.
- Schoology mobile apps do not support course creation.
- There is no limit to the number of courses you can create.
To manually create a course:

- From the navigation bar, click Courses.
- Click My Courses from the drop-down menu.
- From the Courses page, click the Create Course button
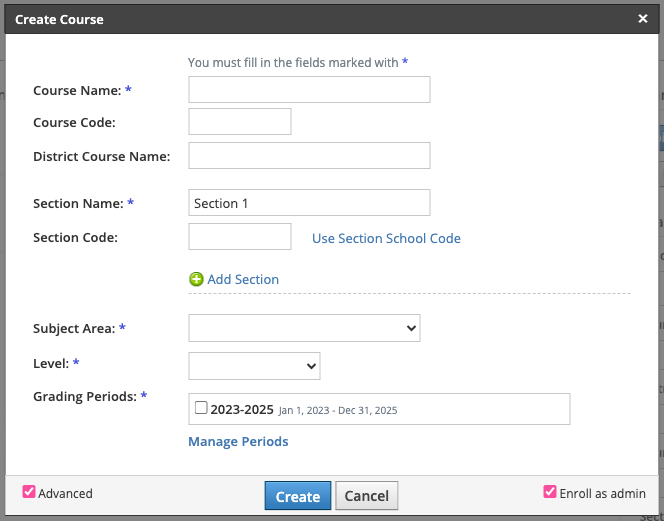
- In the Create form:
- Enter a Course Name; for example, "English 101."
- Rename the Section Name by clicking into the area that says Section 1.
- Select a Subject Area.
- Enter a Grade Level, or select a grade range.
- Add a Grading Period.
Click Create to finish.
If you are an instructor in an Enterprise organization, additional fields will be available to you. A grading period will only be available if the System Administrator has created a list of designated grading periods. If you don't see a grading period for your course, please contact your Support Contact. You can also add a Course Code and Section Code.
District Course Name and Curriculum Maps
When creating a course, you can add a District Course Name to link your Schoology course to Curriculum Maps. By connecting your courses you can easily link a map across buildings and school years, saving teachers and administrators time by providing the linked map immediately when they view maps from Schoology.
District Course Names are manually entered when creating a course or through an import, unless you are using the PowerSchool SIS integration. If you are using a PowerSchool SIS integration, then District Course Names will automatically populate based on the Course Code being imported from SIS.
A District Course Name can be changed, however it is not recommended. District Course Names are typically used for various integrations and if it is changed on a course in Schoology, it will break that course's Curriculum Map link.
Course Name vs. Section Name
Each course has a Course Name, and a Section Name. This naming convention allows you to create multiple sections for the same course in your district. For example:
Course Name: English 101
Section Name: Section 1
Creating Additional Sections
Create a new section under an existing course
If you already have a course, and you'd like to add another section under that same course, use the Add Section option to create a section. This option does not copy any of the course materials into the new section.
- Click Courses.
- Click My Courses from the drop-down menu.
- Click Add Section next to the desired course.
- Click Create.
OR
Create a copy of a current course section
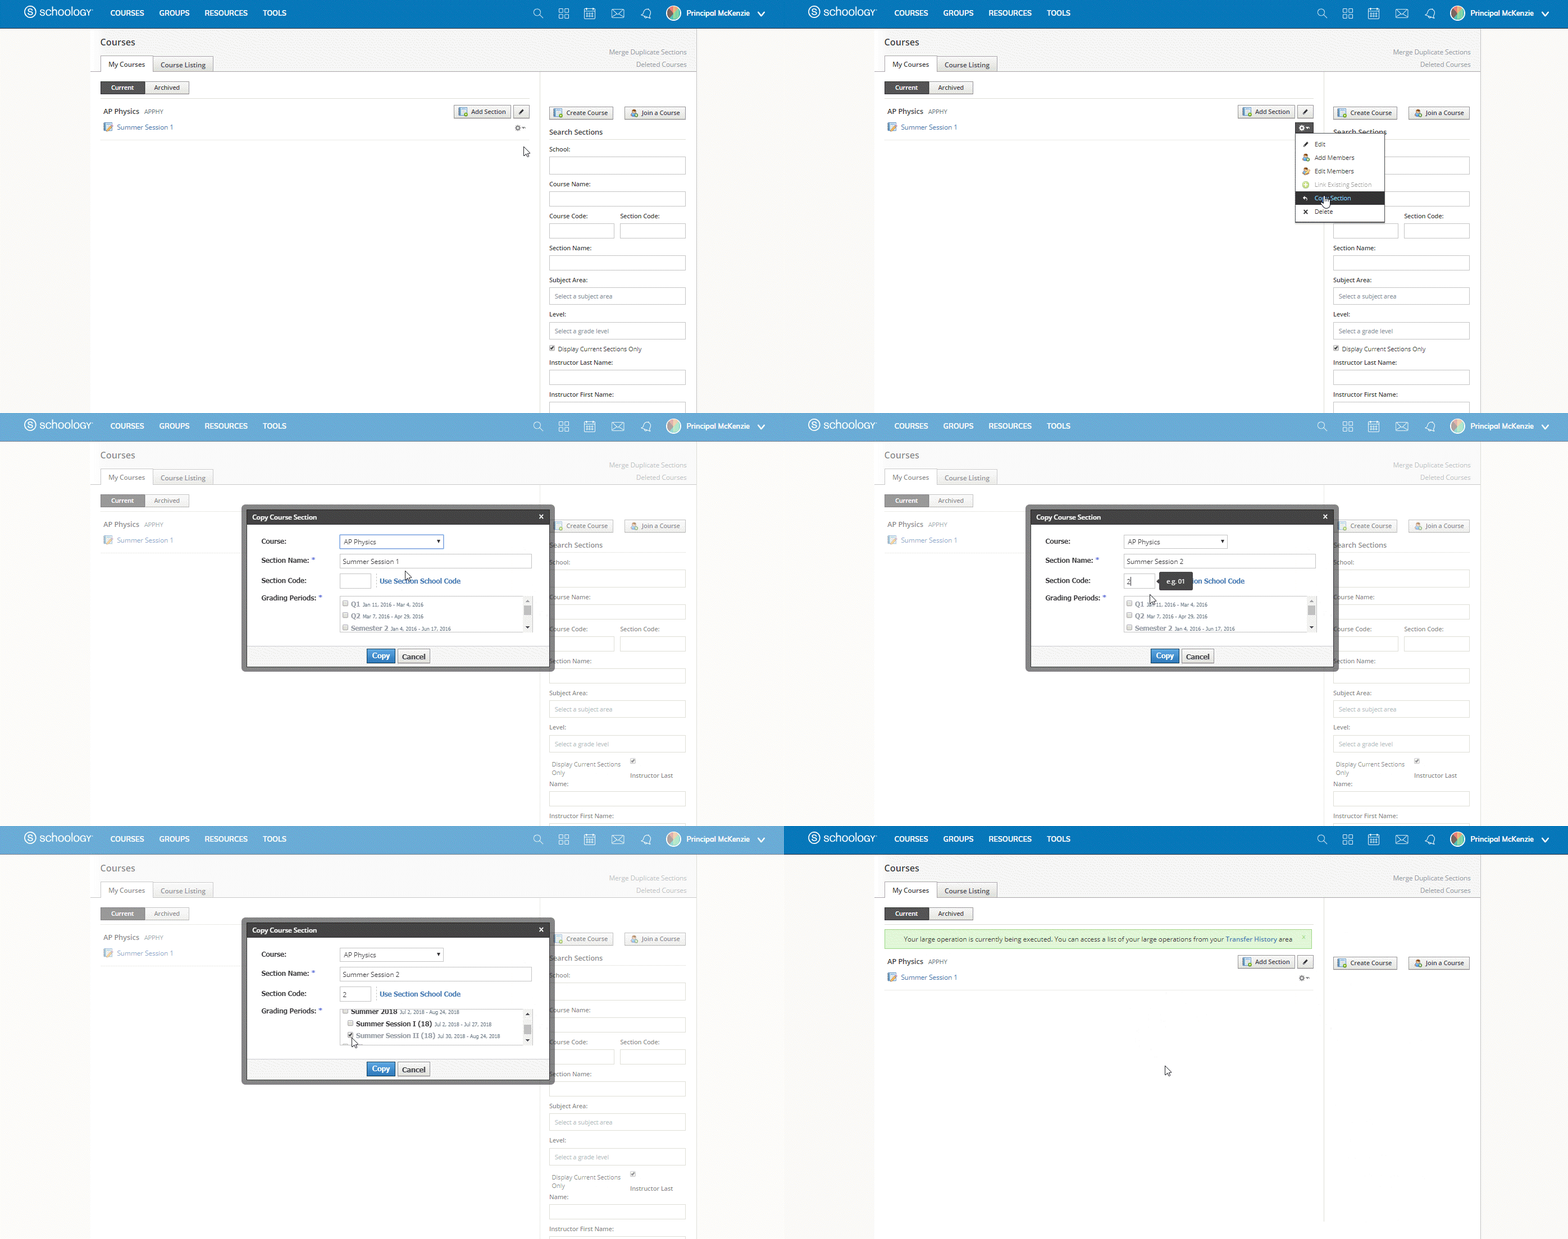
Use the Copy Section option to create a clone of an existing section you have created under the course. This option copies over the course materials you've built out in the existing section. This is a good way to add a new class with the same materials, but a different roster of students. Since this operation also copies your existing materials and content, check your Transfer History to follow the progress of the section copy.
- Click Courses in the header.
- Click My Courses from the drop-down menu.
- From the section you'd like to copy, click the gear icon.
- Select Copy Section from the drop-down menu.
- Complete the Copy Course Section form.
Click Copy.
 Upon copying a section, you will receive a notification that the process is being executed and that you can access a list of large operations from the Transfer History area. Once the copy process shows completed in Transfer History, the course section will be available from Courses.
