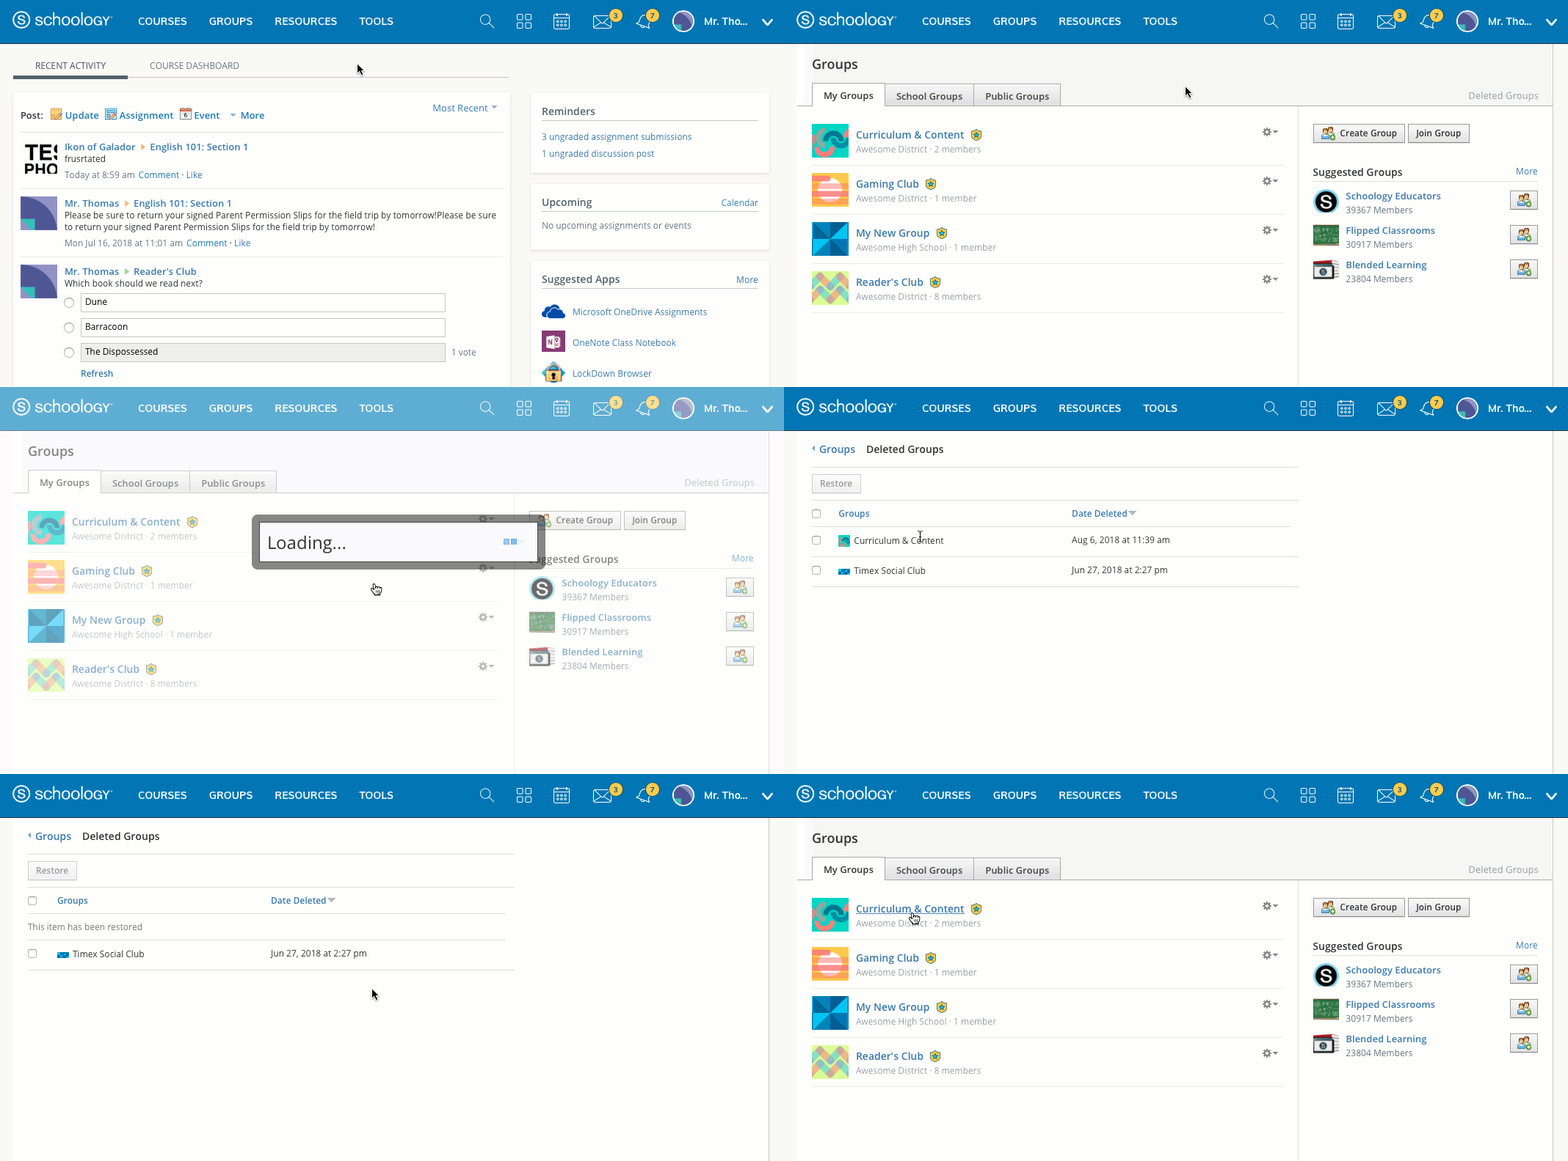
Guide to Schoology Groups
Groups are an excellent way to connect with people locally and worldwide. Depending on the permission settings at the administrative level, educators, parents, and even students can create or join Groups. They can be used to connect, collaborate, share materials, learn “best practices,” and more. There are so many different ways to use the Groups feature, they may become a vital part of your educational management.
Create and Join Groups
Create Groups
You can create a group from Groups in the top menu of your homepage. To create a group, follow these steps:
- Click Groups at the top of Schoology.
- Select My Groups.
- Click Create Group on the right.
- Fill out the Group form.
- Write a Description (optional).
- Set Privacy to customize who can view the group.
- Set Access to customize who can join the group.
- Click Create to finish.
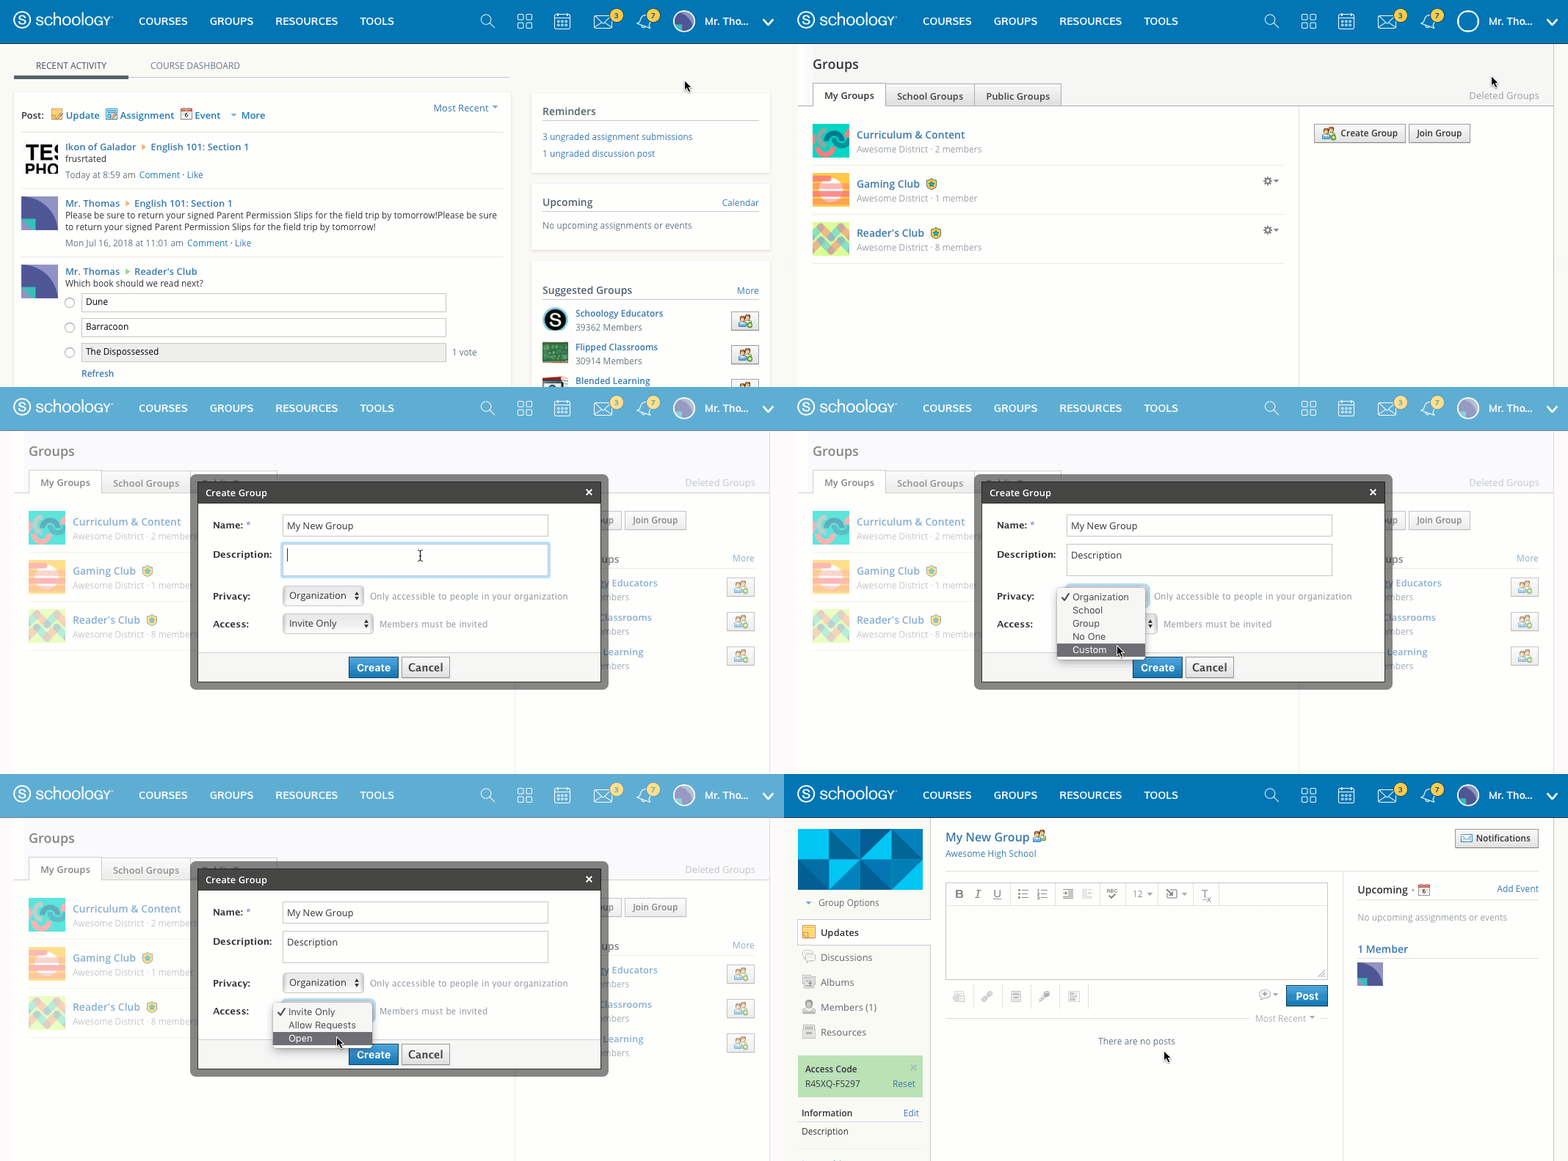
Once you have created a group, you are now a Group Admin. In your Groups drop-down menu, groups you administer are marked by the shield icons.
Join Groups
To join an existing Group:
- Click Groups at the top of Schoology.
- Select My Groups.
- Click Join Group on the right.
- Enter the Group Access Code.
- Click Join.
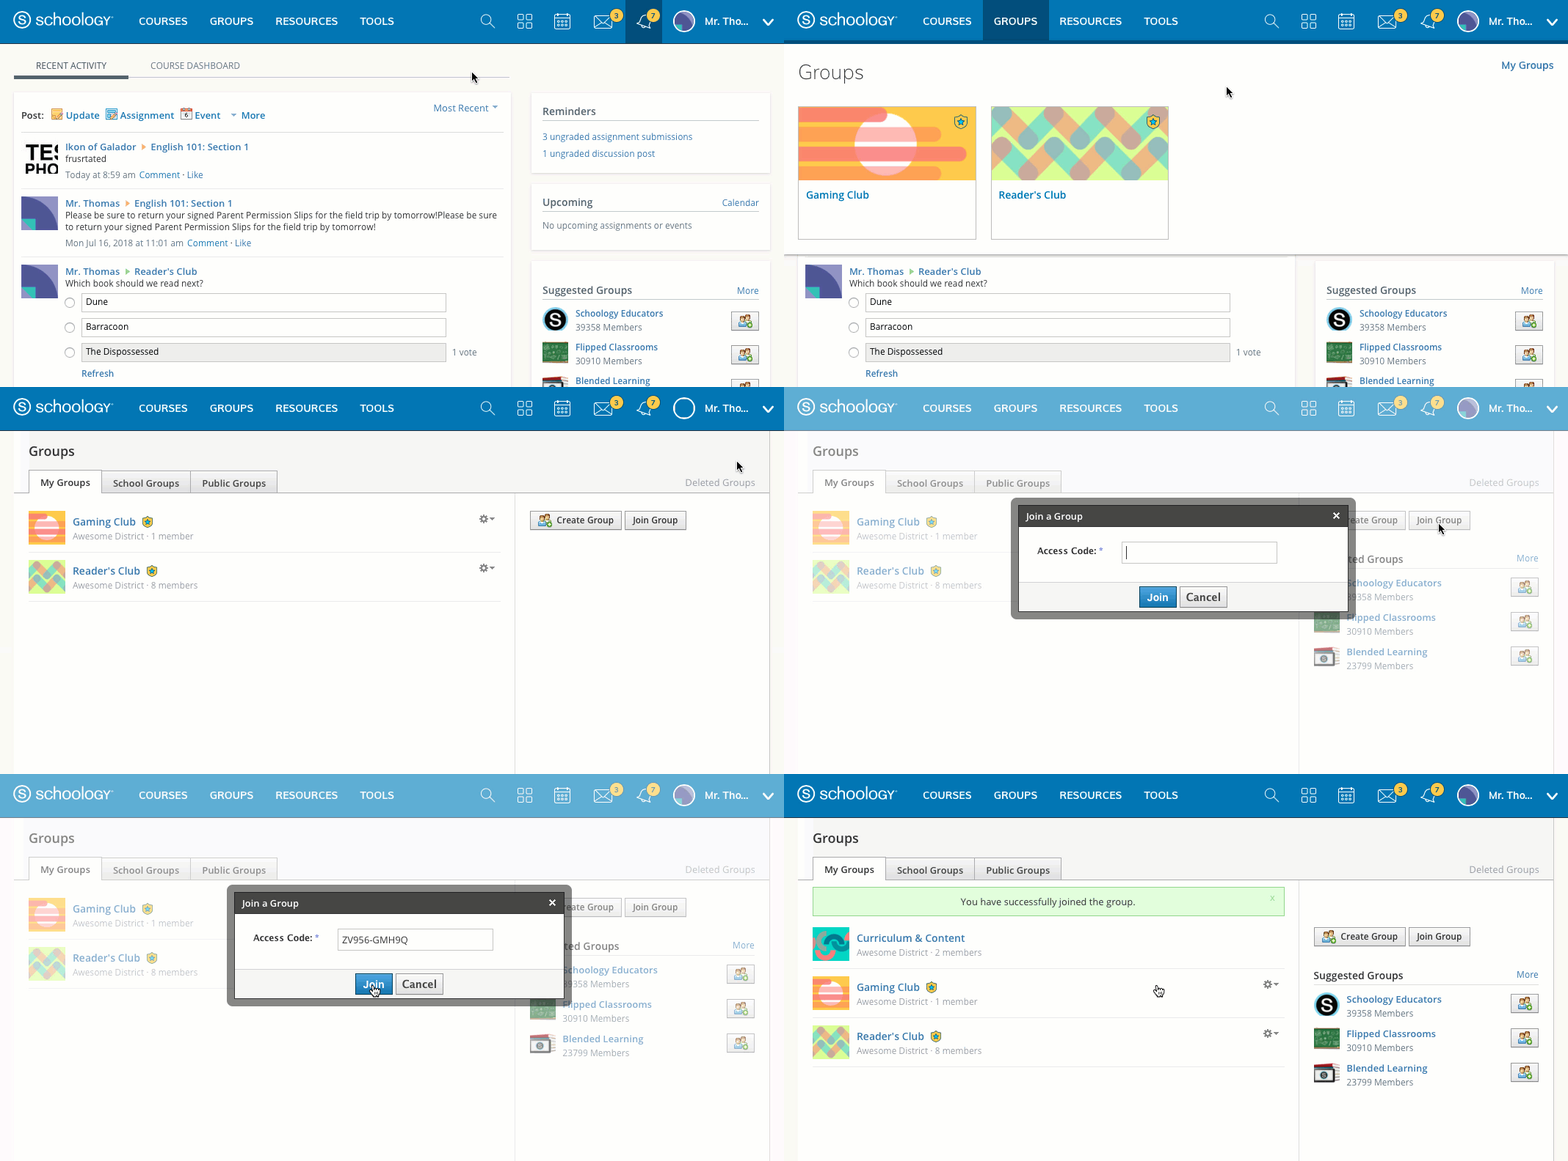
The format of the group access code should be XXXXX-XXXXX (10 digits). Contact the group administrator for the access code.
Once you join a group, you will begin receiving updates, posts, comments, and event notifications from the group. To manage which notifications you receive, see our article on Notifications.
Reorder your Groups Menu
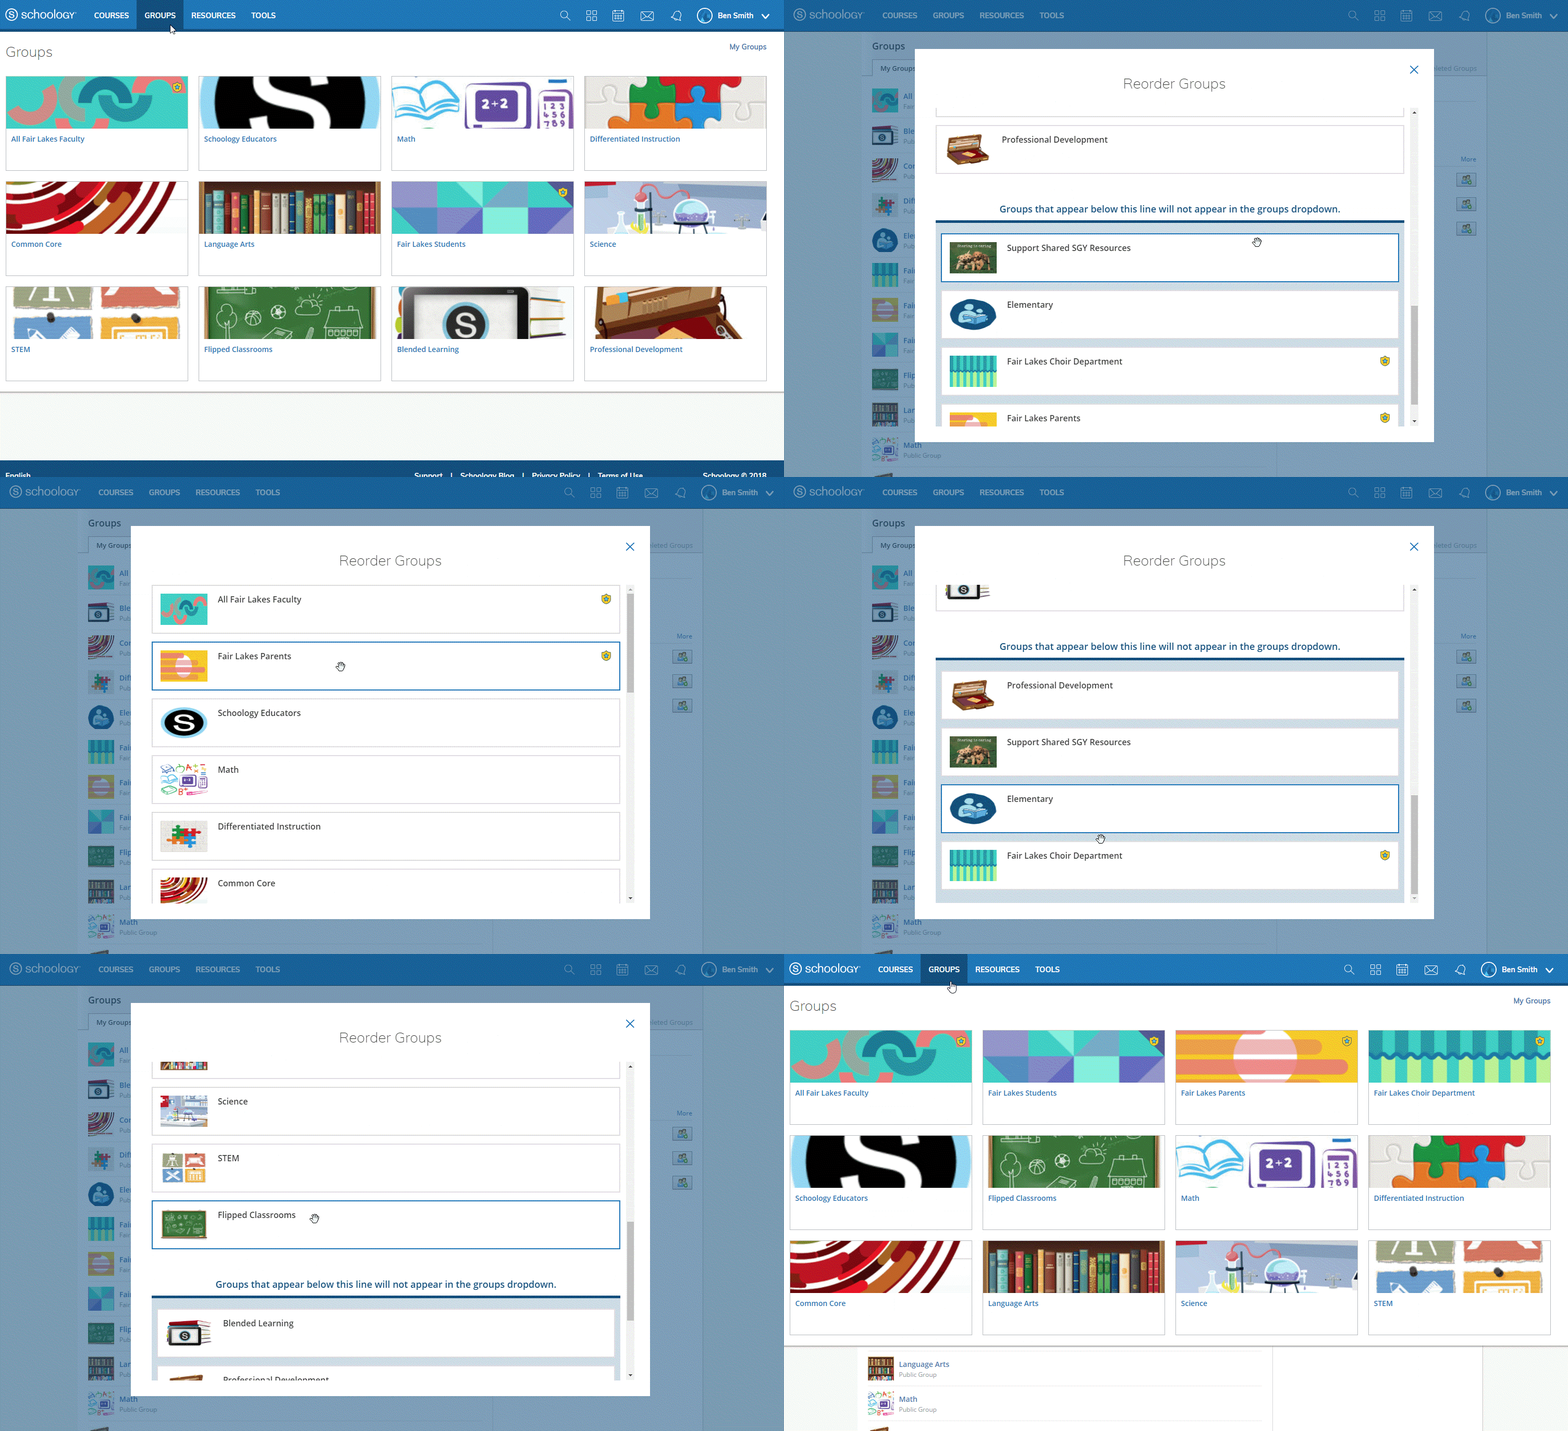
The Groups drop-down menu displays 12 groups at a time. To re-order your Groups drop-down menu:
- Open the Groups drop-down and click My Groups.
- From the My Groups page, click Reorder Groups.
- In the reorder modal, drag and drop the groups in which you're enrolled. If you're enrolled in more than 12 groups, you'll see a line identifying which groups will appear in the drop-down menu.
Click the X to save and exit the modal.
This does not change the order in which the groups appear on the My Groups page, only the Groups drop-down menu.
Groups at Your School
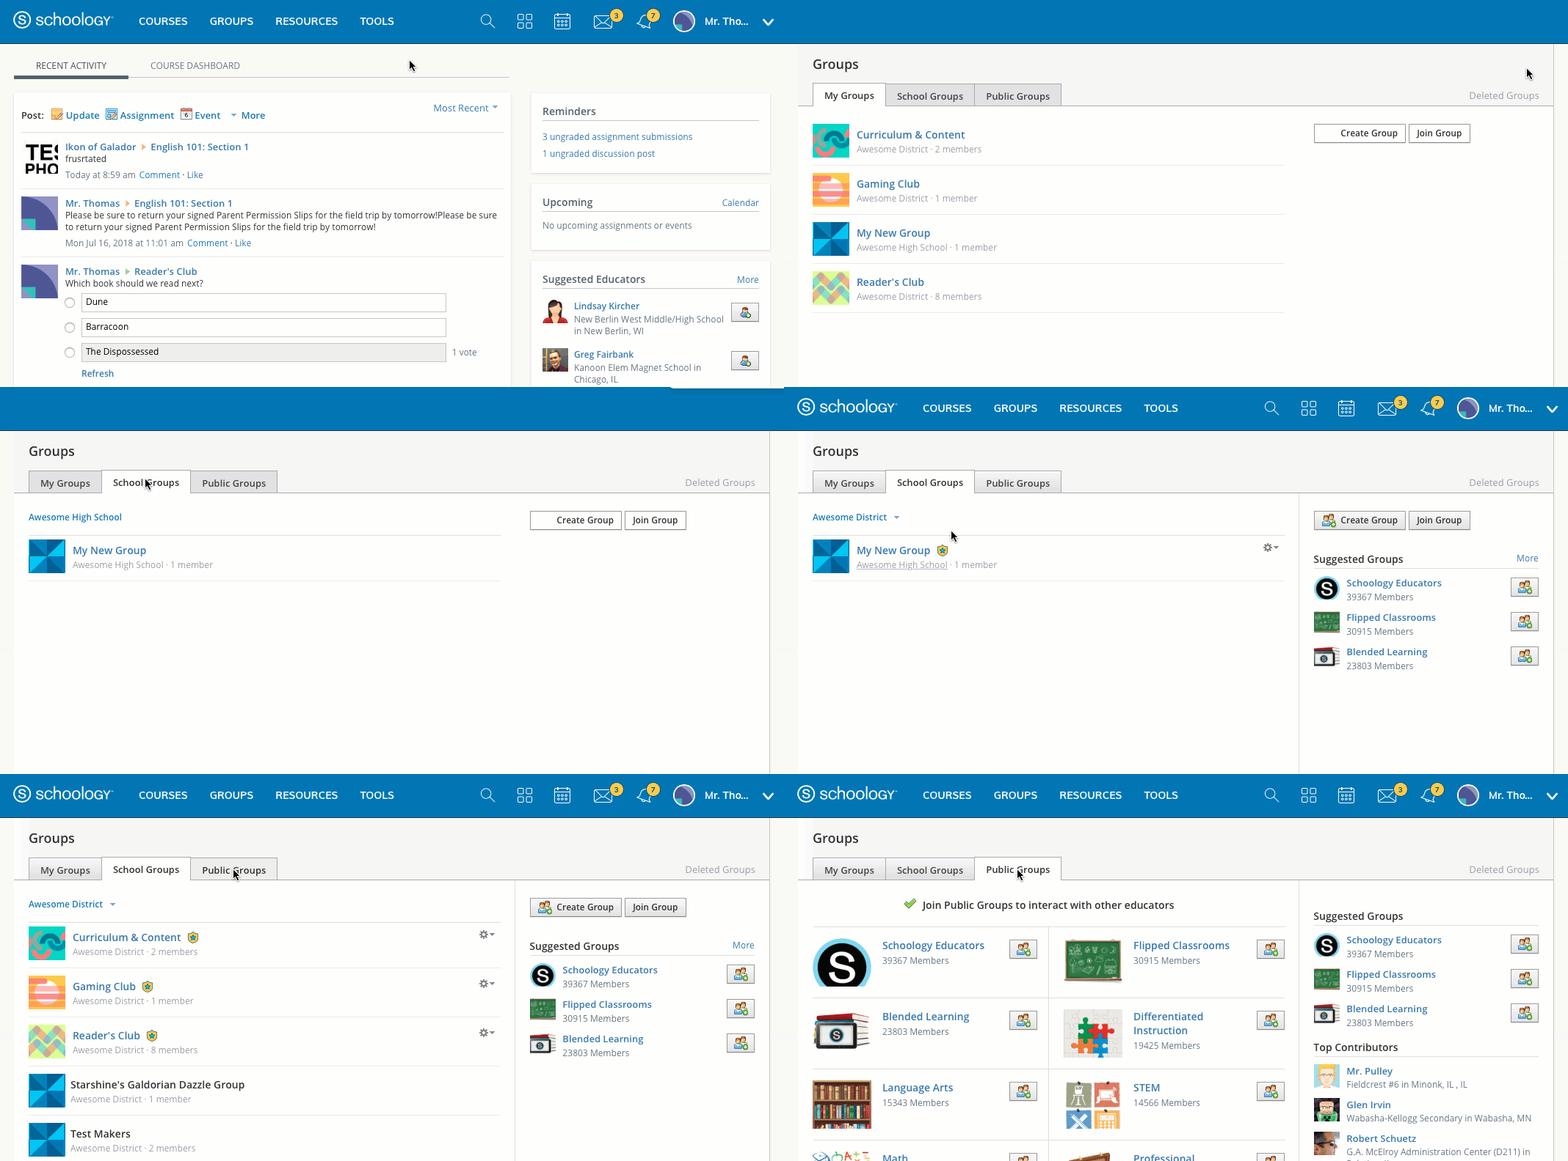
You can see all groups in which you are enrolled, as well as groups at your school, by clicking Groups, then My Groups on the right. Click the School Groups tab to see groups at your school. Use the drop-down menu to choose different schools within your organization (if applicable).
Schoology Public Groups
Schoology has also created open groups based on areas of study and teaching techniques. You can view and join the Schoology Public Groups by clicking the Public Groups tab.
Group Updates
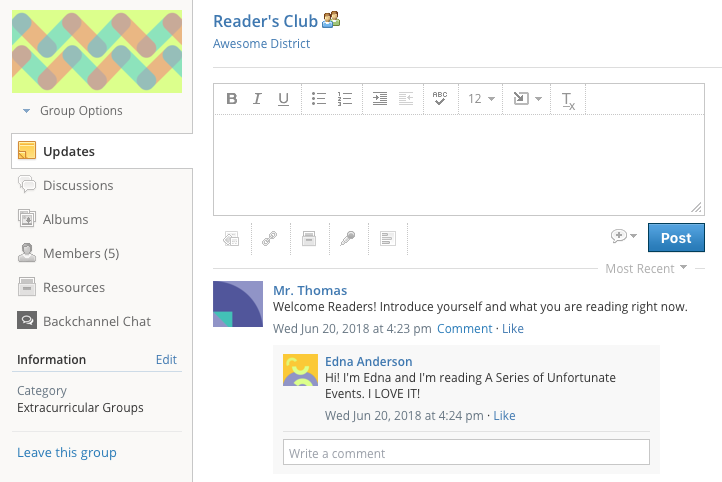
Updates are meant to be brief messages posted to your group. When updates are posted to your group, they will appear in the Updates section of your group as well as on each in the Recent Activity area of members in your group.
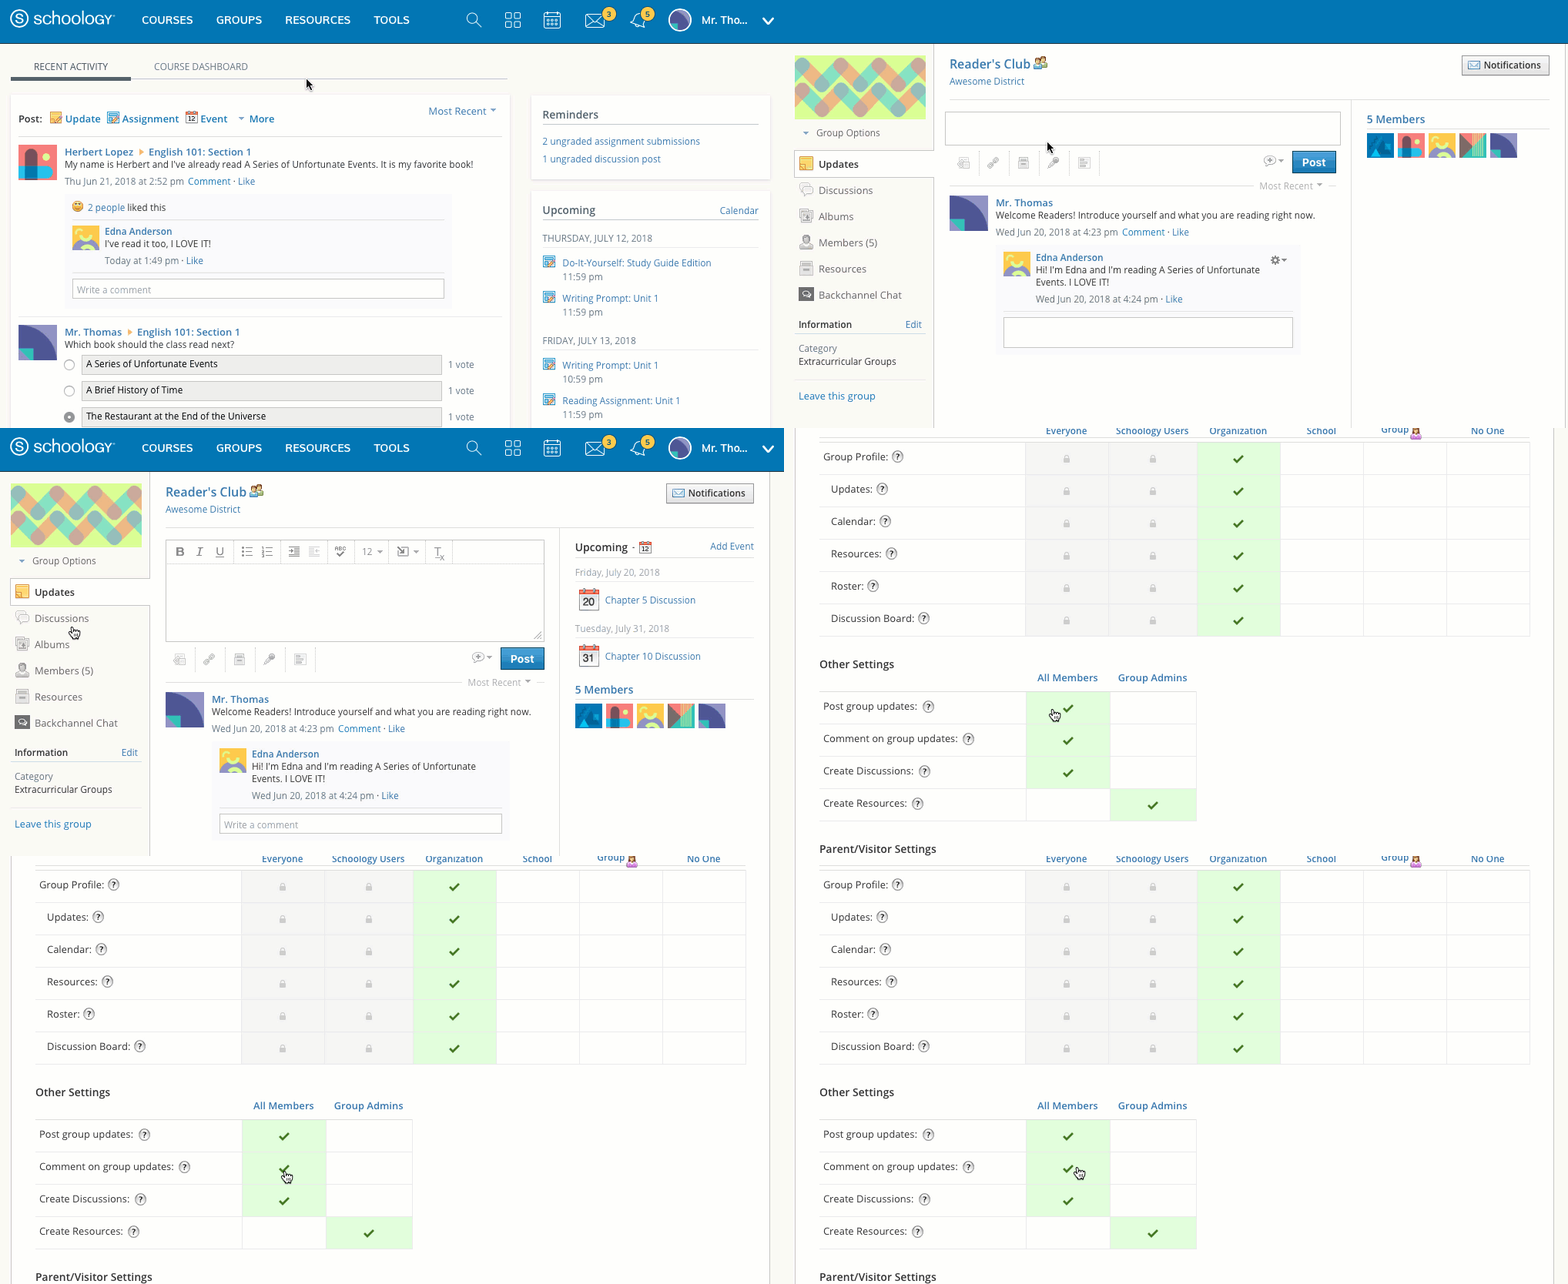
By default, any member can post updates. If you are a group administrator, you can limit this ability to only other group administrators. To do so, follow these steps:
- Click Groups in the top menu and select a group you administer.
- Go to Group Options in the left menu of the group page and click Edit Privacy/Group Settings.
- Click All Members in the Post group updates row to enable or disable this feature.
- Click Save Changes to complete.
Group Polls
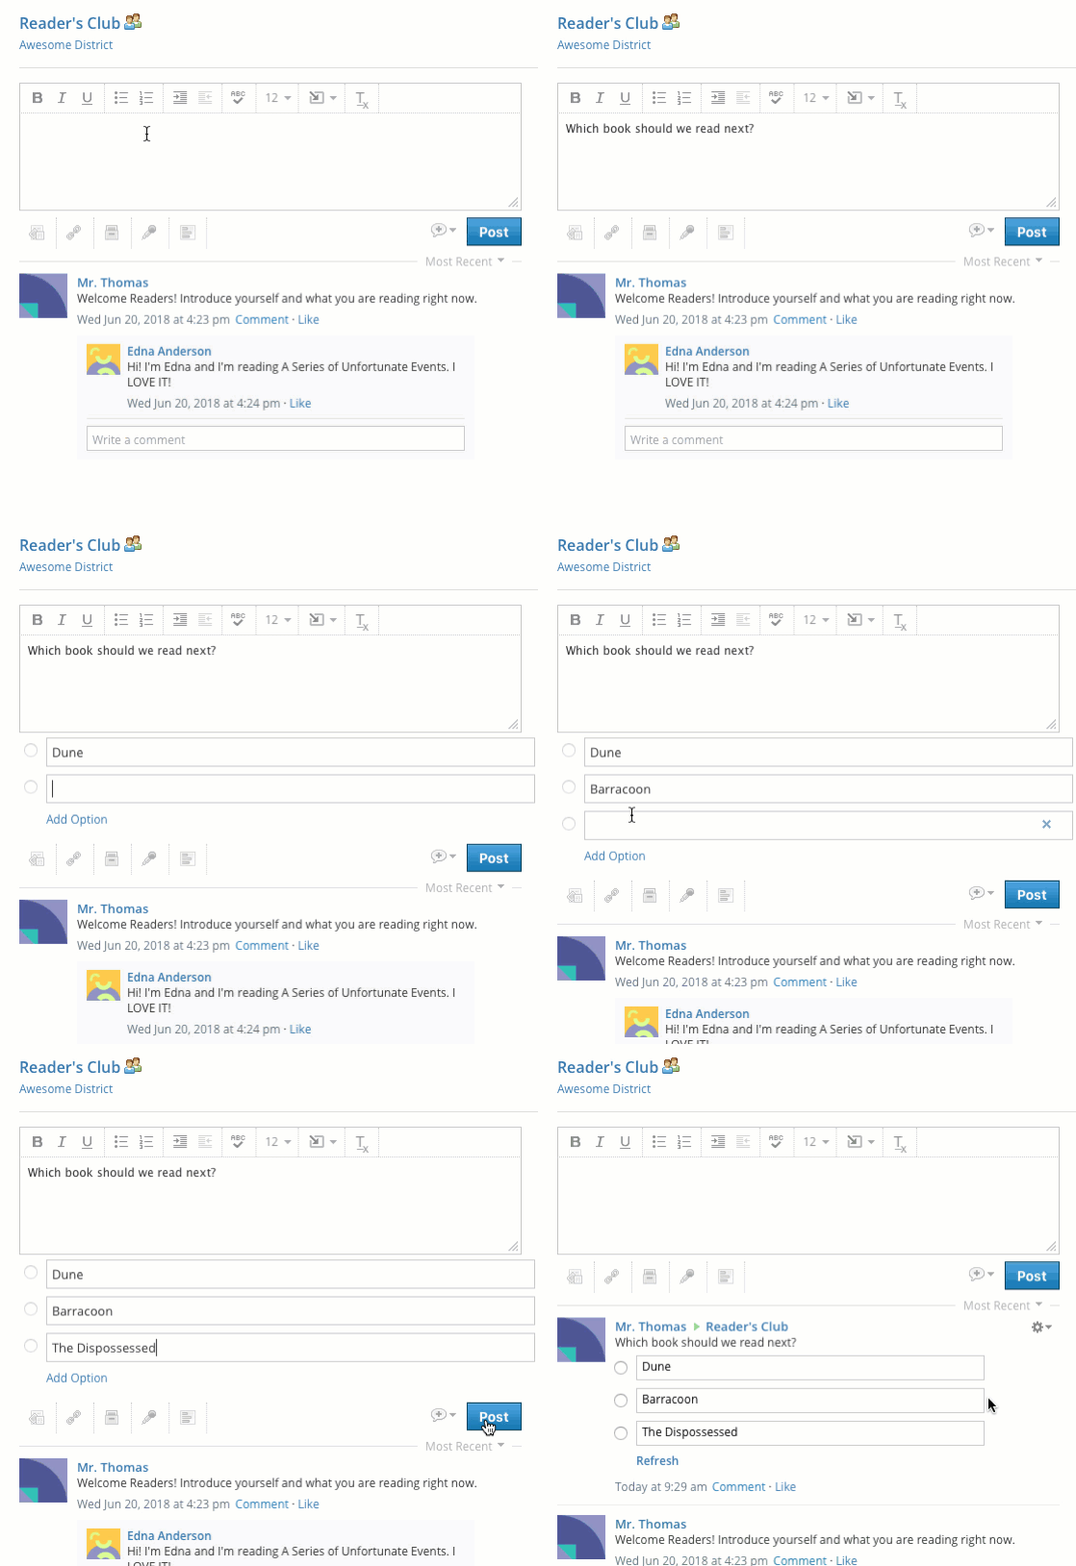
You can post a Poll in your group to receive live feedback as members vote. To create a poll, please follow these steps:
- Click Groups in the top menu and select a group you administer.
- Type an update in the text box at the top.
- Click the poll icon under the text box.
- Two fields will appear by default. If you'd like to add more options, click Add Option below the fields.
- Click Post to complete.
Group Discussions
There is no limitation on the number of discussions you can add to a group, but for performance stability we recommend 5,000 discussions or less per group.
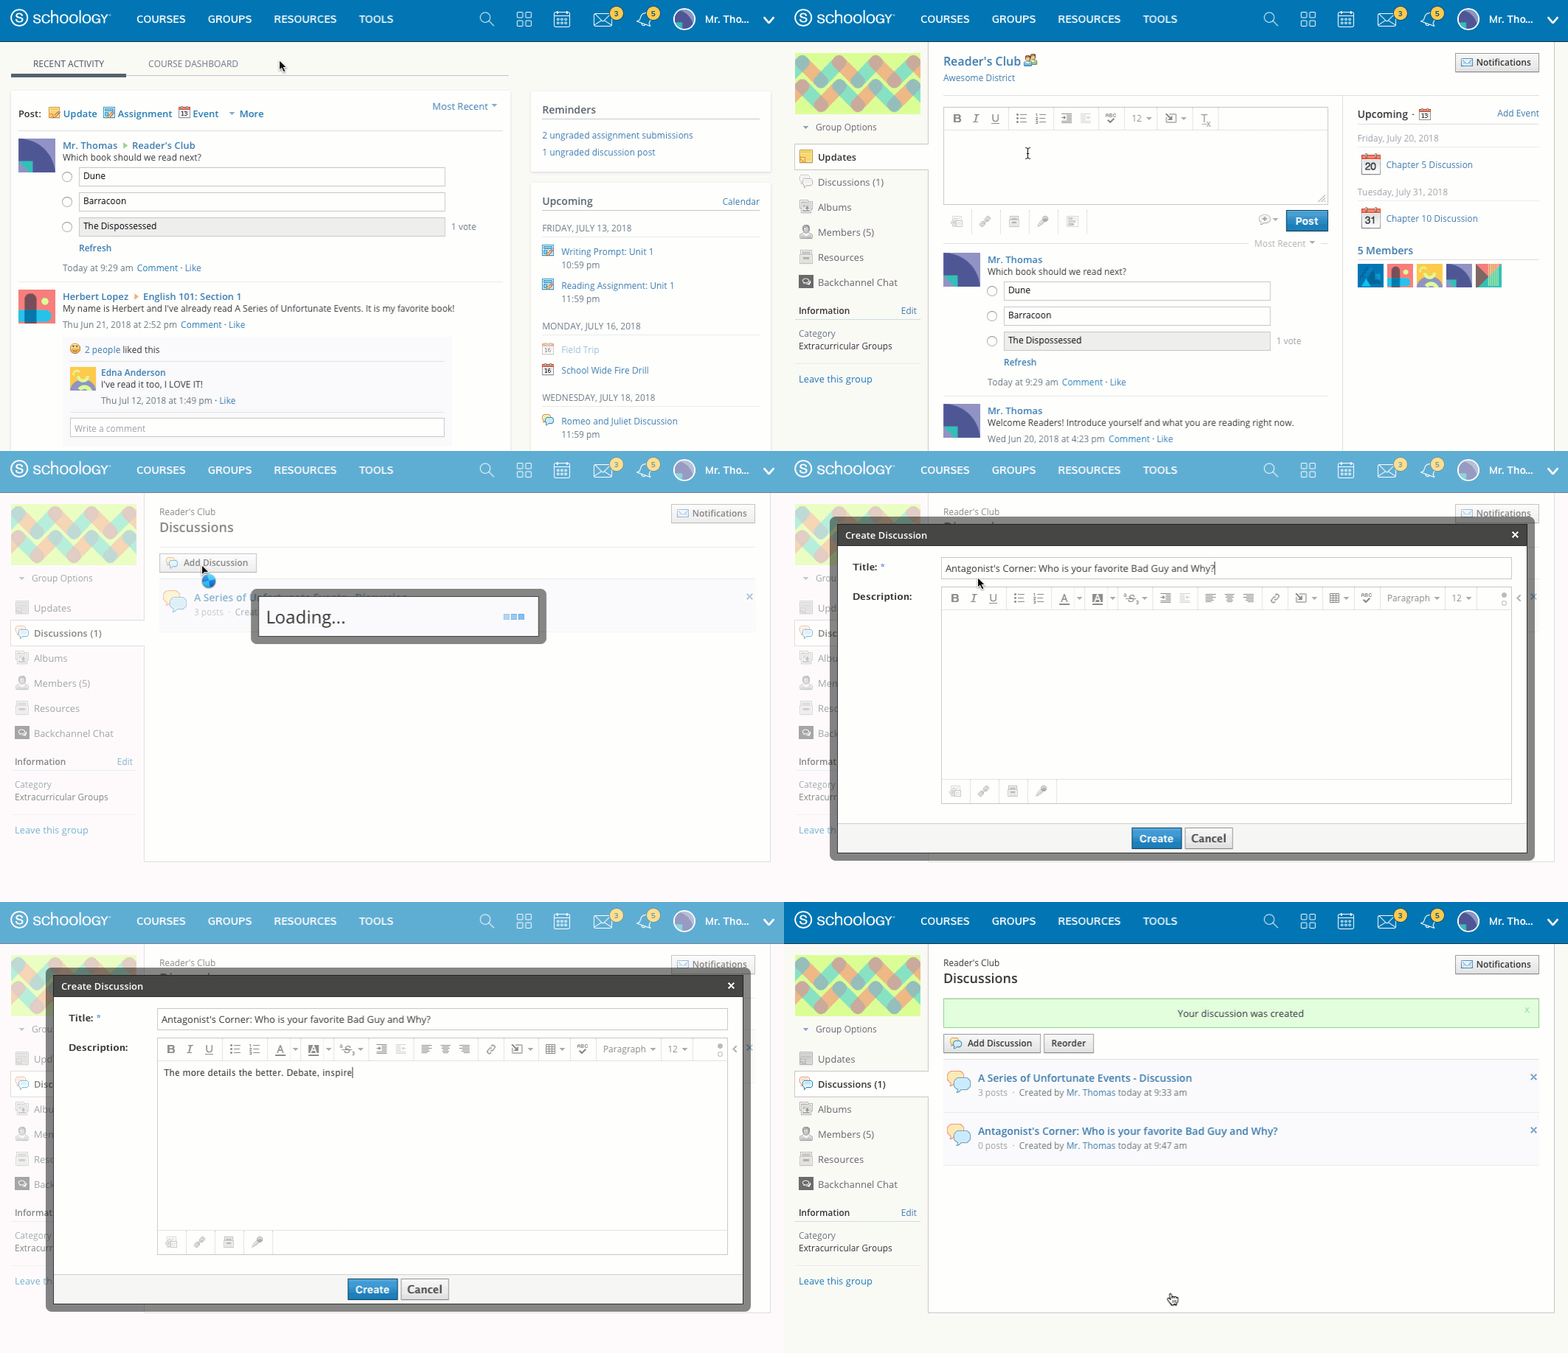
Group discussions are a great way for members to engage in interests outside or in conjunction with the classroom. To add a discussion to your group, follow these steps:
- Click Groups in the top menu and select a group you administer.
- Click Discussions in the left-hand menu.
- Click Add Discussion.
- Add a title and description (optional) to the discussion.
- Click Create to complete.
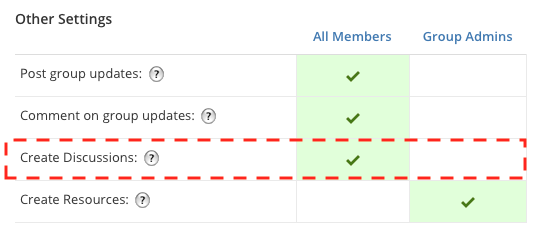
By default, any member can add discussion threads to the group. If you are a group administrator, you can limit this ability to only other group administrators. To do so, follow these steps:
- Click Groups in the top menu and select a group you administer.
- Go to Group Options in the left menu of the group page and click Edit Privacy/Group Settings.
- Use the Create Discussions option to enable or disable this feature.
- Click Save Changes to complete.
Group Albums
Group Albums are another great way for members to share photos and media files with each other. Photos can be cropped and rotated after you add them. You may allow commenting on each item within an album. You can also tag users in uploaded photos, or allow students to upload and tag media as well.
- There is no limitation on the number of albums you can add to a group, but for performance stability we recommend 5,000 albums or less per group.
- Group album tags are not supported in groups containing more than 1,000 members.
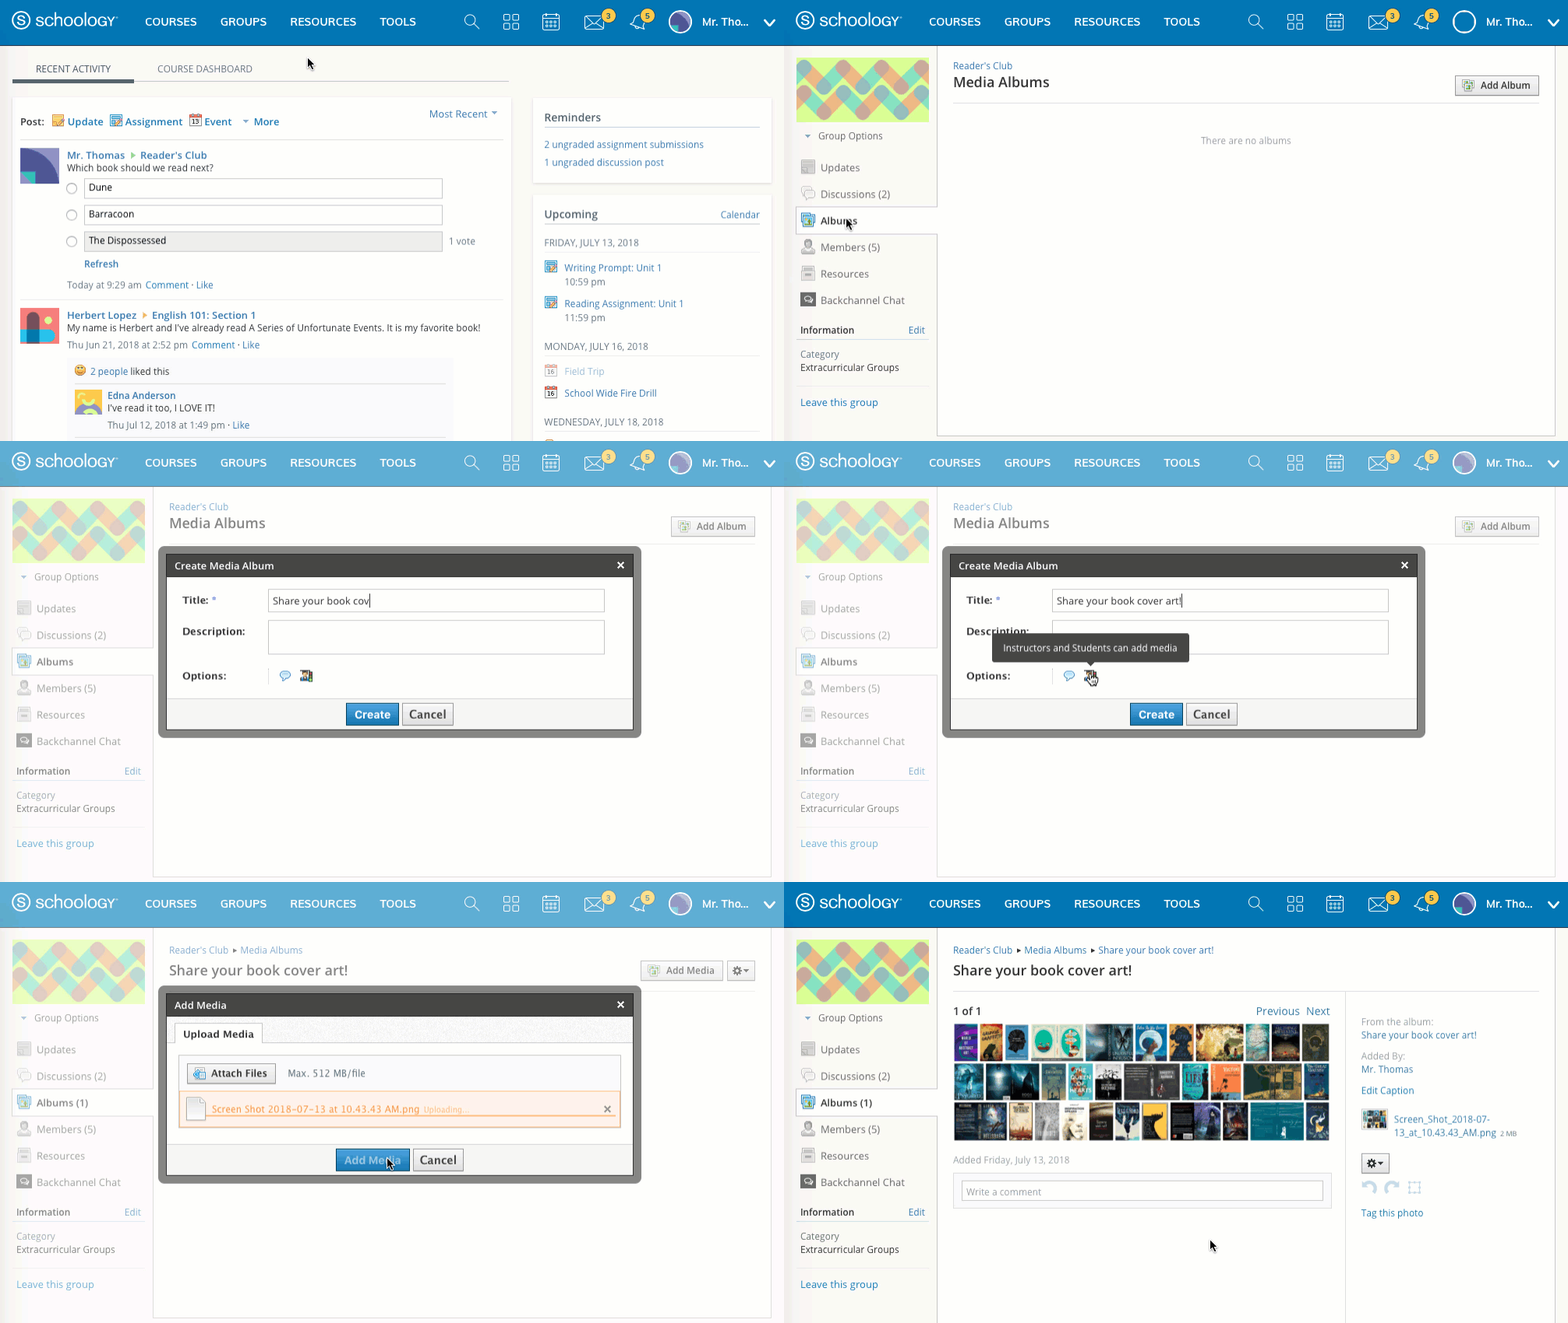
As Group Admin, you must add media albums in the group in order for members to participate in the albums. To add an album, follow these steps:
- Click Groups in the top menu and select a group you administer.
- Click Albums.
- Click Add Album.
- Add a title and description (optional) to the album.
- The option to Allow Comments will allow members to add comments to uploaded photos and media.
- The option to Allow Students to Add Media will allow members of the course to upload photos and media to the album. This will also allow students to edit or delete only the content they have uploaded to the album.
- Click Create to complete.
Add Group Members
Go to the group profile by selecting a group from Groups at the top of Schoology, or click My Groups for a complete list of your groups. You can add members to your group by distributing the Group Access Code. Group administrators can locate the access code from the Members area: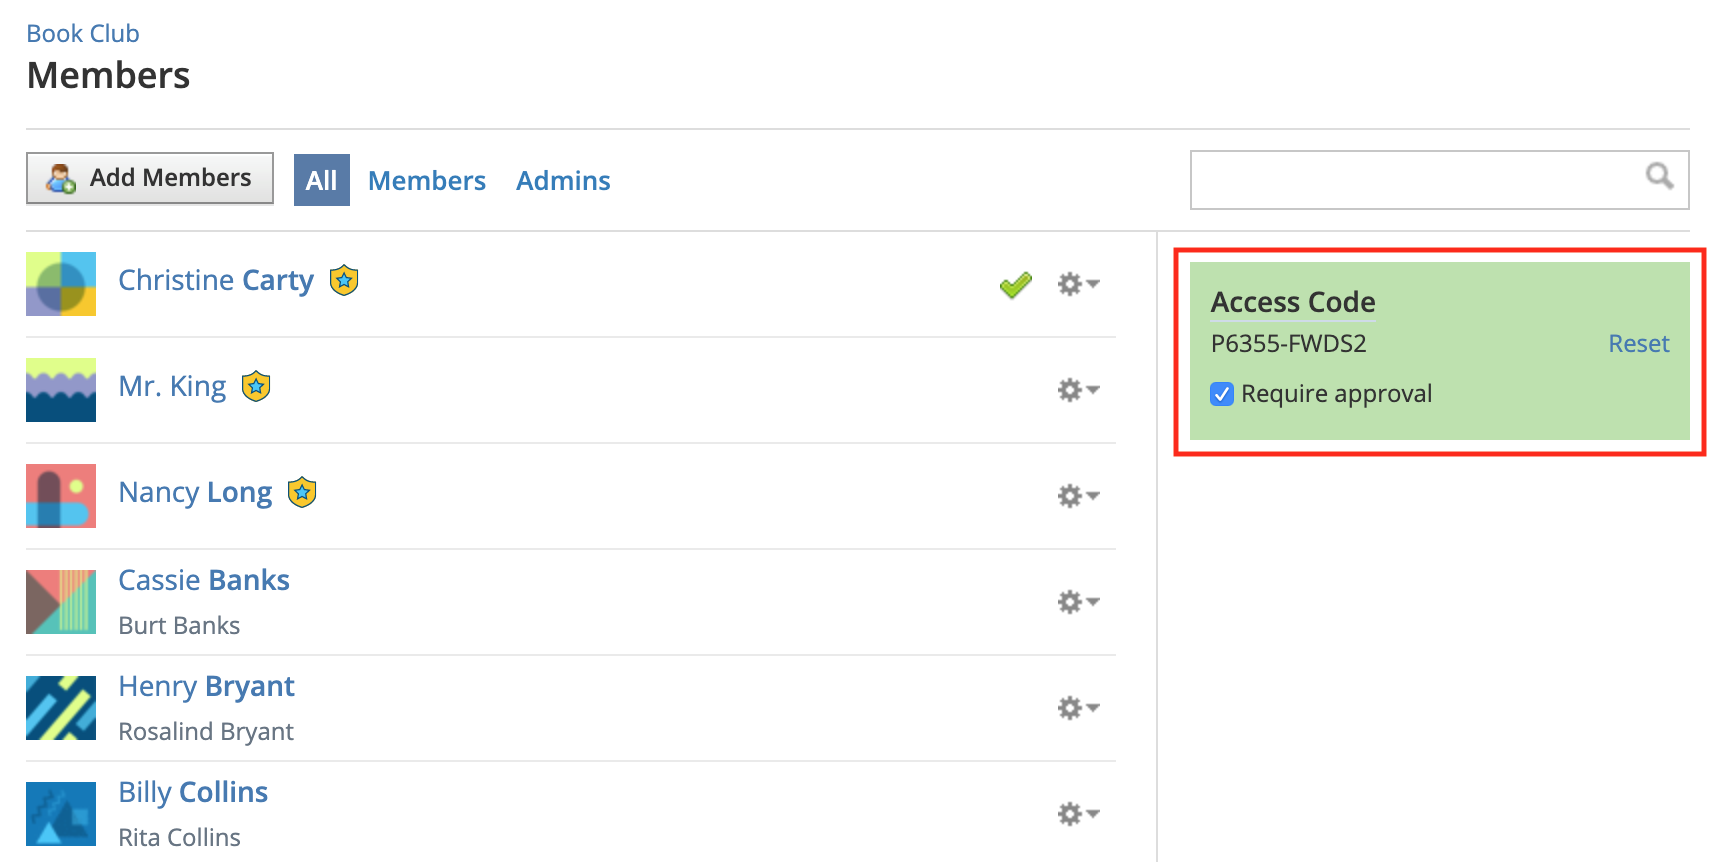
Add Members (Enterprise only)
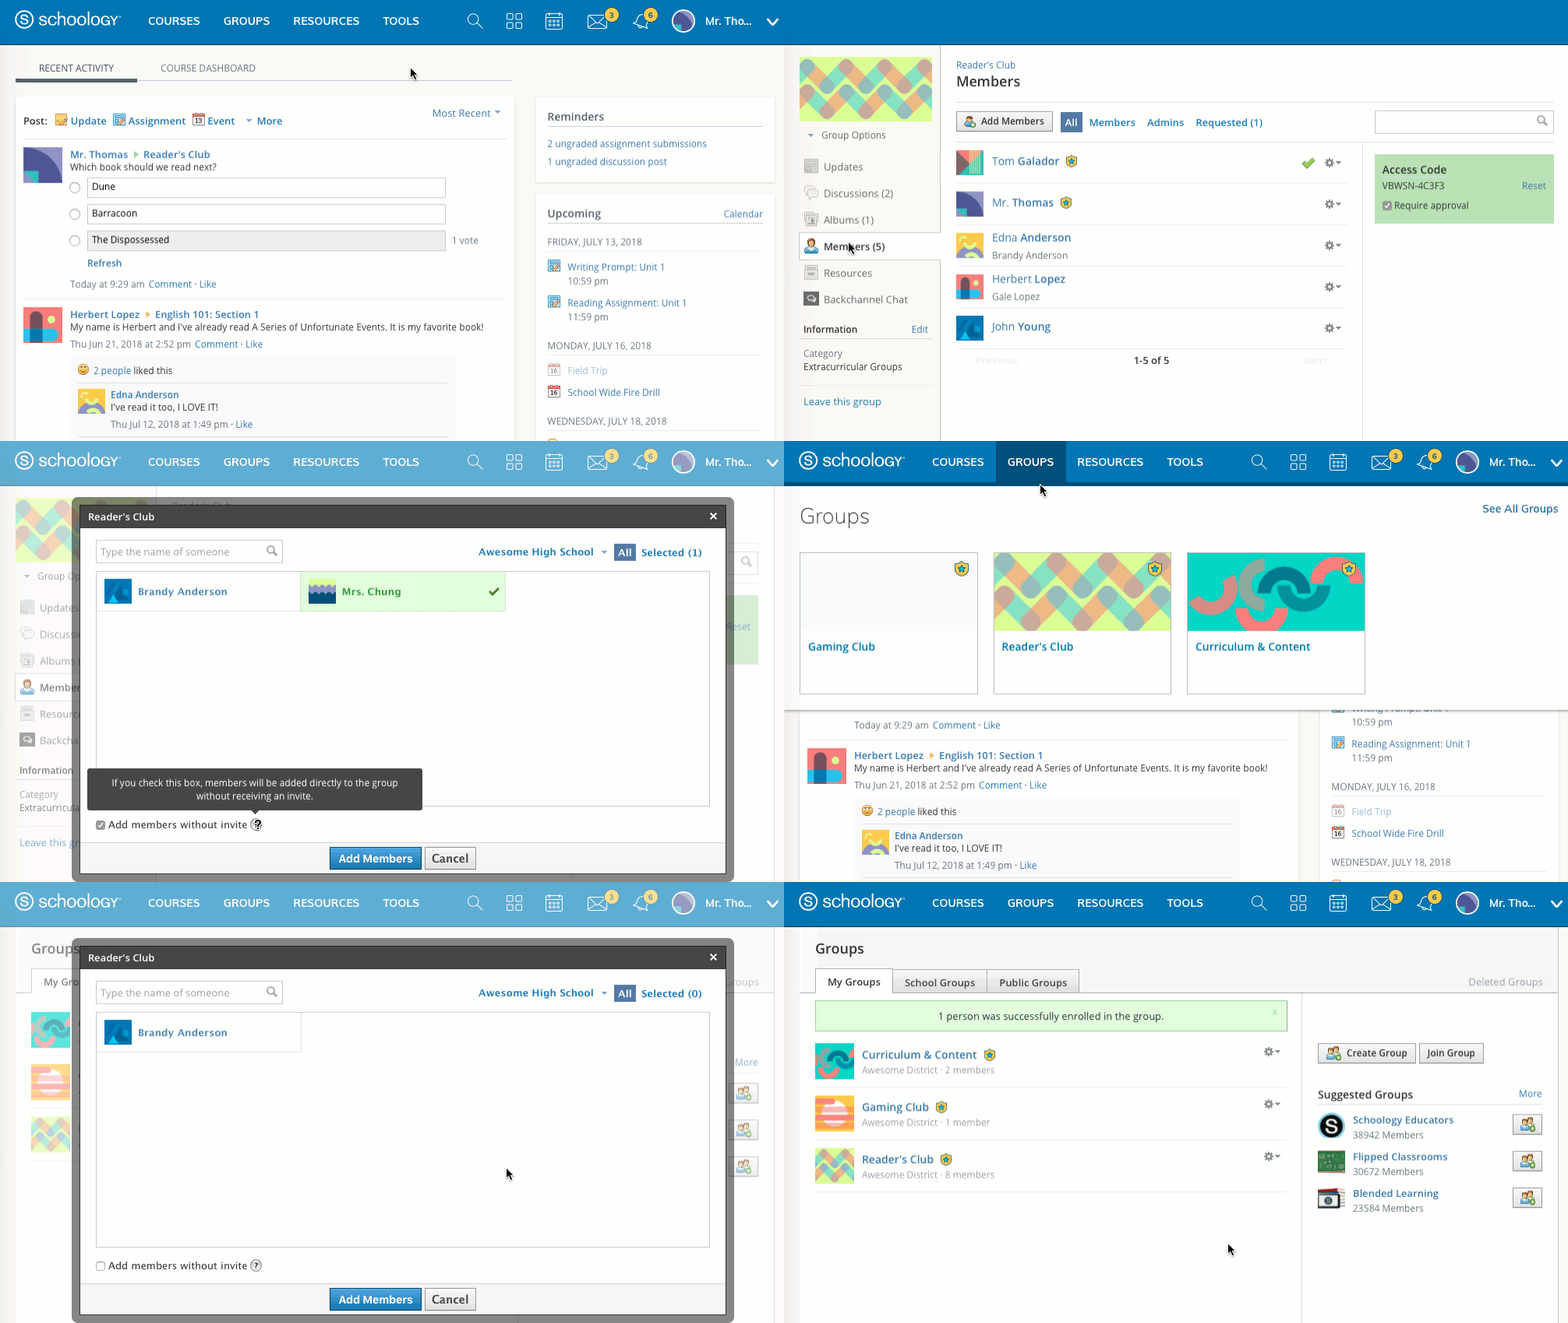
Enterprise instructor accounts see an Add Members on the Members page of the group. Instructors with this button available can add members by following these steps:
- Click Groups in the top menu and select a group you administer.
- Click Members in the left-hand menu.
- Click Add Members.
- Select member(s) to invite to the group.
- You will see a selected count in the upper right corner.
- You can also search or browse for each user, without affecting the previously selected members.
- If there are multiple school buildings in your organization, you may need to use the filter to search for the school in which the user is enrolled.
- If cannot locate the user you wish to add, check to confirm whether they are already enrolled in the group. Enrolled group members will not appear in the Add Members search results.
- Click Add Members to finish.
Require Approval
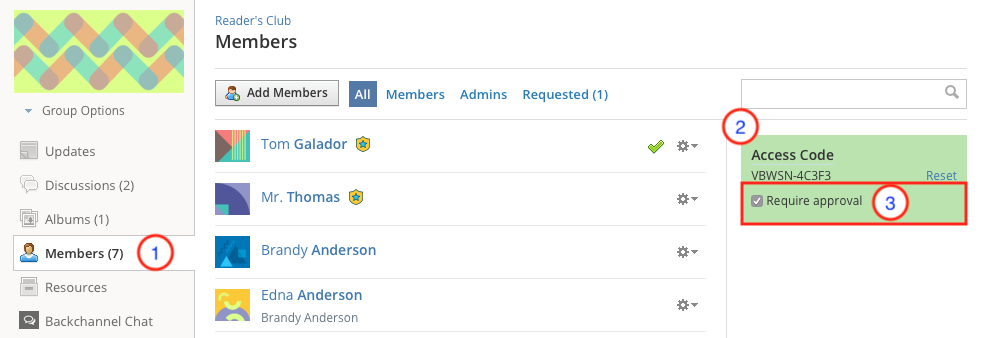
If you would like to manually approve each user who uses the access code before they can join the group, follow these steps from the Group Profile:
- Click Members on the left.
- Look for the Access Code (green box) on the right.
- Click the checkbox to Require Approval moving forward.
- The Add Members button is only available for Enterprise accounts.
- Basic Student accounts and Basic Parent accounts cannot join Enterprise Groups, however, Basic Instructors accounts can join via a Group Access Code.
Group Resources
Group Resources is an area for members to share files and links that pertain to their interests. One of the unique features of this area is that you may allow other members to add to the Resources section.
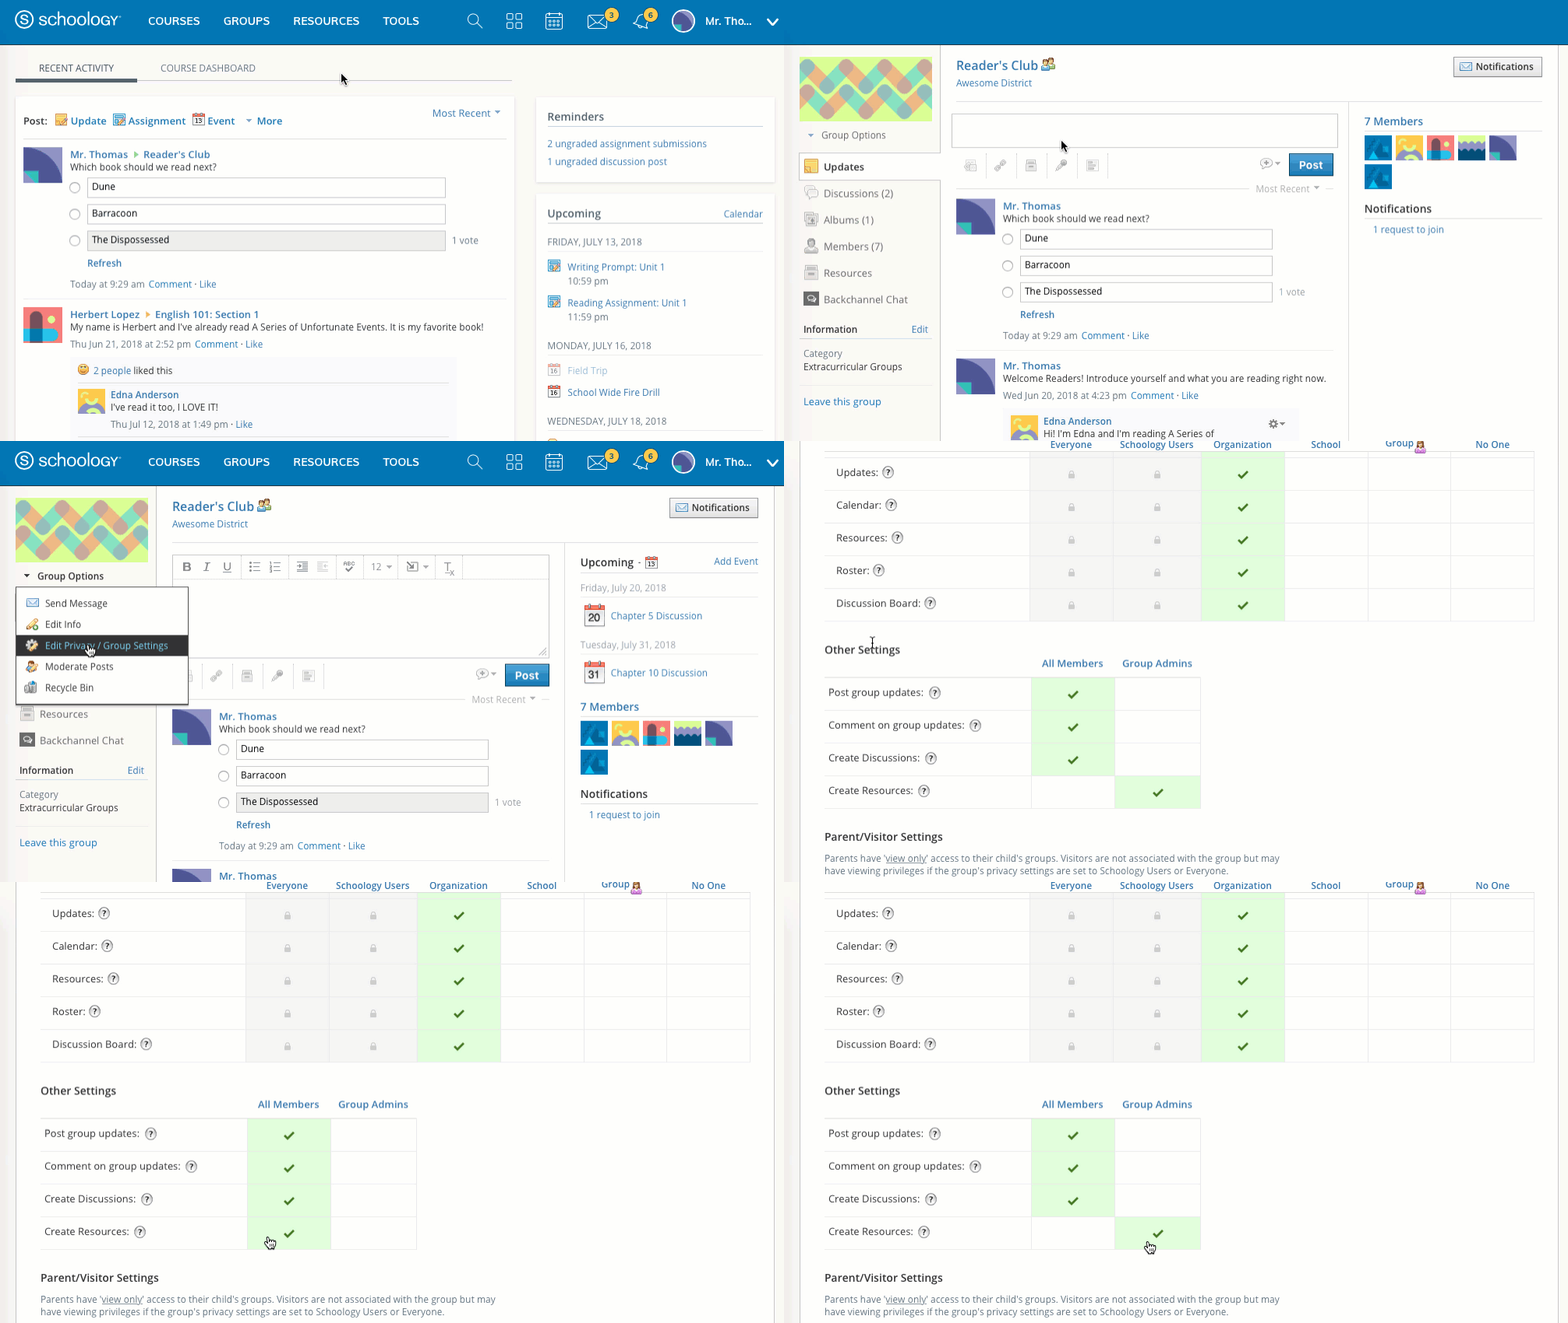
To allow members to add resources, follow these steps:
- Click Groups in the top menu and select a group you administer.
- Go to Group Options in the left menu of the group page and click Edit Privacy/Group Settings.
- Use the Create Resources option to enable or disable this feature.
- Click Save Changes to complete.
Archive Groups
To archive groups, follow these steps:
- Click Groups in the top menu.
- Select the option to My Groups on the right.
- Click the gear icon to the right of the group you'd like to archive.
- Select Archive.
- If you're sure you'd like to archive the group, click Submit.
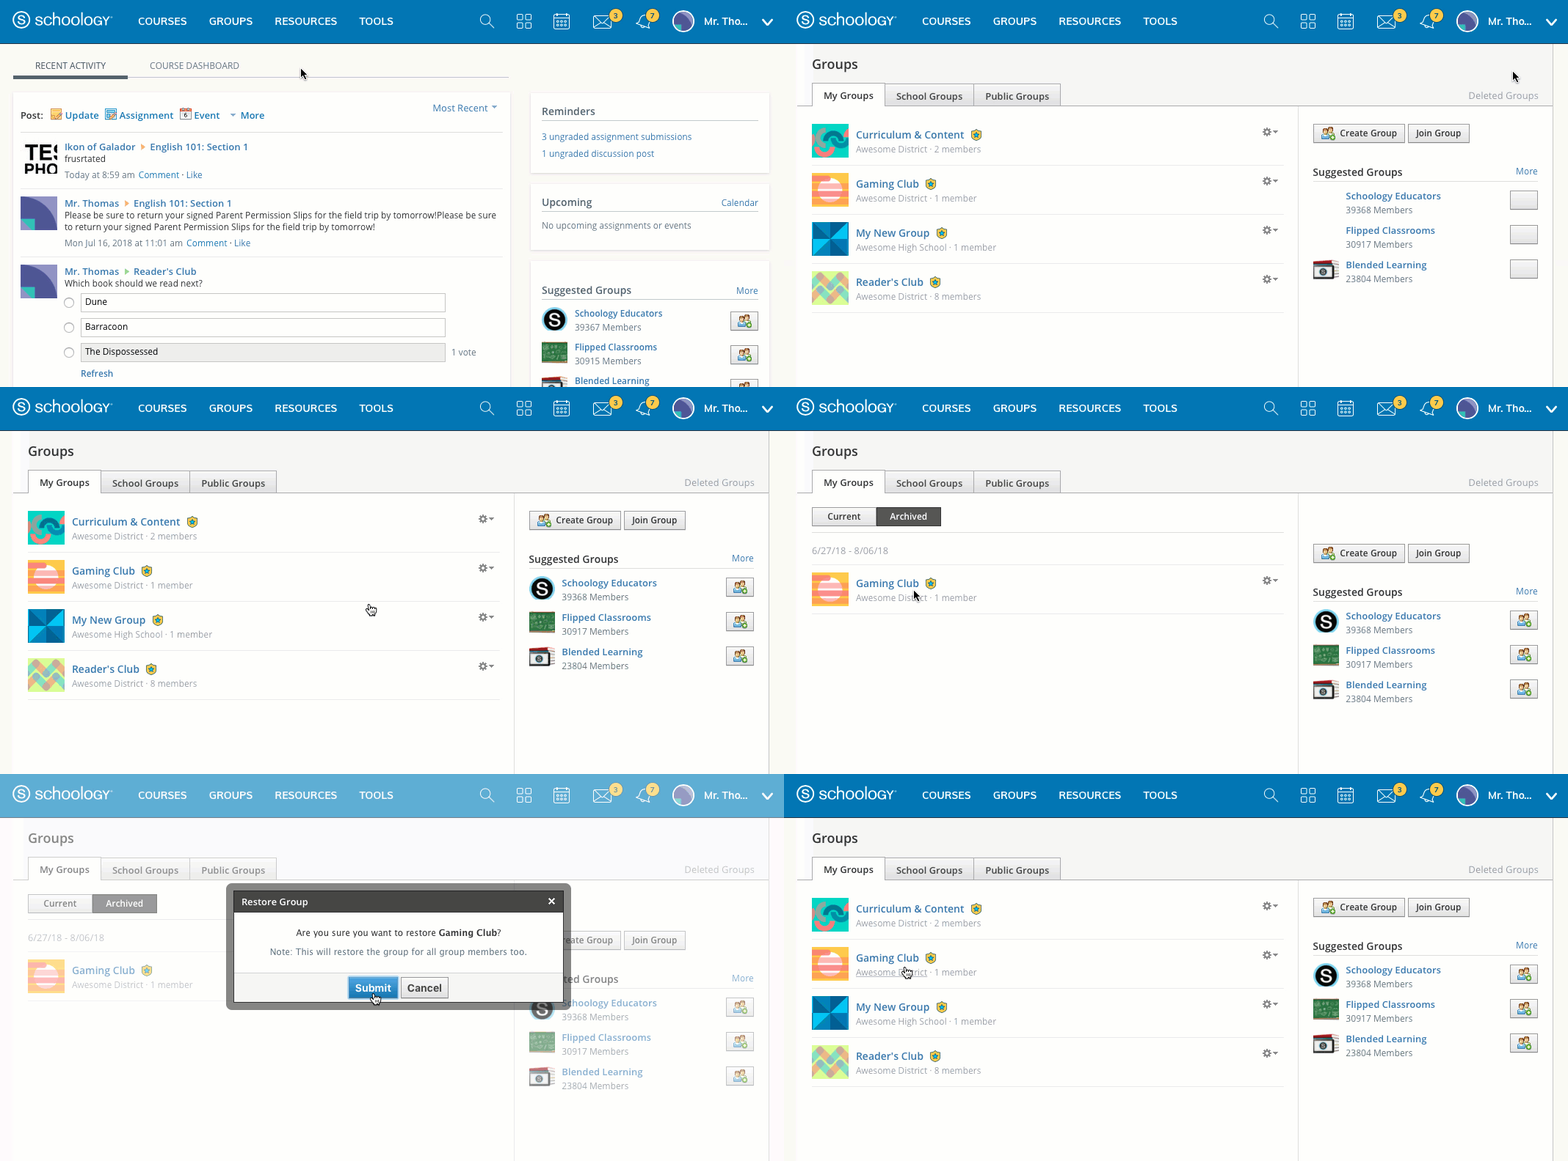
Administrators of the group can continue to access the group from the Archived area of Group Listing.
To restore an archived group:
- Click Groups in the top menu.
- Select My Groups.
- Click Archived.
- Click the gear to the right of the group you'd like to restore.
- Select Restore.
If you're sure you'd like to restore the archived group, click Submit.
Restoring a group will allow group members to access and to participate in the group. No group content or enrollment will be lost during the archival process.
Delete Groups
To delete groups, follow these steps:
- Click Groups in the top menu.
- Select My Groups.
- Click the gear to the right of the group you'd like to delete.
- Select Delete.
To restore a deleted group, follow these steps:
- Click Groups in the top menu.
- Select My Groups.
- Click Deleted Groups on the right.
- Check the box next to the Group you'd like to restore.
- Click Restore.
- If you're sure you'd like to restore the deleted group, click Restore.
