Both students and educators need to communicate their achievements and reflect on what they learn. Portfolios provide them with the ability to quickly and easily collect, organize, and share their work with others.
To access portfolios:
Click your name in the upper right corner and selectYour Profile.
Navigate to Portfolios from the left menu under your profile picture.
By default, all Enterprise users have permission to access portfolios. Your System Admin can enable or disable this feature.
System Administrators can enable the permission for users to create Portfolios with the following steps:
ClickTools.
SelectUser Management.
Click Permissions.
ThePortfoliospermissions are in the Users area of this page.
Check the box corresponding to the permission Create Portfolios to enable Portfolio creation for the selected roles.
How to Create a Portfolio
Click your name in the upper-right corner of any page in Schoology.
SelectYour Profile.
ClickPortfoliosin the left menu.
ClickNew Portfolioto add a new portfolio to your account, or click on an existing portfolio on the page to edit it.
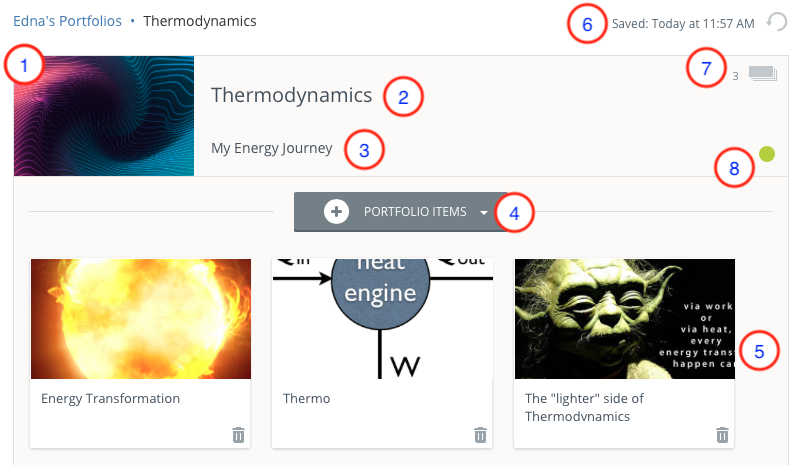
Portfolios Page
Click to change the cover image for the portfolio. This is the image that displays for the portfolio on the main Portfolios page.
Click to title the portfolio. Your title displays below the cover image for the portfolio on the main page.
Click "What does this portfolio mean to you?" to add a description for the portfolio. This text displays when you hover over the cover image for the portfolio on the main page.
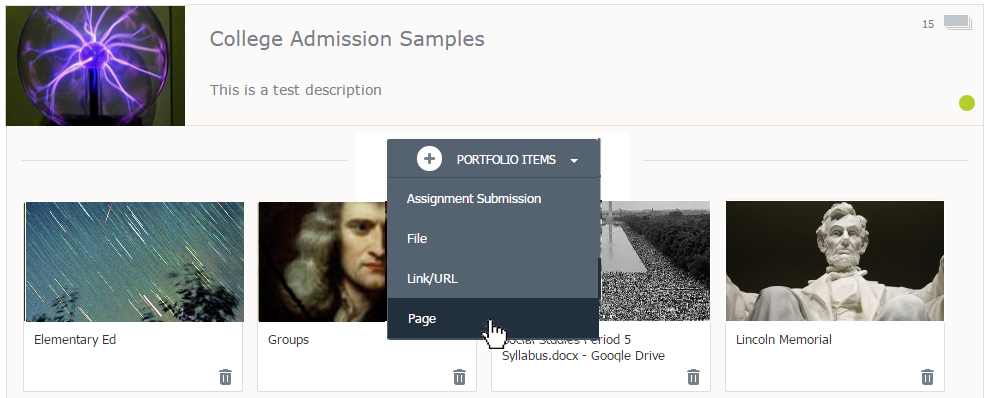
ClickPortfolio Itemsto open the menu, from which you can select:
Assignment Submissions.
Files from your computer. You may attach any file type with a size limit of 512mb.
Web links.
Web pages.
Assignment Submissions that were submitted through theGoogle Drive Assignments apporOneDrive Assignments appare not supported in Portfolios. Instead, students can export the document and add as a file or add the direct URL shareable link.
See the sections Adding Items to a Portfoliobelow for more information.
Added items display in the panel below the add button. Click and drag items to re-arrange them in your portfolio.
The timestamp in the upper-right shows when the portfolio was most recently saved. To the right of the timestamp is theUndobutton. Click it to undo your most recent action – for example, if you accidentally delete an item from your portfolio, clickUndoto add it back.
The Undo button is a "single-level" function and cannot undo actions previous to the most recent one you completed.
The number below theUndobutton shows how many items are in the portfolio. The items number displays in the lower-left corner of the portfolio on the main page. This portfolio, for example, contains 12 items.
Click the circle in the lower-right to publish the portfolio and make it viewable for other Schoology users. See the sectionSharing Your Portfoliobelow for more information.
Adding Items to a Portfolio
After you add a portfolio, you can begin to build it with content added from your assignments submitted in Schoology, from your computer, from online links, and from web pages created directly in your portfolio.
Items housed in your Resources cannot be added to Portfolios.
You can add files from your computer to a portfolio by dragging and dropping one or more files onto the field below thePortfolio Itemsbutton. Alternately, you can clickPortfolio Itemsand then:
To add Schoology assignments you've previously submitted in a course:
ClickAssignment Submissions.
Select the course in which you submitted the assignment.
Select the course in the list and then clickAdd Submission.
You can also submit an assignment to a portfolio from the assignment itself by clicking theSubmit to Portfoliobuttonin the Submissions area on the right side of the page.
Assignment Submissions that were submitted through theGoogle Drive Assignments apporOneDrive Assignments appare not supported in Portfolios. Instead, students can export the document and add as a file or add the direct URL shareable link using the instructions below.
To add files from your computer:
ClickFileand browse to the location where you’ve saved the content.
To add the file, highlight and then clickOpen, or just double-click it. The portfolio item automatically takes the filename as its title, but you can edit the title by clicking into the text box.
To add web links:
ClickLink/URLto open theAdd a Linkwindow.
Paste a URL to add a web page.
Paste a video embed code to add an embedded video—for example from YouTube or Vimeo. The portfolio item automatically takes the webpage or embedded video’s name as its title, but you can edit the title by clicking into the text box.
To add a web page:
Click Page.
Enter aTitle and Descriptionfor the page.
Use the Rich Text Editor to design a page within your portfolio. Use the Insert Content tool to add multimedia, links, items from your Schoology Resource Apps, and more to your Page.
As you build your web page, click thePreviewbutton in the upper-right, above the Rich Text Editor, to see how the page will look when published.
Your Portfolio automatically saves once you have completed an upload, or once you have finished typing and clicked your cursor out of the text field. However, note that if you are experiencing poor Internet connectivity, auto-save may not function correctly. Check the auto-save timestamp in the upper right of your Portfolio item to ensure it is saving as you work.
Editing Items in a Portfolio
After you’ve added items to your portfolio, click on the content card to open it and add details or make changes.
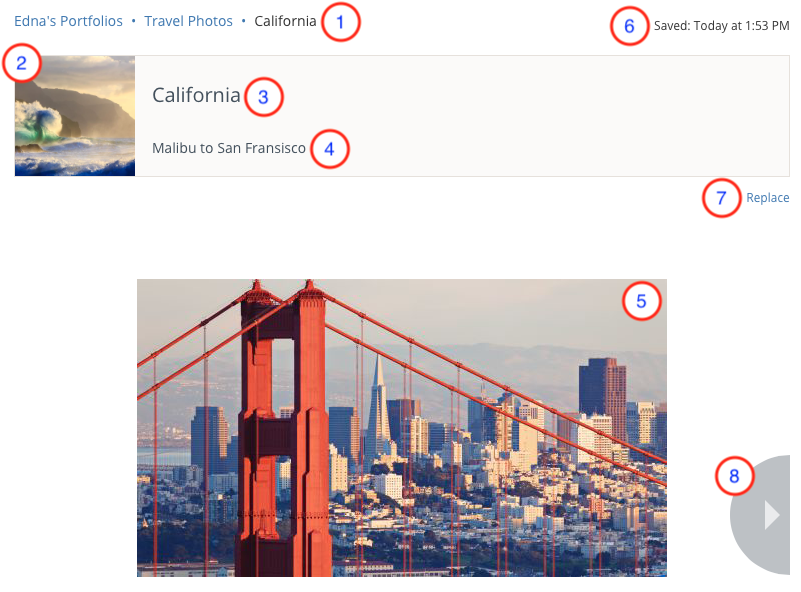
Click on any level in the breadcrumbs to return to that area. For example, click onPortfoliosto return to your main Portfolios page, or click onCollege Admission Samplesto return to that portfolio.
Click to change the cover image for the portfolio item. This is the image that displays for the item on the main Portfolios page.
Click to title the item. Your title displays below the cover image for the item on the main page.
Click to add an item description. The description displays when you hover over the cover image for the item on the main page.
The item's full page view display is how the item looks in your portfolio after you publish it.
Portfolio items also have a time stamp showing when your portfolio was last saved and an Undo button to undo your most recent action.
A Replace button is also in the toolbar to change files you've added to your portfolio. To replace a link you’ve added, highlight the link in the URL text box below the description and paste in the new link.
Use the arrows on either margin to browse through the other items in your portfolio.
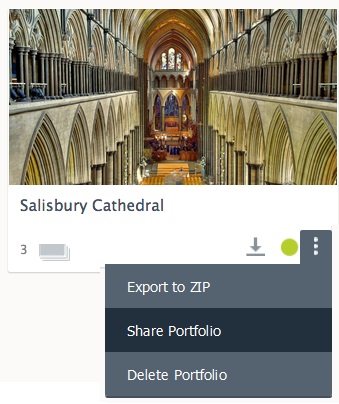
Sharing Your Portfolio
From a Portfolio's More Optionsmenu you can generate a private link that enables anyone to view your portfolio even if they are not logged into Schoology (or don't have a Schoology account). For example, if you have a Portfolio for a college admissions application, you can generate a link to share with admissions counselors.
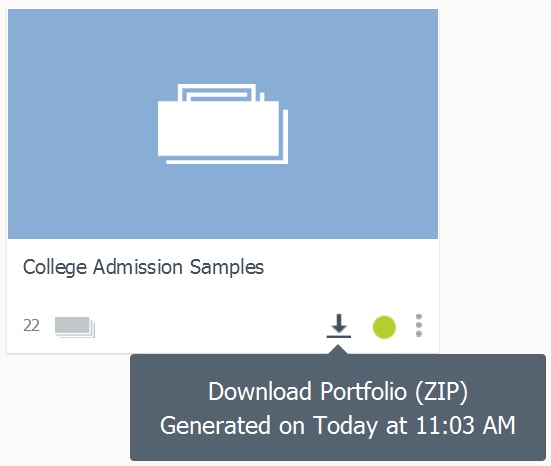
You can also download a ZIP archive of your portfolio, so you can still access your work and materials from your local computer (if you don't have an internet connection for example) or if you no longer have access to your Schoology account.
Sharing Your Portfolio from a Private Link
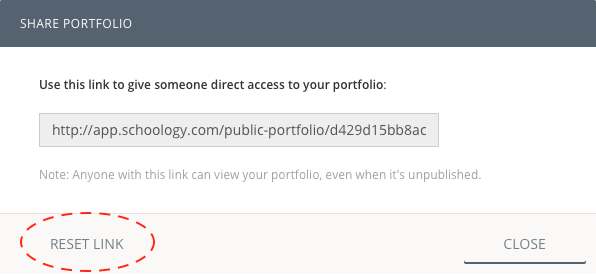
You can share your Portfolio using a private link that will allow the recipient to view your portfolio even if they are not logged into Schoology (or don't have a Schoology account).
To generate a private link for your Portfolio:
Go to your personal profile.
Click Portfolioson the left side of your profile.
Click the lower-right corner of your profile cover.
Select Share Portfolio.
UseCommand + C (Mac) or CTRL + C(Windows) to copy the link to your clipboard, and paste into a Schoology Message or email to send to the recipient.
Anyonewith the link will be able to view your portfolio,even if your portfolio is Unpublished, and regardless of the privacy settings on your personal profile and/or whether or not they are logged into Schoology. The link overrides all privacy settings configured at the system or account level.
You may reset the URL that points to your portfolio to prevent anyone who previously held the link from continuing to access your Portfolio.
To reset your private link:
Go to your personal profile.
Click Portfolioson the left side of your profile.
Click the lower-right corner of your profile cover.
Select Share Portfolio.
ClickReset Link.
Sharing Your Portfolio from Your Personal Profile
The System Admin at your school manages the privacy settings for your personal profile, which includes your portfolios. Depending on how your Admin configures these settings, your published portfolios may be viewable by:
Everyone: Anyone who has the URL may view the portfolio.
Schoology users: Anyone with a Schoology account may view the portfolio.
District: Any Schoology user in your district may view the portfolio.
School: Any Schoology user in your school may view the portfolio.
Connections: Only Schoology users to whom you’re connected may view the portfolio.
No One: No other Schoology users may view the portfolio.
These settings affect who can view your portfolios by navigating to your personal profile and clickingPortfolioson the left menu. You may also choose to further restrict the sharing permissions for your Portfolios. For example, if your admin has set portfolio-sharing permissions to District, you may choose to adjust your own settings to School, Connections, or No one.
These settings apply to all of your portfolios. You can not choose different privacy settings for different portfolios.
To change your sharing permissions:
Click the arrow next to your name in the upper-right corner of any page in Schoology.
SelectPrivacyfrom the list.
In the Portfolios row, check the box for the group with whom you want to share your published portfolios. You can only select columns at or below the sharing permissions set by your System Admin.
ClickSave Changesto update your settings.
Exporting Your Portfolio
Instructors and students can export their Schoology Portfolios as ZIP files so they can archive their work and continue to access it even if they no longer have access to their Schoology accounts.
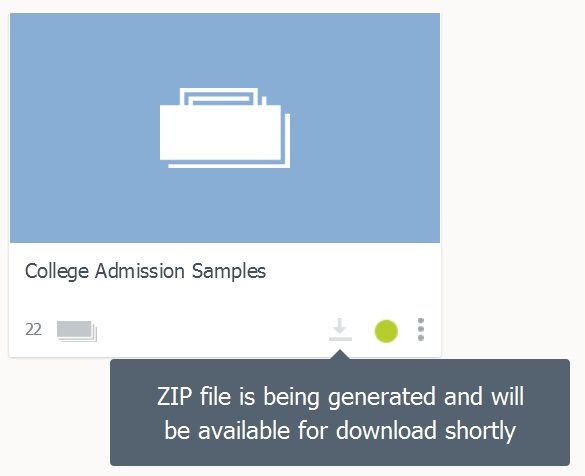
From theMore Optionsmenu, selectExport to ZIPto download a copy of your portfolio that you can access from your computer even if you don't have an internet connection, or if you no longer have access to your Schoology account.
The export process may take some time to complete; you can monitor its progress by hovering your mouse over the down arrow.
Download in process
Download complete
Unpack the ZIP file and click theIndex.htmllink from the root folder to open a webpage with all the items in your portfolio listed. Click any item in the list to open that item in a new page.
Frequently Asked Questions
Q:Can I organize my portfolio into sub-folders?
A:Although you cannot currently organize Schoology portfolios into sub-folders, you can create as many portfolios as necessary and organize them on your main Portfolios page.
You can review all your portfolios at a glance and quickly re-arrange them by drag-and-drop functionality.
Q:Why is the content of a web page I added to my portfolio not displaying?
A:Content from some popular websites – including Wikipedia and Schoology.com – may be blocked in your portfolio due to perceived security risks from your web browser.
If this happens, when you open the link in your portfolio the contents of the web page will not display in the item pane. Different browsers indicate this issue in different ways; Chrome, for example, displays a gray warning icon in the URL field, while Firefox shows a lock and warning icon.
To display the content in the item pane, click the icon for your browser and follow the instructions.
If your content still doesn't display in the pane, Schoology provides an "open in" icon in the link pane.
Click the icon to view the web page in a separate tab in your web browser.
Q: How do I view someone else's portfolio?
A:To view another user's published portfolio, go to their personal profile page and clickPortfolioin the left menu. You will be able to see all of their portfolios that are published and shared at a level at which you have access.
To send a message about the portfolio to its owner, clickSend Feedbackin the upper-right corner. A System Admin for your school manages the messaging permissions for your profile.
JavaScript errors detected
Please note, these errors can depend on your browser setup.
If this problem persists, please contact our support.