
View PowerSchool Special Programs Alerts and Student Documents in Schoology
Schoology and PowerSchool Special Programs offer an integration that gives system administrators and instructors access to review student educational plans, accommodations, and documents without leaving Schoology.
Your organization must use Special Programs and PowerSchool SIS to use this feature.
Special Programs features are available in the following areas in Schoology:
Special Programs alerts in the course Members area
Special Programs filter in the course Members area
Special Programs filter in Grading Groups
Special Programs Doc Viewer in student Profile.
Special Programs App General Requirements
Before you install the Special Programs app to your organization, make sure you have the following items completed:
Upgrade your PowerSchool SIS instance to version 21.4.0.0 or later.
PowerSchool Special Programs (on-premise requires standard state model) installed for your organization.
A shared Identity Provider (IdP) across all the above-mentioned platforms (PowerSchool SIS; Microsoft SSO, or Google SSO).
You must be enrolled as a Course Admin in order to access student alerts, filters, and student documents.
Install and Configure Special Programs App (System Administrators)
Once you have fulfilled the general requirements above, you can begin to install the Special Programs app in Schoology. Use these steps to set up the integration between your PowerSchool instance and your district's Schoology account.
Copy the Integration URL in Special Programs
In Special Programs, click Administration, choose Configuration, and then choose Integration.
Click Schoology Integration.
Click Configure Integration.
The Schoology Integration wizard outlines instructions on how to install and configure the Special Programs app in Schoology. Click Next to continue.
Select and copy the custom integration URL within the Schoology Integration wizard. You will use this URL to configure your Special Programs app in Schoology.
Install and Configure the Special Programs App in Schoology
As a System Admin, click App Center in the header of Schoology.
Locate the Special Programs app and click the title.
Click Install App.
Click I Agree to continue with the installation.
Click Add to Organization to install for your district.
Under Organization Apps, click Configure next to the Special Programs app.
Fill out the form:
– Custom URL: Paste the custom integration URL from Special Programs into this field.
– Custom SAML URL: Paste the same custom integration URL from Special Programs into this field.Click Save settings to apply.
Under Organization Apps, click Install/Remove next to the Special Programs app.
Check All Users and then the Student role.
Click Submit to confirm changes.
Copy Consumer Key and Secret in Schoology
Click Tools in the header of Schoology.
Select School Management.
Click Integration.
Click API.
Copy the Consumer Key and Consumer Secret. You will paste these into the Schoology Integration wizard in Special Programs.
Complete Schoology Integration in Special Programs
If you have kept the Schoology Integration wizard open, click Next, and then Next to continue to the last step. Otherwise, navigate to the Schoology Integration wizard and click Advanced.
Select or enter the Schoology API URL.
Enter or paste the Consumer Key and the Consumer Secret that you copied from Schoology.
Click Finish.
Once the setup is complete, the School NID and Schoology API URL details are displayed in the Schoology Integration tab within Special Programs.
View Special Programs Alerts
Special Programs alerts can be viewed from the course Members area. From here, instructors can easily identify which students have Special Programs documents or needs that should be accounted for when managing their class and assigning materials.
Additionally, instructors can use the quick filter option to display only the students that have alerts that the instructor may have to account for and filter by alert to creating grading groups.
Click Members from the left menu in your course.
Alerts display next to the student’s name. Alerts include the student's educational plans and associated documents.
Hover over the alert to display the full text of the alert.
Click Special Programs to filter the course members list to students with alerts only.
Identify Special Programs Alerts
A document icon indicates there are Special Programs documents associated with the student. Instructors may view student documents directly from the student’s profile.
A lettered or numbered icon indicates the type of special program.
Hover over the alert to display the full text of the alert.
If there are alerts displayed next to a student in the Members area, be sure to check the student profile for any available documents in connection with the Special Program.
Create Grading Groups Based on Special Programs
Use Special Programs alerts to help create and determine your grading groups based on students’ educational plans. When creating grading groups, instructors may use the Special Programs filter to narrow the search down to students participating in programs.
Click Members from the left menu in your course.
Click Organize members into Grading Groups on the right.
Click Special Programs to filter course members to students with alerts only. Only one filter can be used at a time.
Select the desired students and enter a title in Group Name.
Click Create Grading Group to complete.
Students added to a special program after a grading group has been created will not be automatically added to any grading group based on the Special Programs filter originally selected in the creation of that group. You will need to manually add the student to the desired grading group.
View Student Documents
Instructors may view Special Programs documents on each student’s profile page. Use the Special Programs alert in the Members area to identify which students have documents available to view. Instructors can click a student’s name in Schoology to be taken to their profile. For example, click a student’s name from the course Members area or from the Messages area. System-wide privacy settings in your school may affect whether you can view other users’ profiles. Check with your Support Contact if you have any questions.
Students and parents do not have access to documents from the profile page. Students will see the following message if they attempt to view the Special Programs area on their profile: No Special Programs Data Available.
Instructors with the following permissions have access only to documents that are available to them in Special Programs:
Access user profile app "Special Programs"
View user profile data for app "Special Programs"
To view documents:
From the student's profile page, click Special Programs from the menu under the profile picture. The Special Programs Doc Viewer displays all available documents:
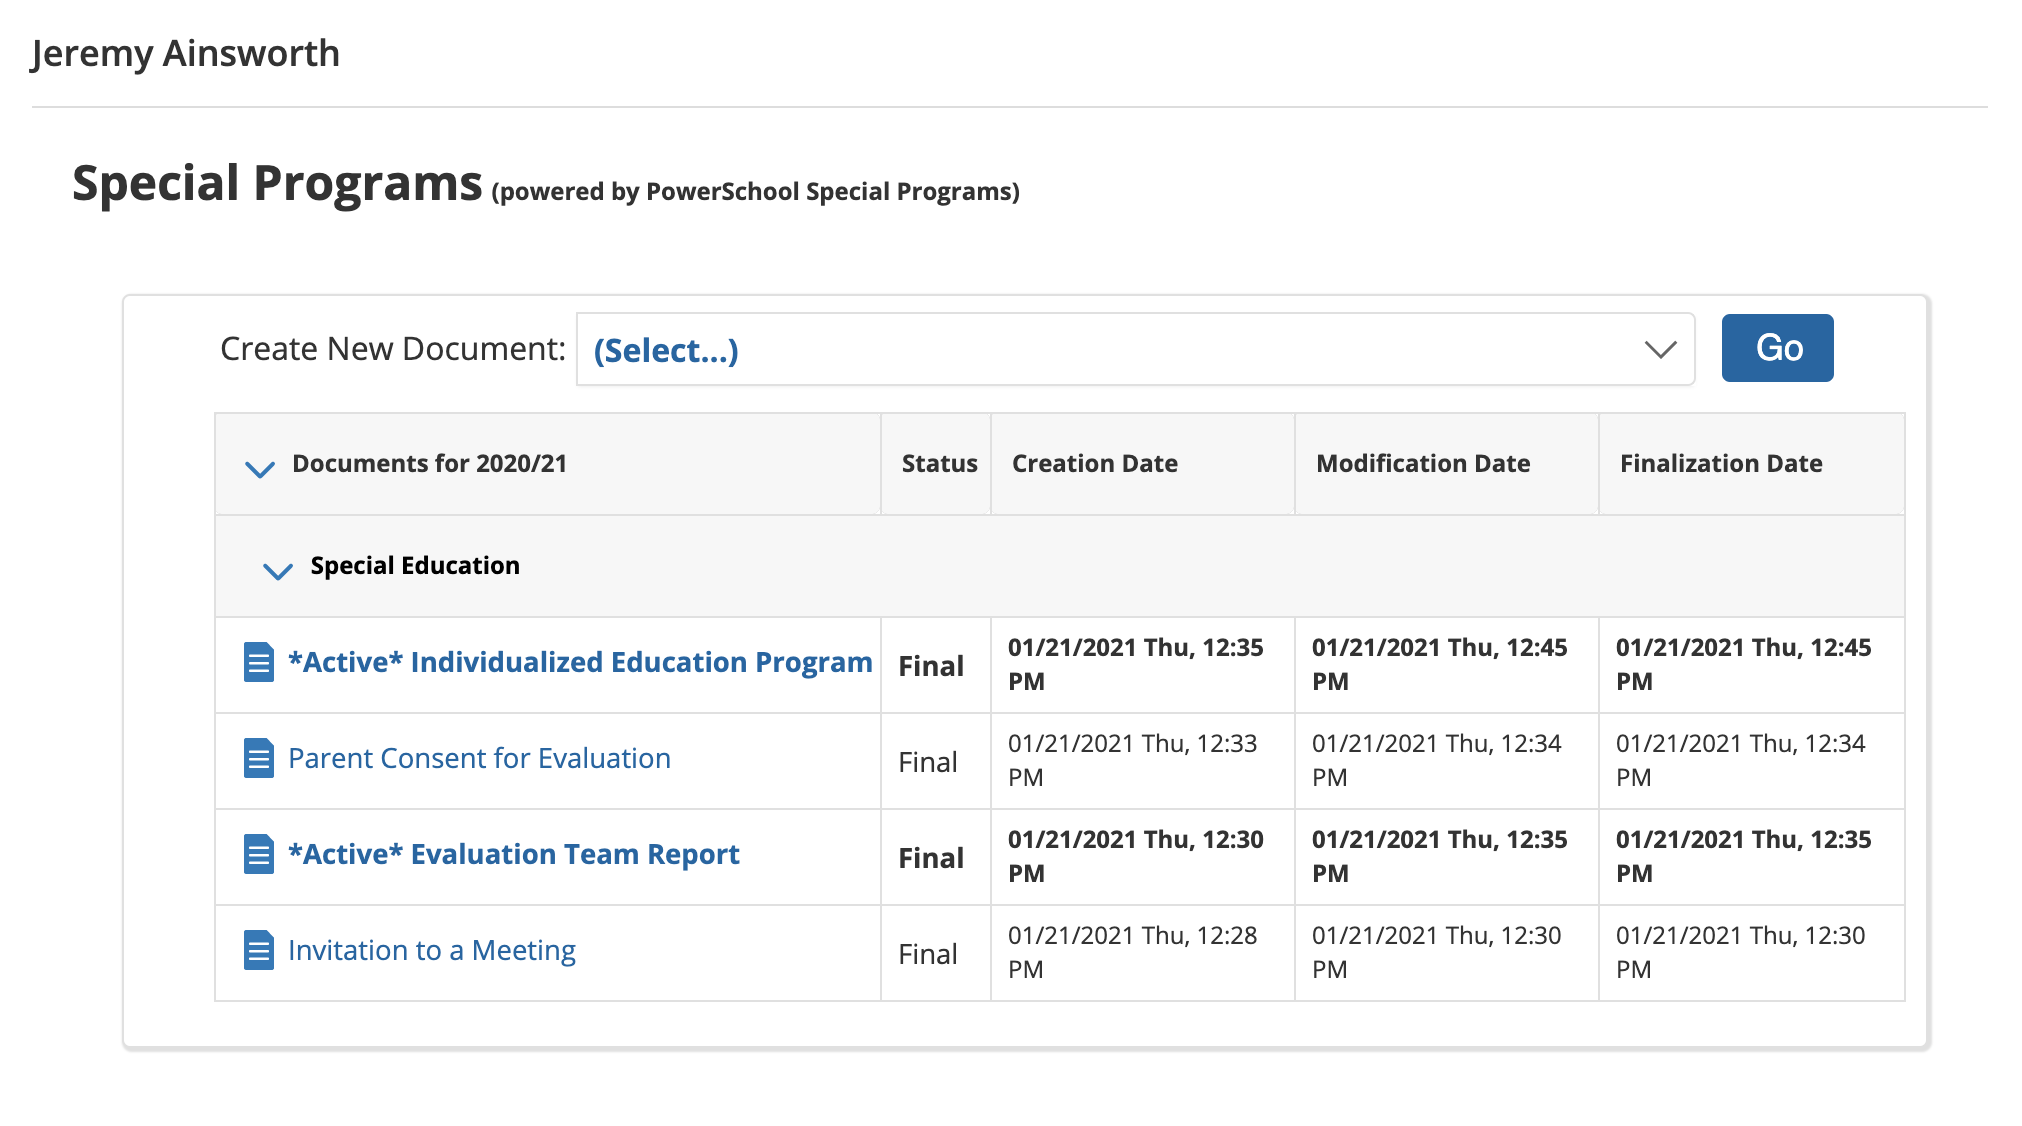
Click the title of any document to open it in Special Programs in a new browser tab. Make sure you’re logged into Special Programs otherwise you may be directed to log in.
To create a new document:
From the student's profile page, click Special Programs from the menu under the profile picture.
Click (Select...) next to Create New Document.
Select the desired document type from the drop-down menu.
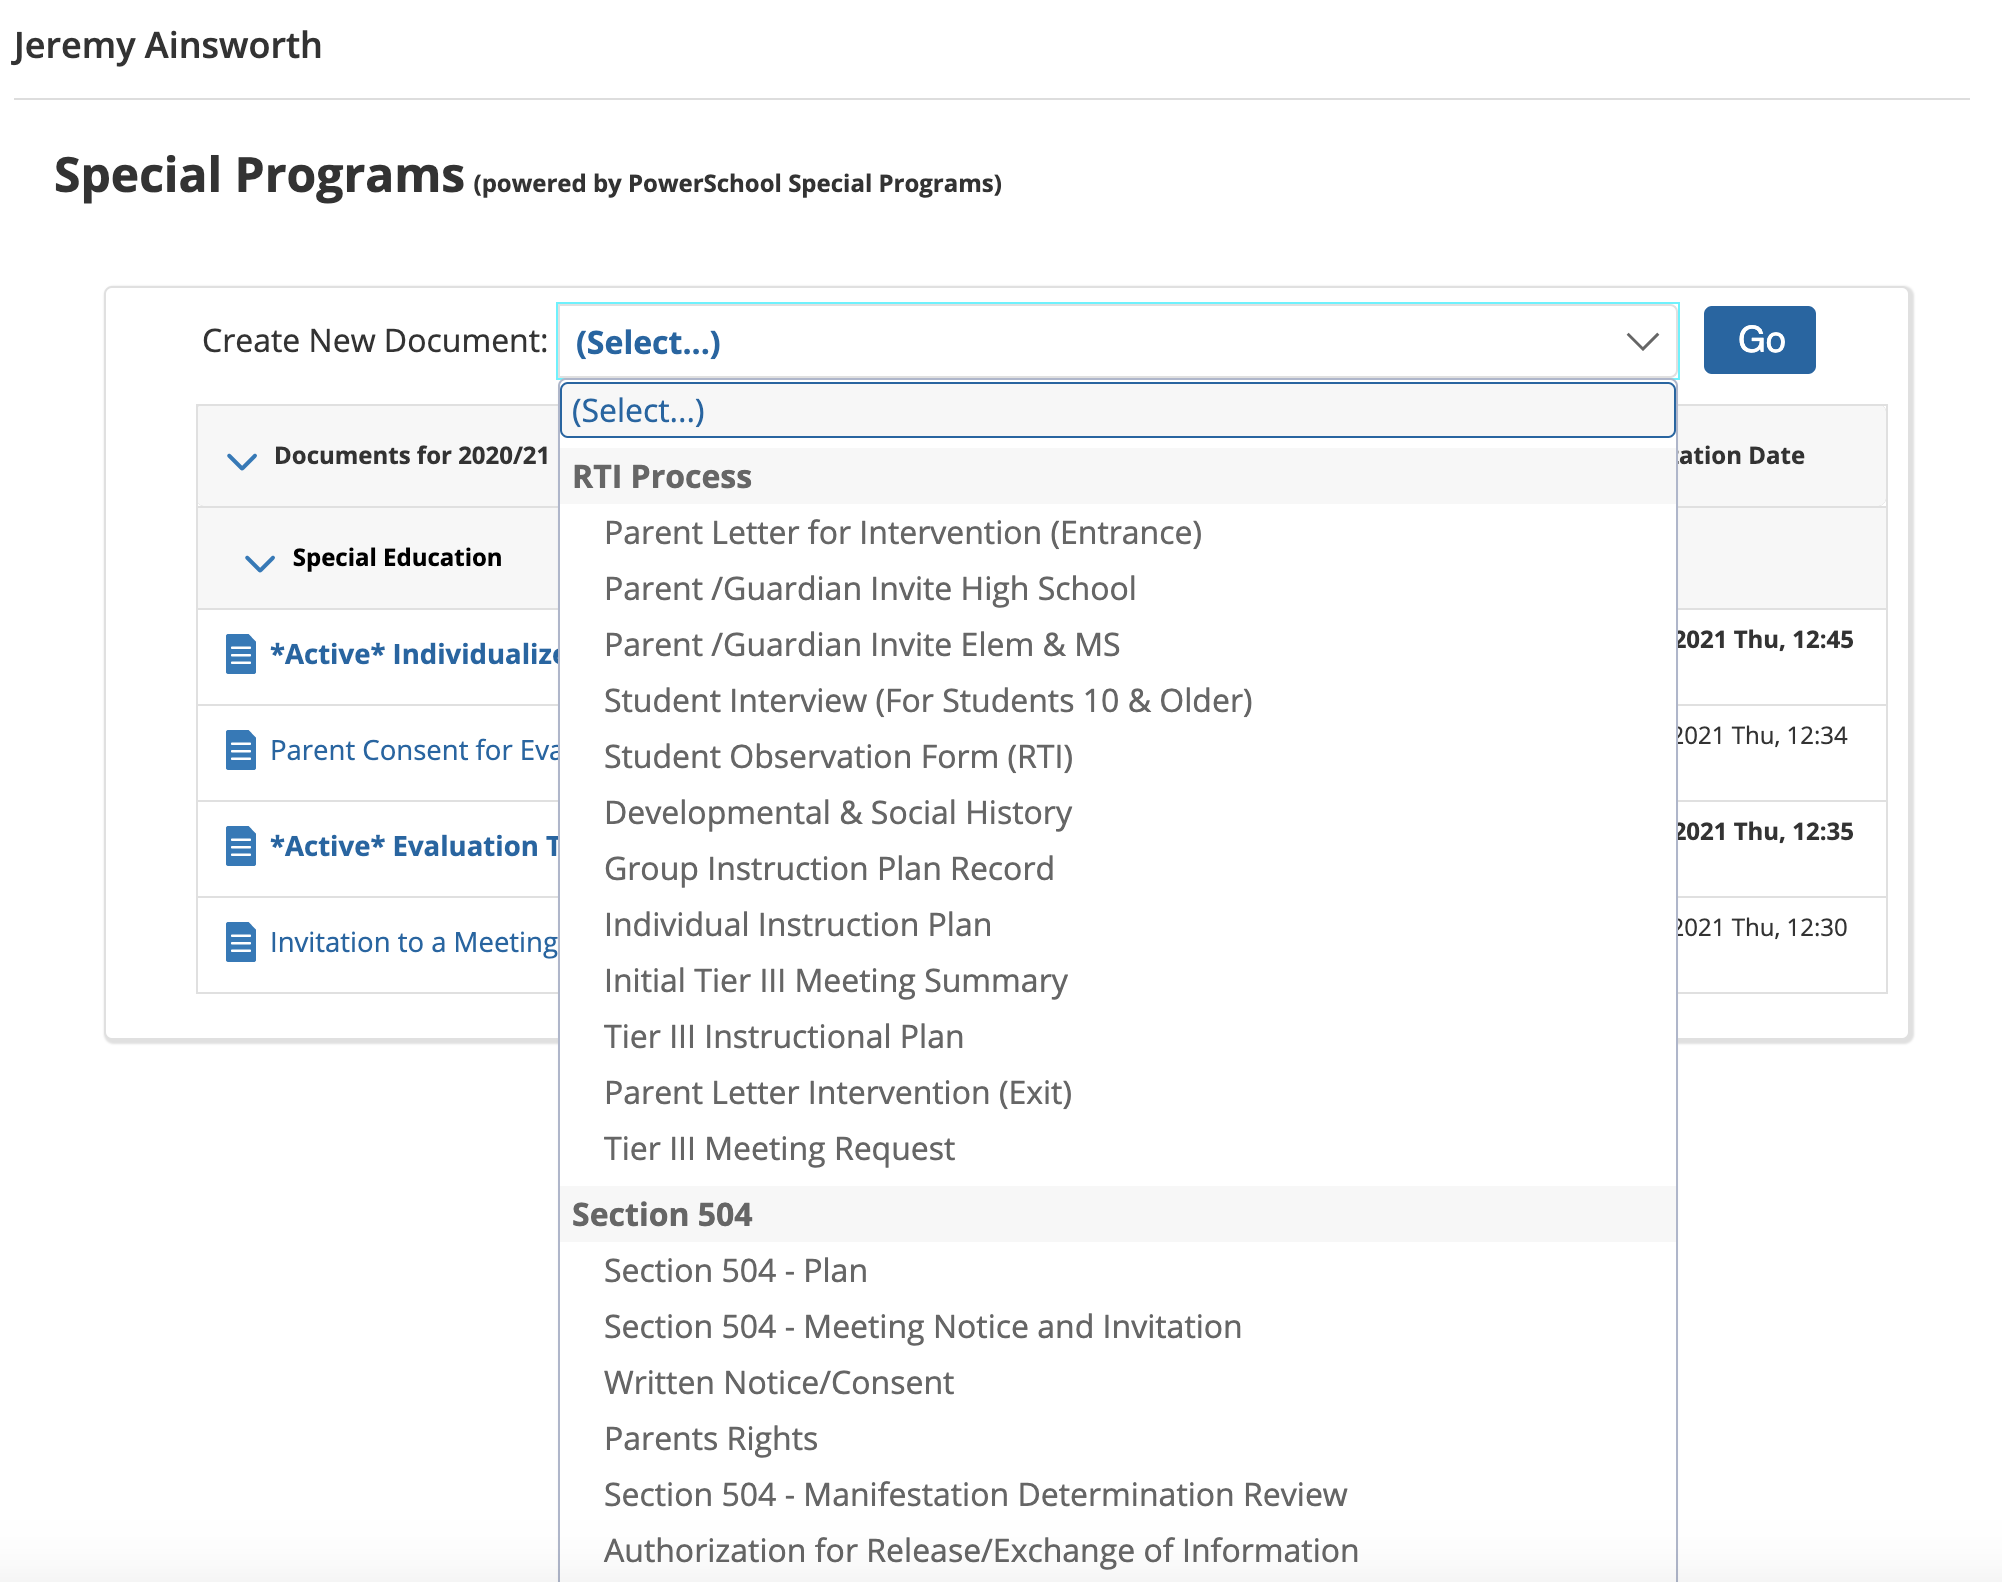
Click Go to be taken to Special Programs where you can continue to create the document.