
Scoring Assignment only allows you to score rubric-based items from OLA or scan sheet tests, but it allows considerable flexibility in who can score and the scoring options that can be used. Scoring Assignment allows multiple scorers to score tests, blind scoring (the student's name is not displayed during scoring), defining who can grade specific students (you can prevent teachers from grading their students), and limiting scorers to only their school or a different school. You can add or remove individual scorers or groups of scorers for a test, and scorers do not require permission to the test. Scoring Assignment is only used for tests with human-scored interactions. When a test is saved, a scoring assignment is automatically created with default settings, and it is displayed on the Edit Scoring Assignment page.
Use Scoring Assignment when one or more of these scenarios is true:
-
More than one scorer will grade the test.
-
Blind scoring is required (the student's name is not displayed during scoring).
-
It is necessary to specify who can score the test.
-
Scorers must not score their students.
-
Scorers must only score their students.
-
Scorers can only score students from their school.
-
Scorers are part of a scoring group.
-
You cannot play student responses for audio/video interactions in Scoring Assignment. Audio and video responses can be played and scored using Online Scoring.
Configure scoring assignment
Use the Edit Scoring Assignment page to configure Scoring Assignments. Before students can be scored, the scoring assignment must be configured to add scorers and set any options.
If a test is intended to only be scored using Scoring Assignment, do not select Enter/Edit Responses in the test's administration window. This prevents the test from being scored inadvertently in Online Scoring.
-
Use the global search to locate the scoring assignment.
-
From the Type section, select Scoring Assignments.
-
Enter Search criteria, then press Enter.
-
To list only open assignments, navigate to Scoring Assignment State, then select Open.
-
Click Edit for the desired scoring assignment.
-
The Edit option will only display if you have permission to edit the scoring assignment.
-
You can also display Edit Scoring Assignment for a test directly from the Test Edit page by clicking Edit Scoring.
-
You can update the scoring assignment title.
-
Click More Details to display the scoring assignment settings.
-
You can update the scoring assignment Description.
-
Enter the scoring Begin Date and End Date.
The start date default is the start date of the test's administration window, and the end date default is a month after the testing window ends. If the test administration window end date is changed, the end date for the existing scoring assignment is extended to one month past the new end date of the test administration window.
-
Select from the following options to determine who can score the student responses:
-
None indicates there is no specific determination on which students a scorer will score.
-
Exclude prevents scorers from scoring their students.
-
Include limits scorers to scoring only their students.
-
Limit to School limits scorers to scoring only students in their schools.
-
Blind Scoring prevents student names from being displayed for scorers
-
-
Enter the Score Lock Timeout value. After a scorer reviews a student's response to an item, it is locked to them so that no other scorers can review it and overwrite their work. The timeout determines how long a scorer has (in minutes) to complete the scoring process before the student's response for that item is released for another scorer to review and score.
-
Click Add/Remove Scorers to assign and permit scorers to score the assignment.
Permissions only grants permissions to the Scoring Assignment. It does not give permissions for scorers to score the assignment. You must use Add/Remove Scorers to give scorers permission to review and score.
-
On the Select Scorers dialog, you locate and add users, roles, or groups.
-
Enter criteria in the Search field.
-
Click ADD for each user, role, or group.
-
Click Save. Scorers have permission to review the scoring configuration for this test but cannot make changes. For flexibility, you can create scoring groups to select in this step.
-
-
Click Item View to determine the settings for how the final score will be computed for each item.
-
Under Algorithm/Count, enter the number of scorers who will score the item.
-
Click Apply to All for the same settings to apply for every item on the test.
Currently, Average Score is the only Algorithm selection available.
-
Click Save.
Create and use scoring groups
You can create groups to assign scorers to scoring assignments. For example, you can create groups by grade so only scorers from one grade will score another grade's test.
-
Create a scoring group.
-
From the main navigation menu, choose Admin, then choose New Group.
-
Enter the Group Name and Group Description.
-
Add members to the group.
-
Save the group.
-
-
Verify permissions to rubrics.
-
To all existing rubrics, assign Read permissions for the scoring group you just created.
-
When a new rubric is created, ensure that Read permission is assigned to scoring groups.
-
When configuring a scoring assignment, you can add the scoring group as a scorer.
Use scoring assignment to score a test
If you are assigned as a scorer for a test, you can score student responses to manually scored interactions that have been entered either via OLA or within a student response area on a scan form.
You cannot review an assignment from the Score Assignments section of the News and Assignments tab of MyDashboard unless you created the scoring assignment.
After student responses are ready for scoring, the scoring assignment Status changes to Open.
-
From the main navigation menu, choose Tests, then choose Test Center.
-
Search for the test that has the scoring assignment you want to score.
If the test does not display, ensure that its test window is open, and confirm that Limit to Open Test Window is not selected.
-
In the test's Actions column, select the ellipsis, then choose Scoring Assignment.
-
Click Score Items.
-
Alternatively, you can use the global search to display scoring assignments.
-
Click the global search icon.
-
From the Type filter, choose Scoring Assignments.
-
Click Score on the desired assignment.
-
-
Select a scoring layout for the listed items:
-
In Item View, you will score rubrics for all students for one selected item.
-
In Student View, you will score rubrics for all items for one selected student.
-
-
In Student View, you can filter for a specific class by clicking the Select Classes filter You may select multiple classes.
-
Depending on your layout, locate the item or student to score. Use Search to narrow the list in either layout. Click on Score Items or Score Student in the corresponding row.
-
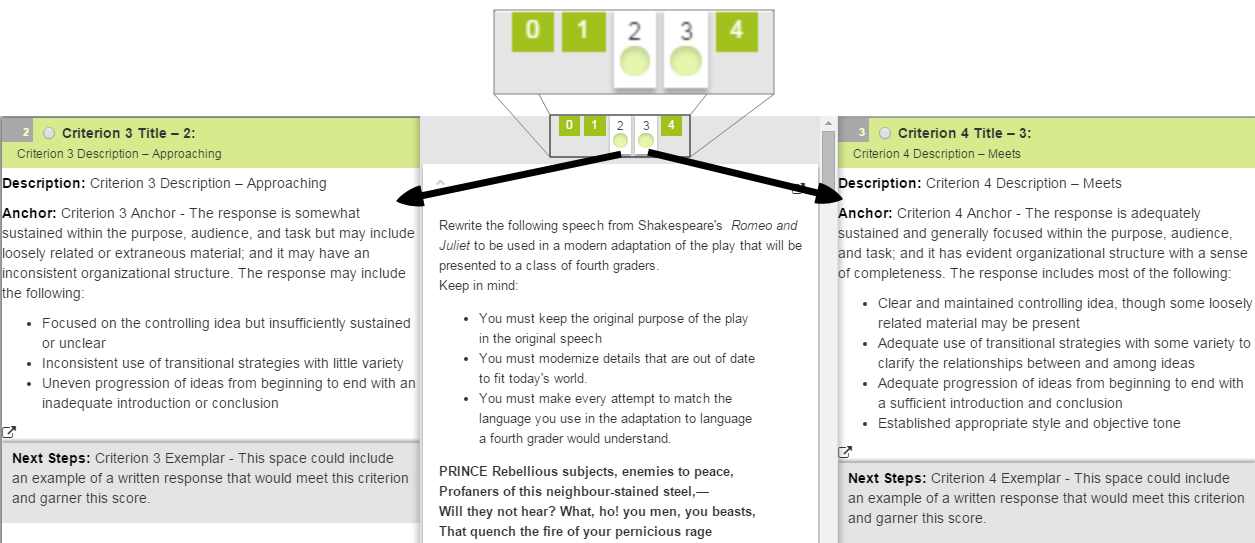
On the scoring screen, the students being scored are represented by bubbles. An arrow points to the corresponding bubble of the student whose response you are reviewing. The student's ID will display in place of the student's name if blind scoring is enabled.
-
After you review a student's response, you have a set time to complete the scoring. If you do not score a student's response in the defined amount of time, the response will be released to another scorer. The time remaining is indicated by a clockwise ring on the student's bubble.
-
After the time expires for the student, you must click the student bubble to begin scoring again.
If you selected Item View, the additional bubbles represent students whose responses you have reviewed and who are locked to you for scoring. Scroll through students either by clicking on their bubbles or by using the left and right arrows.
If you used Student View, only the selected student displays. Click the navigational arrows to navigate through the items.
-
Depending on how the rubric was created, an item can have multiple rubric panels to be scored. Every panel is expanded by default for reviewing and scoring, so be sure to scroll down to score all the rubrics. Click the caret to expand and collapse the rubric panels while reviewing.
-
If the student's response spans multiple sheets, the rubric panel displays their response in the order of the pages. Click the carets to display passages or other resources associated with the item.
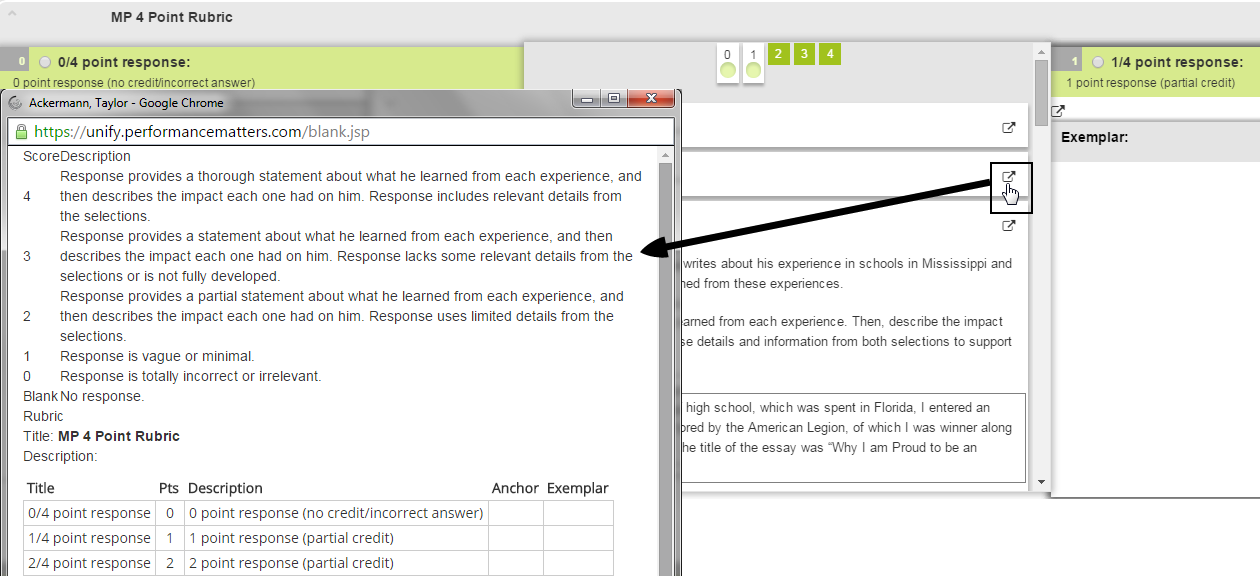
You can click the full-screen icon to display a larger window that contains the student Online Testing response or full scan sheet. In Item View, the content of this window updates as you scroll through students. In Student View, this window closes when you scroll to a new item.
-
Review the details of the rubric scores and criteria. Tabs represent every rubric level and display each level's score. Click these tabs to scroll through performance levels.
The rubric details for third-party items are presented in a collapsed field. Use the expand icon to display the rubric.
-
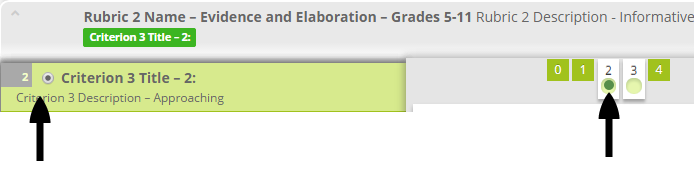
Use the rubric criteria to determine the appropriate rubric score. Click the corresponding score button.
-
To remove scores for this item, click the refresh button.
-
Select a score for each rubric associated with the item. The student bubble fills to indicate scoring progress. The bubble will be completely filled when all rubrics are scored for the response.

-
If you use Item View, click Return to select a new item for scoring after you score all students.
If you use Student View, click the home icon to select a new student for scoring after you score all items.

-
The scoring assignment status changes to Closed when both of these conditions are met:
-
All student responses and rubrics have been scored by the designated number of scorers.
-
Thirty days have elapsed since the designated end date of the scoring assignment.
-
After closing, scores can no longer be changed.
Quick scoring
If you do not need to review responses or rubric details, you can use Quick Score.
Quick Score is only available for single scorers. When multiple scorers are required, Quick Score is disabled.
-
From the main navigation menu, choose Tests, then choose Test Center.
-
Search for the test that has the scoring assignment you want to score.
-
In the test's Actions column, select the ellipsis, then choose Scoring Assignment.
-
Click the Student View tab.
-
Locate the students to be scored.
-
In the Quick Score column, click the drop-down selector for each rubric and select a score.
Scores save automatically.
You can also use Quick Score to change a score if you assigned the score, and the scoring window is open.
Re-scoring student responses
-
From the main navigation menu, choose Tests, then choose Test Center.
-
Search for the test that has the scoring assignment you want to score.
-
In the test's Actions column, select the ellipsis, then choose Scoring Assignment.
-
Click the Student View tab.
-
Locate the student.
-
Click Reset Scores.
-
Click Delete to confirm. The scores will be cleared and responses can be re-scored.
If you click Reset Scores, all scores are removed for the student, including those assigned by other scorers. This action cannot be undone.