SafeArrival Guide for District Staff
You must have a SchoolMessenger Communicate account to use SafeArrival. In addition, your account must have the Manage SafeArrival permission enabled.
If you need to have these permissions added and you are not a System Administrator in SchoolMessenger Communicate, please contact your district’s System Administrator. If you are a System Administrator, you can contact SchoolMessenger solutions support for assistance with adding these permissions.
Note: SchoolMessenger Solutions Support cannot change user account attributes in SchoolMessenger Communicate that you cannot change yourself without permission from a SchoolMessenger System Administrator within your district/school assigned to setting up and maintaining your SchoolMessenger Communicate account.
Sample SafeArrival URL where mydistrictabbrev is specific to your district:
https://admin.safearrival.schoolmessenger.com/mydistrictabbrev (US)
https://admin.safearrival.schoolmessenger.ca/mydistrictabbrev (Canada)
If you are already signed in to SchoolMessenger Communicate, you can also access SafeArrival by clicking SafeArrival from the System tab. If you do not see the link to SafeArrival, you need to have the Manage SafeArrival permission added to your account.

SafeArrival Menu
SafeArrival Settings Configured by SchoolMessenger Solutions Support
In consultation with your District, the following settings will be configured for you:
District Name
District Code
District Time Zone
URL for district/school staff SafeArrival websites
Toll-Free Number
SafeArrival Status (Active or Not Active)
Hide Discrepancies (If ON, discrepancies are not shown on SafeArrival summary/reports.)
Multi-Language (If ON, supported languages must be configured.)
SIS Integration (If ON, attendance file upload from the SIS to SafeArrival must be configured.)
SIS Write-Back
Full-day Consecutive Days Switch
Attendance File Import Settings
Notification Settings
Email push Window
SMS Window
Maximum number of times to call a number
SafeArrival uses five Messages and five Communicate Broadcast Templates for its communication with parent/guardians.
Notification of a marked absence
Confirmation of a reported absence
Notification for an updated absence
Notification for a deleted absence
Notification for an explained absence
To discuss or modify the above settings, please contact the SchoolMessenger solutions support.
SafeArrival Settings
SafeArrival settings can be assigned at the District, School Group and School levels as indicated below. School settings override Group settings, which override District settings.
Assigning schools to groups causes the assigned schools to inherit all the group settings, minimizing the effort needed to set up schools. A school can be assigned to only one group. A school only needs to be assigned to a group if you want it to have settings that are different from the District settings (other than School Start and End Times).
When a school is assigned to a School Group it shares the same calendar and notification settings with all the other schools in that group.
Tip: When you create a Group, a COPY of all events on the District calendar is added to the Group calendar. After that, any changes that are made to the District calendar will NOT affect Group calendars. Be sure to enter all the District calendar events BEFORE creating Groups.
School Groups are set up by grouping schools according to common calendars and notification settings.
Change the settings
Settings that can only be changed by SchoolMessenger Support are indicated as a note in the table. All other settings can be changed by a District Administrator (Manage SafeArrival permission in their user profile).
School users (with Use SafeArrival permission in their user profile but not Manage SafeArrival permission) can manage their Report Recipients*.
Category | Setting | District | Group | School |
|---|---|---|---|---|
School/Group | Add / Edit / Delete Groups | Yes | No | No |
School/Group | Add / Delete Schools from Groups | Yes | No | No |
Absence Options | Absence Type Text | Yes | Yes | Yes |
Absence Options | Absence Type | Yes | Yes | Yes |
Absence Options | Absence Reasons, Text, Codes, Order | Yes | Yes | Yes |
Absence Options | Maximum Consecutive Days | Yes | No | Yes |
Absence Options | Delete / Edit Absences | Yes | Yes | Yes |
Notifications | School Bell Times | Yes | No | Yes |
Notifications | Duration to wait until parents are notified - 20 minutes | Yes | Yes | No |
Notifications | Duration to wait between phone calls - 4 minutes | Yes | Yes | No |
Notifications | Email / Push window (Duration to wait to text via SMS) # | Yes | Yes | No |
Notifications | Duration to wait after sending a text via SMS before retrying phone number # | Yes | Yes | No |
Notifications | Maximum number to try a phone number - 4 times # | Yes | Yes | No |
Notifications | Caller ID | Yes | No | Yes |
Notifications | Options for Late Arrivals / Returns | Yes | Yes | No |
Notifications | Cut-off Schedule | Yes | Yes | No |
Notifications | Cut-off Time | Yes | Yes | No override; can be School Start Time |
Notifications | SIS Integration # | Yes | No | No |
Notifications | SIS Write-Back | Yes | No | Now |
Notifications | Auto Notification Type | No | Yes | Yes |
Language | Enabled Languages | Yes | No | No |
Calendar | School Calendar | Yes | Yes | No |
School Term | School Term | Yes | Yes | No |
Report Recipients | Report receipt. This setting can be changed by school staff. | Yes | No | Yes |
# This setting can only be changed by the SchoolMessenger support team.
Home Page
The Home option on the left-hand menu displays the main screen for configuring the SafeArrival settings.

SafeArrival Home page
Schools and Groups
This page shows either Schools or Groups, depending on which sub-option is selected.
Schools

SafeArrival School Settings
If there are schools covered by your SafeArrival contract missing from this list, please contact SchoolMessenger Solutions Support to have them imported into SafeArrival.
Search the list of schools by entering text or a school code into the Search box and then clicking Search. Click Reset to restore the full list of schools.
School ID: Click this column title to sort the list of schools by School ID. School ID is a number assigned by SafeArrival and should not be confused with the School Code used by the SIS.
School Name: Click this column title to sort the list of schools alphabetically. Click the school name to log into the school’s SafeArrival site.
School Code will be shown beside the School Name column, if it is available. This is the code used by the SIS.
Import school codes: Individual school codes can be edited using the Edit School Code option on the Actions menu. If you need to set up many school codes, you can use this button to import a CSV file that contains the codes for many schools. The CSV file’s format: school code in the first column and the school name in the second column.
School Group: If the school has been assigned to a group, the name of the group will be shown in this column.
Max. Absence Days: Shows the maximum number of consecutive and cumulative days that a parent/guardian can report through SafeArrival.
Bell Time: This column shows the school start and end times.
Import bell times: Individual school bell times can be edited using the Edit School Bell Time option accessible from the Actions menu. If you need to set up many different school bell times, you can use this button to import a CSV file that contains the bell times for each of the schools. The CSV file’s format: School Name in the first column, Start Time in the second column, and End Time in the third column.
Active: This column shows whether a school is actively participating in SafeArrival. When a school is active and it is within the current school term, guardians can report absences for students in that school. Activate or deactivate a school for SafeArrival by clicking the Active switch. Click Activate All to activate all your schools.
Groups

SafeArrival Groups Settings
Create: Click the Create + icon to create a new Group.
Group Name: This is the name of the group. Click this heading to sort the groups alphabetically by name.
Description: Text entered which describes the group.
Schools: This column contains a link to Add Schools if there are no schools in the Group. Otherwise, a link is displayed showing the number of schools currently in the group. Click this link to add/delete schools.
The Actions menu allows you to:
Edit: Edit the Group Name and/or Description.
Delete: Release schools from the Group and delete the Group.
Group Settings: Edit the settings for Absence Notifications and Absence Reporting.
Group School Term: Edit the school terms for the group.
Group School Calendar: Edit the calendar for the school group.
Manage Schools in Group: Add/delete schools from the group.
Auto Notification: In a District that uses SIS Integration, edit the Auto Notification type for schools in this group. You’ll also be able to access the Enable Re-send notifications checkbox by default switch.
Actions Menu
The Actions menu allows you to choose between the Settings and More icons. The options that are available will vary depending on if you are viewing Groups or Schools.
Customization Options
If you click the Settings icon, you will be able to customize settings for a school or group. You can access the settings by clicking on each tab.
General
On the General tab, you can configure the following settings for a school. The General tab is not available if customizing settings for a group.
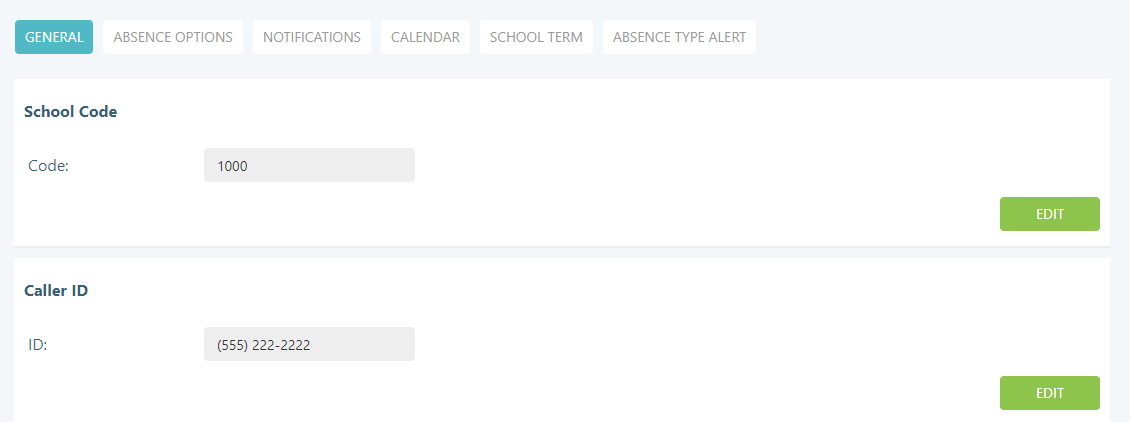
General tab
School Code: To change the school code, click Edit. Enter your updated value and click Save.
Caller ID: You can provide a phone number that SafeArrival will display as the caller ID when SafeArrival phone notifications are sent from the school. To change the phone number, click Edit. Under your number and click Save.
Bell Time: You can change the school Start Time and End Time. To change the time, click Edit. Under your preferred times and click Save.
Max. Cumulative Days: If this feature has been enabled for your district, you can edit the number of cumulative days that an absence can be reported at the school. This edit will overwrite the default setting for the district. To change the setting, click Edit. Enter your desired value and click Save.
Max. Consecutive Days: Edit the number of consecutive days that an absence can be reported at the school. This edit will overwrite the default setting entered for the district. This edit will overwrite the default setting for the district. To change the setting, click Edit. Enter your desired value and click Save.
Note: If any of these settings have been set globally, you will see the option to Customize rather than Edit.
Absence Options
On the Absence Options tab, you can customize the absence reasons and absence types available for a school or group.
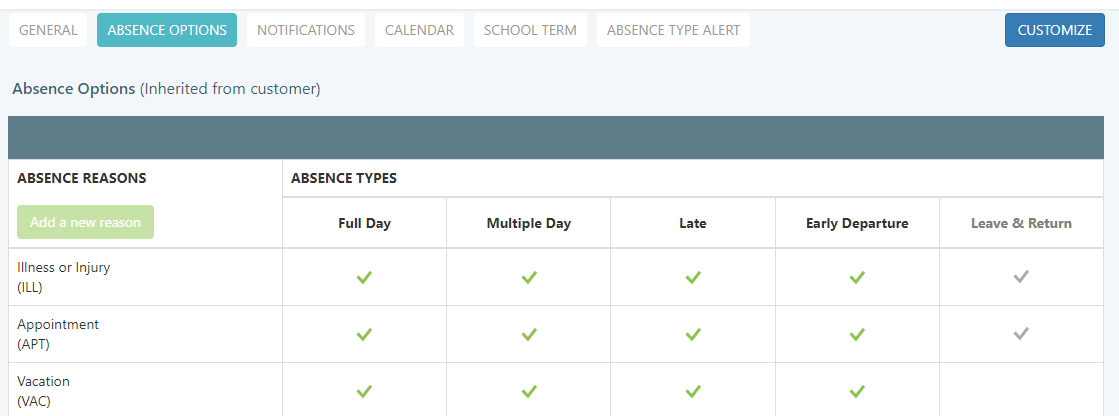
Absence Options tab
To modify the options, click Customize.
On the dialog window message, click Customize again.

Edit Absence Types
On the Absence Reasons table, click Edit.
Edit Absence Types
You will not be able to create new Absence Types. However, you can rename, enable or disable Absence Types to customize them for the current school or group.

Customize Absence Types
To update the name of an Absence Type, click within the name of the Absence Type and enter a new name.
To enable or disable an Absence Type, use the toggle switch.
Add an Absence Reason
To add a new reason to the list of Absence Reasons, click Add a new reason.
In the first field, enter the name of your reason. In the second field, enter the code for your reason.

Add Absence Reason
Next to the absence reason, select the Absence Types that should be able to use your new Absence Reason.

Absence Reason Usage
Edit an Absence Reason
To edit an existing Absence Reason, click within the field you wish to edit.

Edit an Absence Reason
Change the name and code for the Absence Reason you wish to update.
You can also change the order of the Absence Reasons. To reorder the list of Absence Reasons, click the icon and drag the item to your preferred location in the order.

Reorder Absence Reasons
Repeat this process to re-order any Absence Reasons you wish to move.
Delete an Absence Reason
To delete an Absence Reason for your school or group, click the X (Delete) icon to the right of the reason you wish to remove.
Saving Your Changes
After you have made the desired changes to your Absence Reasons and Absence Types for the school or group, click Save Changes.
If you want to go back to your district settings, click Restore Default Values.
Notifications
The Notifications tab shows the notification for your school or group. You are not able to make changes to your Notification settings on a school level, but on a group level you can configure the following:

Notifications tab
For how many minutes should the system try to reach parents: Choose for how long the system should keep trying to reach a parent. You can choose from between 20 and 60 minutes.
If a phone call does not reach a person or leave a message, how many minutes should the system wait before trying the call again: Choose how often the system should wait before trying to reach the user again. You can choose intervals between 1 and 15 minutes.
What is the maximum number of times the system should call a given phone number: Choose the maximum number of attempts to call a phone number for a particular notification. Can choose between 1 and 5.
How would you like to handle notifications for reported Late Arrivals: Choose how to deal with notifications for late arrivals. You can choose between Strict, Loose or a Grace Period.
Which cut-off time would you like to use: Choose the cut-off time for your notifications.
Show SchoolMessenger App link in confirmation messages: Including a link to the SchoolMessenger app is a district-wide setting so cannot be changed at the school or group level.
If you wish to restore your group settings back to the default settings for your district, click Restore Default Settings.
Calendar
The Calendar tab will display the holidays, exam days and in-session events inherited from the district or group.

Calendar tab
If you wish to add events specific to your school or group, click Customize.
On the dialog window, click Customize again.
This will remove any events that have been inherited from the district or group and allow you to create your own school or group specific events.

Add Event to the Calendar
You can now use the Add an event to your calendar (+) icon to create a specific event.
You can also import a CSV file of events using the Import a Calendar (Upload) icon.
If you wish to go back to the events you were inheriting, click Restore Default Values.
School Term
The School Term tab allows you to customize the school terms used at a group or school level. These terms indicate when your school, group or district are in session.

School Term tab
If you wish to set school terms specific to your school or group, click Customize.
On the dialog window, click Customize again.
To add new terms, click the Add new school term (+) icon.
If you wish to go back to the school terms you were inheriting, click Restore Default Values.
Auto Notification
If your district uses SIS Integration, this item will be activated and can be used to change the auto notification type for a given school or group.

Auto Notification tab
If you wish to change your settings at the school or group level, click Customize Setting.
On the dialog window, click Customize again.

Customize Auto Notification
You can choose if you want the Notification Type to be Manual or if you wish to use a Schedule.
You can also access the Enable Re-send notifications checkbox by default switch.
If you change your settings, click Save.
Absence Type Notifications
Within SafeArrival, school staff have the option to be sent an email or notification should an Early Departure or Leave & Return absence be logged. This feature is disabled by default so if you do not see an Absence Type Notifications tab and wish to use these features, please contact our support team.
After clicking Absence Type Notifications, you can enable the alerts through this interface.
💡 Be sure to add autoreport@system.schoolmessenger.com to your safe senders list. This is the email address that is used to send these alerts.

Absence Type Notifications tab
Under Notification Absence Types turn on the toggle switch for Enable sending alerts to school staff for selected absence type(s) for the current day and click OK.
Choose the alert types you wish to trigger a notification. The alerts can only be sent for Early Departure or Leave & Return absences.
Note: When you first enable this feature, you will already be in the editing interface but if you want to enable or disable elements in the future, click Edit at the top of the tab.

Notification Absence Types
Enable the email alerts for your desired Notification Absence Types.
In the Notification Types section, you can choose how your staff is notified.

Notification Types
You can Enable Notification By Email or Enable Notification on Dashboard.
If you choose to enable notifications for the SafeArrival dashboard, the staff will be able to view the push notifications for these absences on their dashboard.
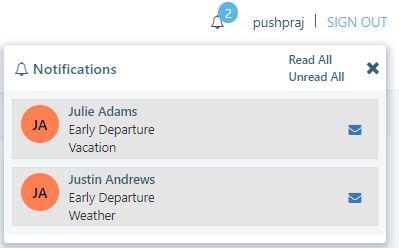
Push Notifications
To determine who should be sent the email alerts, go to the Recipients of the Absence Type Notifications section of the page.
If you want the email alerts to be sent to the staff that are already set up to be emailed SafeArrival reports, enable the toggle switch for Include the Recipients from SafeArrival Report Setting and click OK. Any staff member who is already configured will appear in this section but will not receive emails unless the toggle is on. To add or edit the users in this section, go to Reports > Report Recipients and add or edit recipients. This is only applicable at the school level and not the district level.

Recipients of the Absence Type Notifications section
If you wish to have additional staff notified other than those already included on the SafeArrival report, click Add a Recipient.
Type in the Name and Email of your recipient. Click Save.
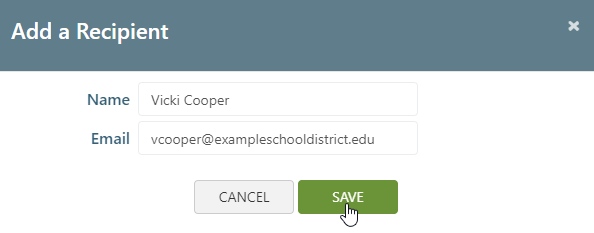
Add a Recipient
Any contacts added as Additional Recipients will also be emailed when an alert is triggered.

Additional Recipients
After you have finished configuring your notification settings, click Save.
NOTE: Each guardian reported early departure or leave and return (whichever options are selected) will result in an individual email being sent for each occurrence. This is not a summary report. This is an almost real time notification that indicates a guardian reported early departure/leave and return type absence. Therefore, this has the potential to generate a lot of emails if those absence types are popular at your school.
Actions Shortcut
When viewing schools or groups, you can use the More icon which provides you with a shortcut to some commonly used actions and customized settings. Some actions are only available on the group or school level.
Schools Actions Shortcut
The following options are available under the More icon drop-down for schools.
Add to a Group, Remove from Group: Add the school to an existing group or remove the school from the group shown in the School Group column.
Edit School Max Cumulative Days: If this feature has been enabled for your district, you can edit the number of cumulative days that an absence can be reported at the school. This edit will overwrite the default setting entered in the Absence Options screen.
Edit School Max. Consecutive Days: Edit the number of consecutive days that an absence can be reported at the school. This edit will overwrite the default setting entered in the Absence Options screen.
Edit School Bell Time: Change the school start and end time.
Edit School Code: Change the school code.
Edit School Term: Change the school terms.
Edit Caller ID: You can provide a phone number that SafeArrival will display as the caller ID when SafeArrival phone notifications are sent from the school.
Auto Notification: If your district uses SIS Integration, this item will be activated and can be used to change the auto notification type for a given school. You’ll also be able to access the Enable Re-send notifications checkbox by default switch.
Show School Settings: View the notifications settings for the school. You can add, edit or delete report recipients.
Sync Student Info: If your district is using SIS, you can sync the latest SIS data for the school.
Edit Absence Options: Edit the Absence Options and Types for the school.
Edit Absence Type Notifications: Edit the alert types that can be sent for the school. This allows you to have an email or push notification send if Early Departure or Leave & Return absences are created. This feature is disabled by default, please contact our support team if you would like to enable it.
Groups Actions Shortcut
The following options are available under the More icon drop down for groups.
Edit: Change the name or description of the group.
Delete: Delete the group. This does not delete the schools within the group.
Group Settings: Change the Notification settings for the group.
Group School Term: Change the School Terms for the group.
Group School Calendar: Edit the School Calendar for the group.
Manage Schools in Group: Add or remove schools from the group.
Auto Notification: If your district uses SIS Integration, this item will be activated and can be used to change the auto notification type for a given group. You’ll also be able to access the Enable Re-send notifications checkbox by default switch.
Group Absence Options: Edit the Absence Options and Types for the group.
Absence Options
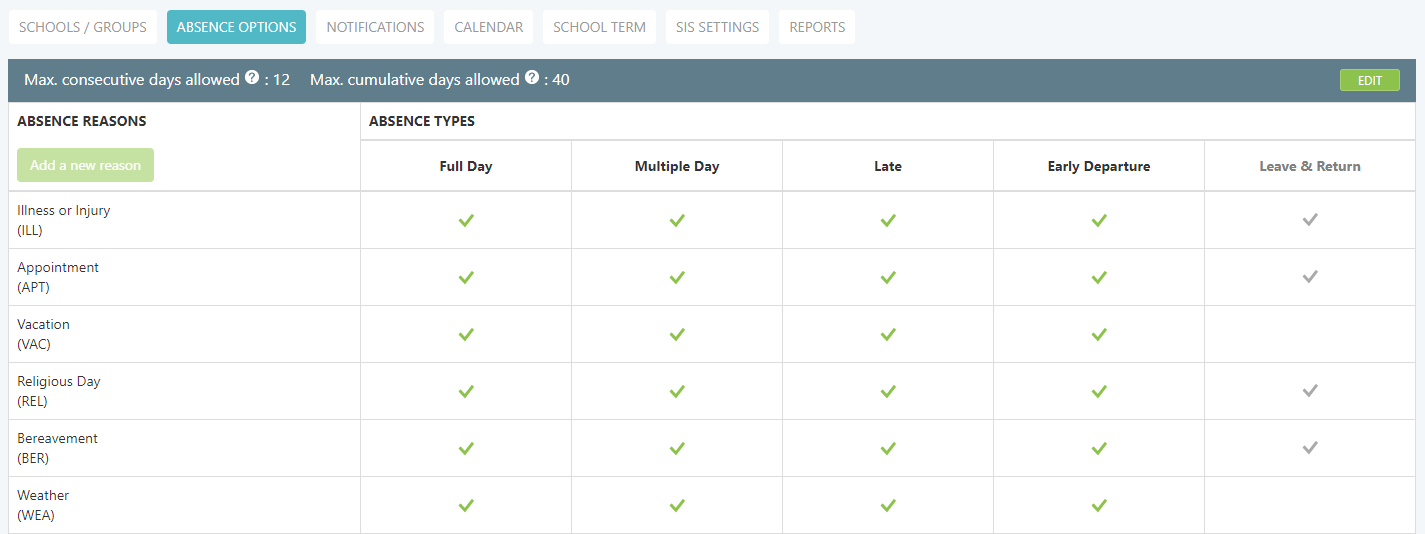
Absence Options tab
Changes can be made on this table only after clicking Edit. Click Save to save changes.
Absence Types
SafeArrival supports 5 types of absences: Full Day, Late Arrival, Early Departure, Leave & Return, Multiple Day.
The types of absences offered to parents are configured on the Absence Options screen.
Absence Reasons
It is recommended that you enable 5 or fewer absence reasons per absence type since guardians using the tollfree phone line may need to listen to all of the reasons before they make a choice. If you have more than 9 absence reasons for a particular absence type, guardians using the toll-free phone line will need to press the “#” key after their choice.
Click Add a new reason to add a new absence reason.
Click the absence code beneath the reason to change it. This is the code that you enter into your Student Information System for this type of absence. It is displayed in the CSV version of the SafeArrival report. If you do not have such a code used in your Student Information System, create an abbreviation and enter it here.
Click the X (Delete) icon to delete an absence reason.
Drag and drop absence reasons to change the order in which they are presented to parent. The most likely reasons should be followed by the less likely ones.
Use the checkboxes to indicate which absence reasons should be allowed for each absence type.
Click Manage Translations to edit the Absence Types and Absence Reasons in the supported languages:
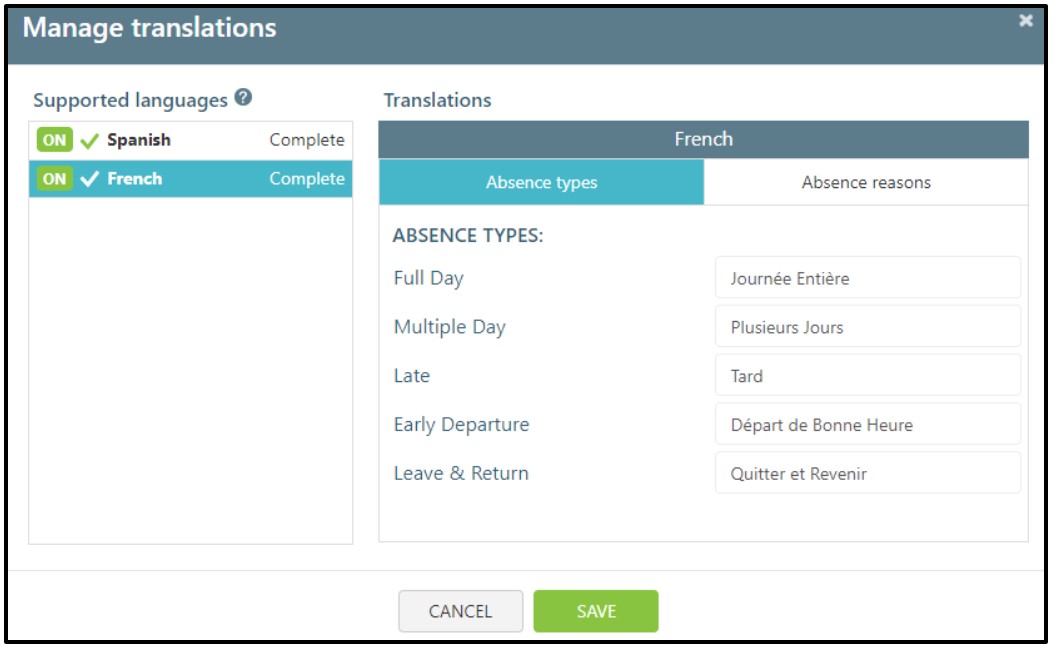
Manage Translations
Absence Type Notifications
When editing the Absence Options for a particular school, you can configure specific Absence Type Notifications to be used for that school.
Maximum Consecutive and Cumulative Days Absence
The default maximum number of consecutive days for which guardians can report absences through the system can be configured here. If guardians try to report a single absence that exceeds this limit, or if they try to report multiple absences that involve consecutive school days and that exceed this limit, they will be asked to contact the school to report the absence. This allows staff to discuss the extended absence with the parent.
Note: If you do not see a Max cumulative days allowed field on the Absence Options tab, and you want to use this feature, please contact our support team and they will enable the setting for your district.
To change the maximum number of consecutive or cumulative days allowed, click Edit.

Edit Absence Options
In the Max. consecutive days allowed and Max cumulative days allowed fields, set the desired number of days. This will be the default used for all schools at your district.
If you wish to not have a maximum number of consecutive or cumulative days allowed, set the value to 0. When the field is set to 0, no maximum threshold will be applied.

Save Absence Options
After updating the maximum days allowed, click Save Changes.
Notifications
SafeArrival notifications are sent in a cascaded sequence and in accordance with the guardian preferences set in the SchoolMessenger App. Individual steps in this sequence will be skipped if the notification destinations (for example, email address) corresponding to them are turned off by parents/guardians in the SchoolMessenger App. The cascaded sequence is as follows:
Email notifications are sent to all destinations configured to receive email messages, and Push notifications are sent to the mobile apps of those who’ve downloaded and configured the mobile version of the SchoolMessenger App.
A configurable pause follows, allowing parent/guardians time to report the unexplained absence reported to them through Email or the Push notification
SMS notifications are sent to all parents/guardians who have opted into receiving SMS messages. For those parent/guardians who have not opted into receiving SMS messages, or if your district/ school is not using the SMS service, this step and the following pause are bypassed.
A configurable pause follows only for those who received the SMS message.
Phone call notifications follow.
The specific points of contact used (who gets messaged and at which destinations) depend on the guardian category and profile settings, the guardian preferences and the Broadcast Settings for Attendance messages in SchoolMessenger Communicate.
If you change any of these settings, be sure to click the Save button.
Absence Notifications
Note: If you have configured SchoolMessenger Communicate so that parents/guardians must give consent before receiving phone calls, SafeArrival will NOT phone parents who have not provided consent. SafeArrival phone calls are classified as Attendance phone calls, using the Communicate Attendance broadcast type.
If you change any of these settings, click Save.
These settings are configured at the District level on the Notifications screen.
The Notifications tab will have an encircled exclamation mark in its upper right corner and the following Reminder will be displayed if and when no District Administrator emails have been added to the system. (See the last option in this section for more information.) Both the exclamation mark and the Reminder will disappear once one or more emails are added

Notifications Reminder
The two fields should contain the district default school start and end times. These times can be overridden for individual schools. Enter the most common bell times here.

School Bell Time
This setting indicates the length of time the system should try to reach parents/guardians with notification of an unexcused absence. The default is 20 minutes. This time can be overridden at the school Group level.

Absence Notifications setting
This setting indicates the minimum number of minutes that the system should wait before redialing the same phone number. The default is 4 minutes. This time can be overridden for school groups.
Note: This setting should not be confused with the intermittent delays between email/push —> SMS —> phone cascade discussed above. This delay applies only to the interval between phone calls.

Phone Number setting
This setting specifies the maximum number of times an individual phone number may be called. Keep in mind that SafeArrival will stop calling a phone number if a message is left on an answering machine or voice mail, but it will continue calling parents/guardians at other phone numbers until such time as a person is contacted. It will make up to four attempts for each such phone number.

Phone Number retries
This setting allows for a single district-wide caller ID to be associated with all SafeArrival phone calls, or the SchoolMessenger Communicate caller ID can be used instead. If the first option is used, schools can set their own caller IDs, which can be different from the Communicate default. This is especially useful in cases for larger schools that have a dedicated attendance telephone line. The attendance caller ID line can then be different from the standard Communicate called ID.

Caller ID display
Also, if the first option here is used, then you can an Import Caller IDs will appear in the Schools page, allowing you the convenience of entering all school Caller IDs in accordance with the specifications should below on the right:

Import Caller IDs
These are three different settings concerning how late arrivals and leave and return absences are to be handled.

Late Arrivals Notifications
Strict will always send a notification message whenever the student arrives after the reported time of arrival, treating it as an unexplained absence.
Loose will always ignore the time of arrival, no matter how much after the reported time the student actually arrives. As long as the student arrives, the interim absence is treated as an explained absence.
Grace Period will treat late arrivals that occur within the configured grace period reported by parents/ guardians as explained absences and no notifications will be sent; whereas, late arrivals that occur after the grace period will be treated as unexplained absences, and an absence notification message will be sent. Grace Period might be considered “strict, with a measure of leniency deemed tolerable by the district.”
Absence Reporting
The cut-off time is the time after which absences for the current day can no longer be reported through SafeArrival. Three options are offered for the SafeArrival cut-off schedule:

Cut-off Time Notifications
If you change any of these settings, be sure to click the SAVE button.
Option 1: The cut-off time is at the time the first notifications are completed each day
This is the default option. Guardians can report planned absences and explain marked absences for the current day up to the end of the first notification period. After that, guardians can only explain absences during subsequent notification periods (if any).
Option 2: The cut-off time is a specific time before the notifications are started each day
With this option, the cut-off time is set at a time that is before the SafeArrival notifications are started each day, usually at or shortly after the morning bell time. After this time, guardians can no longer report planned absences for the current day. During SafeArrival Notifications, guardians can explain absences until the end of the notification period. The time can be set the time to “School Start Time”.

Cut-off Time Notifications Option - 2
Option 3: The cut-off time is a specific time later in the day (an absence report will be emailed at the cut-off time.)
With this option, the cut-off time can be set to later in the day (e.g. midnight). Guardians can report and explain absences for the current day up to that time. This option is useful for high schools, where students may miss periods throughout the day. If a period absence message is sent out in the evening, it makes guardians aware of the absences and can be modified to let them know they have until the cut-off time to explain the absences.

Cut-off Time Notifications Option - 3
Web Links
When users report an absence through a web link, you can control whether or not the confirmation message for the link includes a link to the SchoolMessenger App or not.

SchoolMessenger App link
If you toggle the option on, then the link will be included. If you toggle the option off, then the link will not be included.
District Administrator Recipients
At the end of the Notifications page, District Administrators will be able to manage a list of email addresses:

District Administrator Recipients
If at least one email address is added to this list, school staff will see a District Support and Service link in the footer of the screen. When clicked, this link will allow staff to send an email to one or more email addressed added here. The bottom right corner of the SafeArrival screen will look like this, the first line (next to the highlighted arrow) will have been added:

District Support and Service link
Calendar

Calendar tab
The calendar, in which holidays and exam days are programmed for the District, is maintained on this screen. Separate calendars can be set up for various school groups, but this district-wide calendar, whose numerous entries will cut across group calendars, should be set up first. Its entries can then be downloaded, imported to a group calendar, and then edited there to configure the differences between the district calendar and the group calendar.
Absences are not allowed to be reported through SafeArrival on Holidays. Guardians who try to report absences on Holidays are told that school is not in session that day.
Absences are also not allowed to be reported through SafeArrival on Exam Days. Guardians are told that they need to contact the school directly to report absences on exam days. This gives staff the opportunity to discuss why the child will be absent and how the missed exam will be dealt with.
Note: If the District calendar is changed AFTER a Group calendar is created, the Group calendar will NOT be affected by the change made in the District calendar.
School Term

School Term tab
The school term is configured on this screen. Terms cannot overlap or be longer than 1 year.
Recommendations
The start date should be one or two weeks before the first day of school for the school whose start date is the earliest in the district, and the end date should be the last day of school for the school whose last date is the latest in the district. All school groups can use this term. Add holiday events to the district or group calendars to block out any non-school days for those schools, including the days before school starts. This allows parents to start reporting absences before school starts for dates when school is actually in session. For example:
First day of school is Tuesday, September 5
First day of school term is set to Monday, August 28
August 28 - September 4 are set up as Holidays
On Sunday, August 27 or before, parents will not be able to report absences.
On Monday, August 28 or later, parents will be able to report absences occurring on September 5 or later.
Languages
If you wish you can add support for your absence notice messages to be translated into other languages.
Tip: In order to add support for additional languages you will first need to contact SchoolMessenger Support so we can enable the requested languages.
Your custom translated versions of your absence type and absence reasons can be displayed for parents and guardians who are using the SchoolMessenger app in Spanish or French if you have set up the appropriate translations.
To enable or disable Spanish or French translations, toggle the switch on or off for the desired language(s) and click OK.
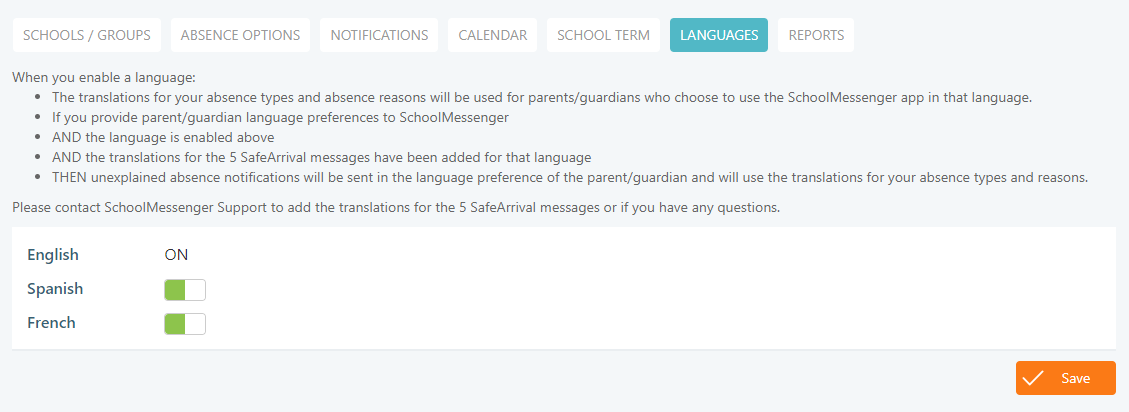
Languages tab
Click Save to confirm your changes.
For more information on translations, including adding Google Translate to absence requests sent via Web Link, see the Multi-Language Support section.
Manual Imports, SIS Integration, and Auto Notification
SIS Integration refers to the ability to have SafeArrival configured so that attendance files from the Student Information system are imported directly through an automated process into SafeArrival. This eliminates the need for school staff to export the Attendance file from the Student Information System, save it on their computer, then manually import it into SafeArrival. There are, however, situations in which this manual process may be preferable, and where, consequently, SafeArrival can be set up to run manually.
Manual Imports
Manual imports involve the following two major steps:
As soon as possible after attendance-taking has been complete, school staff export marked absences from their Student Information System (SIS) and save the file on their computer.
School Staff use the SafeArrival School Staff website to Import Attendance (which has already been taken and written to the Student Information System) and Send Notifications.
SIS Integration and Auto Notification Options
SIS Integration is set up and enabled by SchoolMessenger Solutions Support. They will add all schools to the automated import, scheduling each of the imports according to preferences and requirements.
After SIS Integration has been enabled, the Auto Notification heading will appear and the Auto Notification type will be displayed for each school on the SCHOOLS list.

Auto Notification type
At the school and group level, the Auto Notification option will be activated on the Actions menu. (If imports are manual, this option will be greyed out.)

Auto Notification type in Actions drop-down menu
In most cases, attendance data will arrive fully automated from your Student Management System and appear in the SafeArrival system. However, your setup may be, as it were, semi-automatic. That is, your setup may involve an option within your Student Management System in which the export of the attendance data is accomplished only when you’ve executed an option setup up to transfer the attendance data to SafeArrival. This is different from the fully manual system described above, in that in this case the attendance data is directly written to SafeArrival, and there is no need to save a file and import it into SafeArrival. PowerSchool, for example, is a Student Information System which can be configured in this way with the AutoSend Run Now command. But such manual triggering can also be set up in other Student Information Systems.
For the majority of cases in which SIS Integration is implemented, the importation of attendance data is fully automated. Hence, after attendance has been taken by teachers and others, all the attendance data (marked by teachers and reported by parents and guardians) will automatically appear in SafeArrival. The only thing that needs to be decided is what happens next – how and when the notifications contacting parents and guardians concerning unexplained absences will be sent. There are three options here:
Manual Auto Notification: School Staff will use the Import Attendance Data button to pull the data that has automatically arrived from the Student Information System and then, when ready to, click on the Send Notifications.
Trigger Auto Notification: The arrival of the imported attendance file will automatically start the process of sending notifications to parents and guardians.
Schedule Auto Notification: Notifications will be started automatically at the scheduled times.
When the Trigger or Schedule Auto Notification options are in use, error messages including Invalid Student IDs, Stale Attendance Records, Repeating Notification Requests, Time Zone mismatches, etc. are noted in the SafeArrival Report.
If there is an error during SIS data compilation, such as a file format mismatch, an email is immediately sent to the those set up as the school’s SafeArrival report recipients.
If there is already a notification process in progress when a scheduled time is reached, the scheduled notification will be started but the system will set it to conflict status and stop it. The process that was already in progress will continue to run. The conflicting scheduled notification will not be run when the first process ends.
SIS Write-Back
SafeArrival has the ability to write back absence reasons to select Student Information Systems for Full Day and Multiple Day absences. Reasons can only be written back when the reason selected in SafeArrival has a corresponding entry in the table or reasons in the Student Information System. You can arrange to have this feature enabled by contacting SchoolMessenger Solutions Support.
Refer to PowerSchool SIS write-back for more information on how Absence reasons can be written back to PowerSchool SIS.
Reports
If you wish you can customize how reports are displayed at the school or district level.
Report Customization
To customize your reports, click Customize.
You will now be able to configure the following settings:
Show Horizontal Lines
Show Notification History
Preferred Sort Order: Choose which fields to sort your reports by
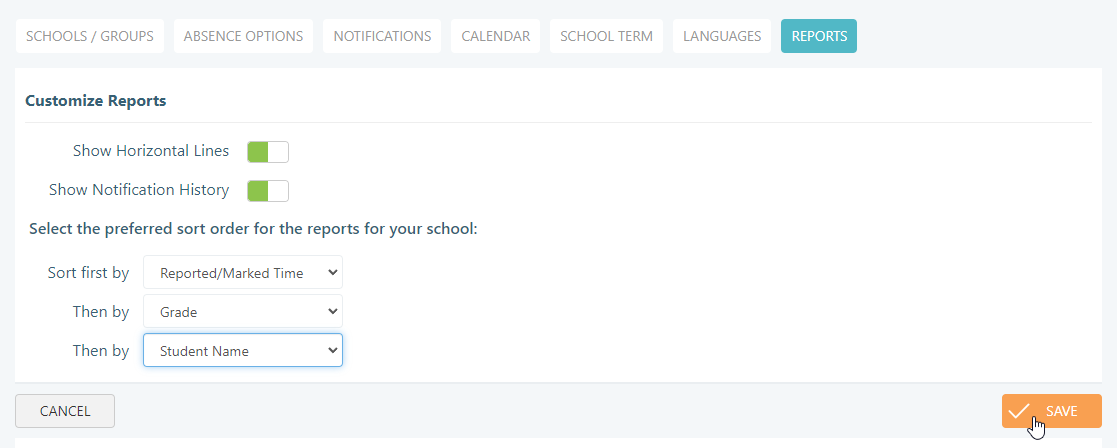
Customize Reports
After making your changes, click Save.
Report Recipients
You can specify who should be emailed your reports by clicking Add a Recipient.
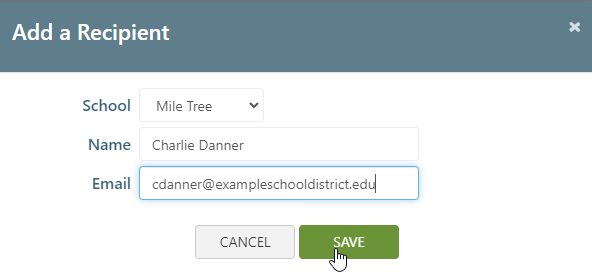
Add a Recipient
Specify the School, the Name and Email Address for your recipient and click Save.
If you have a large number of recipients to add, you can use the Import Report Recipients option.
Your CSV file you are importing must contact each recipient’s school (either by School Name or by School Code), name and email address.
You will be prompted to choose if your CSV you are importing uses the School Name or School Code to determine the school.
You can also choose if you want to Keep all report recipients that have already been set up and just add these additional recipients or if you would like to Delete all report recipients that have already been set up and replace them with the recipients in your CSV file.
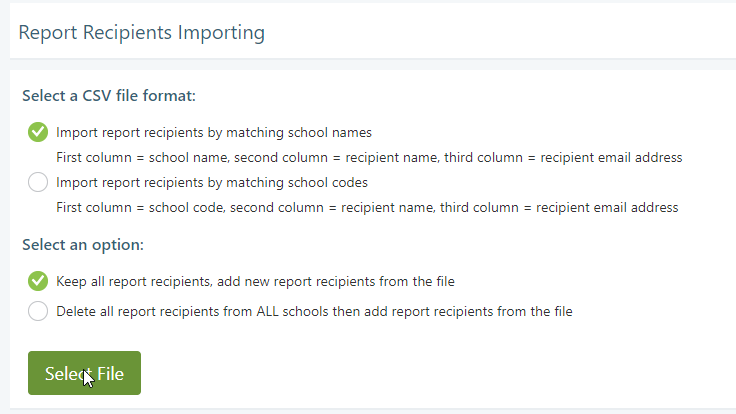
Import Report Recipients
Click Select File to choose your CSV file.
Choose your file. A list will be shown of all recipients that are to be imported as well as any entries that are missing one or more of the required fields.

Save Import Report Recipients
After reviewing the report, click Save to add the recipients.
Footer Information
At the bottom of the SafeArrival District Administrator pages and the SafeArrival School Staff pages, the following information is written:
The username with which you are currently logged in.
The current date, time and time zone.
Your SafeArrival toll-free number.
The URL for the SchoolMessenger app.
A District Service & Support link for users to click when they need help from you. This link will only appear after you have added a list one email address to the list of District Administrator Recipients (on the Notifications tab). When this link is clicked, an email can be sent to the list of District Administrator Recipients.
The SchoolMessenger support email address and toll-free phone number.
Links to the Privacy Policy and Terms of Service.
Copyright information.
Multi-Language Support
The SchoolMessenger app can be displayed to users in English (default), Spanish or French.
For the web (go.schoolmessenger.com or go.schoolmessenger.ca), there is a language selection menu item where the user can select English, Spanish or French.
For the mobile apps, the language in which the app is displayed is determined by the device language setting.
In order to display your Absence Types and Absence Reasons in the language that users have selected for the SchoolMessenger app (Spanish or French), you will need to do the following:
Make a request to SchoolMessenger solutions support to have your District enabled for multi-language support, if this has not already been done.
Once multi-language support has been enabled, go to the Absence Options tab and click the Manage Translations button.
Add any translations that are missing for the Absence Types and Absence Reasons in the desired languages. See below for suggested translations for the default Absence Types and Absence Reasons.
Once you have added your translations, go to the Languages tab and enable the languages of your choice. Click Save.
Outbound SafeArrival Notifications in the form of phone calls, SMS and emails can now be provided in the specified Guardian Language (English, French, or Spanish) if the guardian preferred language is part of the guardian information imports. For Web Links, you can also request we enable a Google Translate dropdown for parents or guardians to use. Follow these steps:
Make a request to SchoolMessenger Solutions support:
If you have the guardian language preferences in your Student Information System, they will add the guardian language preference to your imports. The preferred guardian language will then appear in the SchoolMessenger language field of the guardian record. (If your district does not use the Guardian Data Model, the student record is considered the guardian record, so the preferred language in the student record will be used).
Support will add French/Spanish email and SMS contents to the 5 SafeArrival Messages (SMS and email).
Support can also enable a Google Translate dropdown for Web Links so that when a user clicks a web link to explain an absence, they will be able to use Google Translate to translate the page into any language that Google Translate supports. Please note that if you have already set up your own translations for Spanish and/or French, your own translations will be used in place of Google’s.
Inbound SafeArrival phone calls (calls to the toll-free number) are in English only.
Suggested Translations for Absence Types and Reasons | ||
English | French | Spanish |
Full Day | Journée Entière | Día completo |
Multiple Day | Plusieurs Jours | Día Múltiple |
Late | Tard | Tarde |
Early Departure | Départ de Bonne Heure | Salida anticipada |
Leave and Return | Quitter et Revenir | Salir y regresar |
Illness or Injury | Maladie ou Blessure | Enfermedad o Lesión |
Appointment | Rendez-vous | Cita |
Vacation | Vacance | Vacaciones |
Religious Day | Jour Religieux | Día religioso |
Bereavement | Deuil | Duelo |
Weather | Météo | Clima |
Personal or other reason | Raison personnelle ou autre | Razón personal o de otro tipo |
Missed Bus | Manqué l'Autobus | Bus perdido |
Illness or Injury | Maladie ou Blessure | Enfermedad o Lesión |
Influenza-like Illness | Maladie Comme la Grippe | Enfermedad similar a la influenza |
Injury | Blessure | Lesión |
Doctor Appointment | Rendez-vous Chez Son Médecin | Cita con el médico |
Dentist Appointment | Rendez-vous Chez Son Dentiste | Cita con el dentista |
Logging into an Individual School’s SafeArrival Site
To log in to the SafeArrival site for a specific school, click the name of the school in the Schools list. This will give you access to the school’s Home, Reports, Attendance and Settings screens. To return to the District site, click the BACK TO DISTRICT PAGE item on the menu.
Refer to the SafeArrival Guide for School Staff for further details of that site.
Updating SafeArrival for a New School Year
Remove Schools (if any have been closed)
When a school is removed from SchoolMessenger Communicate, it cannot currently be removed from SafeArrival. Set the school’s “ACTIVE” switch off.
Add New Schools
When a new school is added in SchoolMessenger Communicate, ask SchoolMessenger solutions support to import the school into SafeArrival.
All setup for the new school must be completed (SIS Integration, attendance file uploads, school bell times, holiday schedules, adding to a group etc.)
Update Groups (as needed)
Add new Groups if needed.
Rearrange schools within Groups as needed.
Update Group settings as needed.
Update Schools (as needed)
Change school start and end bell times as needed.
Update District and Staff Accounts with Permissions (as needed)
See SchoolMessenger Communicate documentation for setting up accounts and user profiles.
School Staff, who need to be able to send notifications and access the Reports and Attendance functionality, need to have Use SafeArrival permission. School Staff must also have access to one or more schools in SchoolMessenger Communicate.
District Staff, who will be able to configure the Settings for the whole District as well as do anything School Staff can do, need to have Manage SafeArrival permission
Add a New School Term
Add the new school year.
Add Holiday/Exam Days to the District Calendar
Add events that apply to all schools in the District for the new school year.
Add all events to every Group Calendar. (Events from the District calendar will not be copied to the Group Calendars.)
Tip: Remind school staff to update the list of Recipients of the SafeArrival Report for their school.
The Statistics Page
You can generate many different insights into how SafeArrival is being used in your school. These analyses can be crucial, in that SafeArrival, whose main purpose is to ensure student safety, will show how well this purpose is being served. It will show, for example, how long after bell time the notifications go out (the shorter the time span, the better). It can also reveal how parents and guardians use SafeArrival, suggesting potential ways in which that use can be improved and optimized. It can reveal how often parents/guardians respond to initial notifications, and, on average, how quickly this occurs. Running these statistics will provide you with the intelligence that you can use to improve use of your SafeArrival system and its integration into the school community.
This is the Statistics screen, broken down into its functional elements:
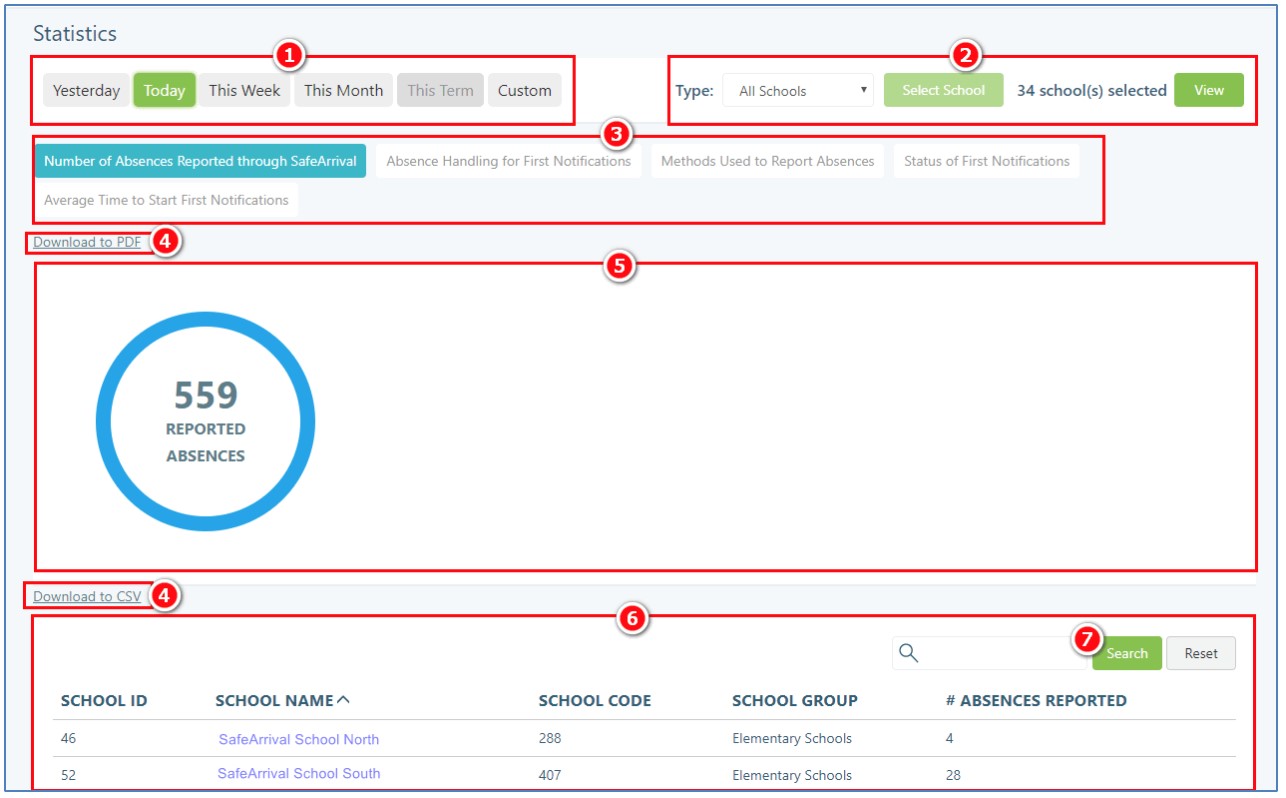
Statistics page
Date Scope: Select the date range for which you would like to see statistics. The options are self-explanatory.
School Selection and Preview: Select the individual schools or school groups to be included.
Report Selection: These are all the various types of reports that you can generate a statistical overview for. The scope of the reports depends on the time frame ❶ and the selection of schools or school groups ❷. Graphs and summary statements will appear in Summary section ❺, and the details for each school will appear in the Details section ❻.
Number of Absences Reported through SafeArrival: This report shows you the total number of absences reported using the SafeArrival system and the details for each school.
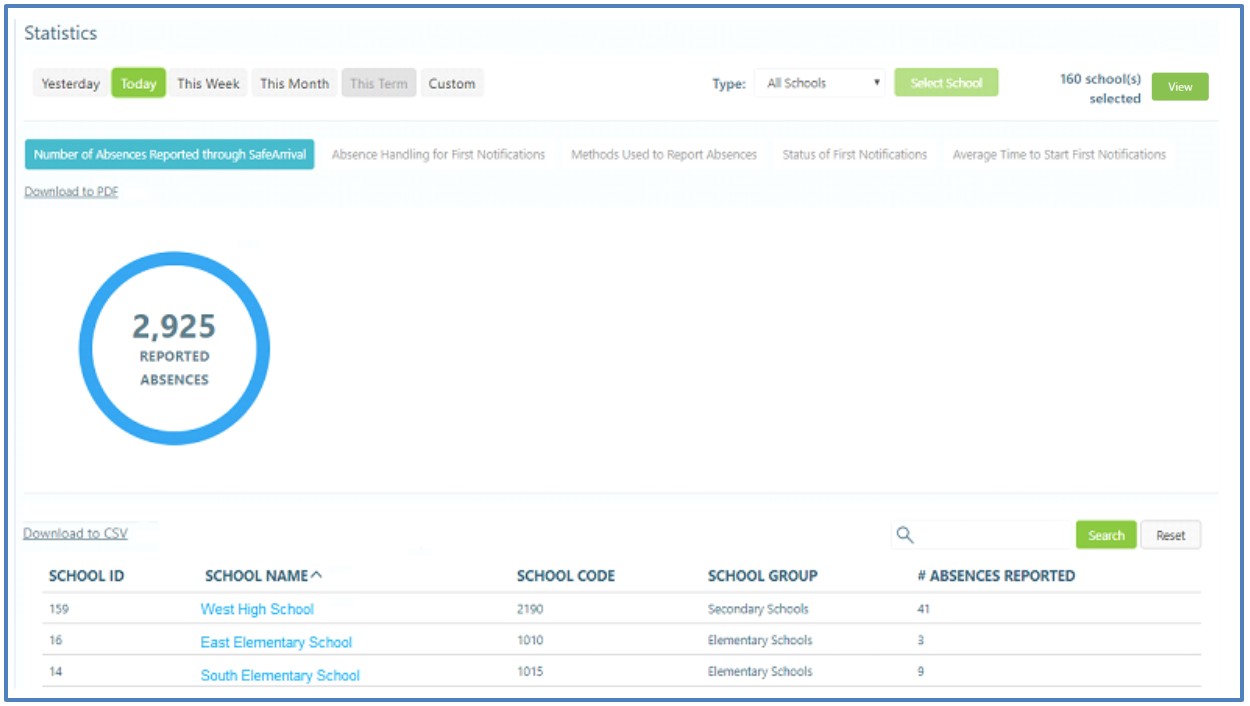
Number of Absences Reported through SafeArrival tab
Absence Handling for First Notifications: This report shows i) the number of absences reported before the first pass of notifications go out, ii) those that are reported during the first pass of notifications, and iii) those that remain unexplained after the first pass.
Monitoring these statistics provides you with an indication of how responsive parents/ guardians are to the use of the system. Obviously, the best-case scenario is to have all absences reported through the SafeArrival system before any notifications might go out. Seeing the actual numbers will give you an indication of what needs to be done, if anything, to improve cooperation from parents/guardians. You might 1) check to see if all necessary contract information for all parents/guardians appears in school records; 2) if parents/guardians have been thoroughly apprised of the various means available to them to report absences and how to use each of those means.Where remaining unexplained absences remain high, you should think about resending notifications at least one more time.
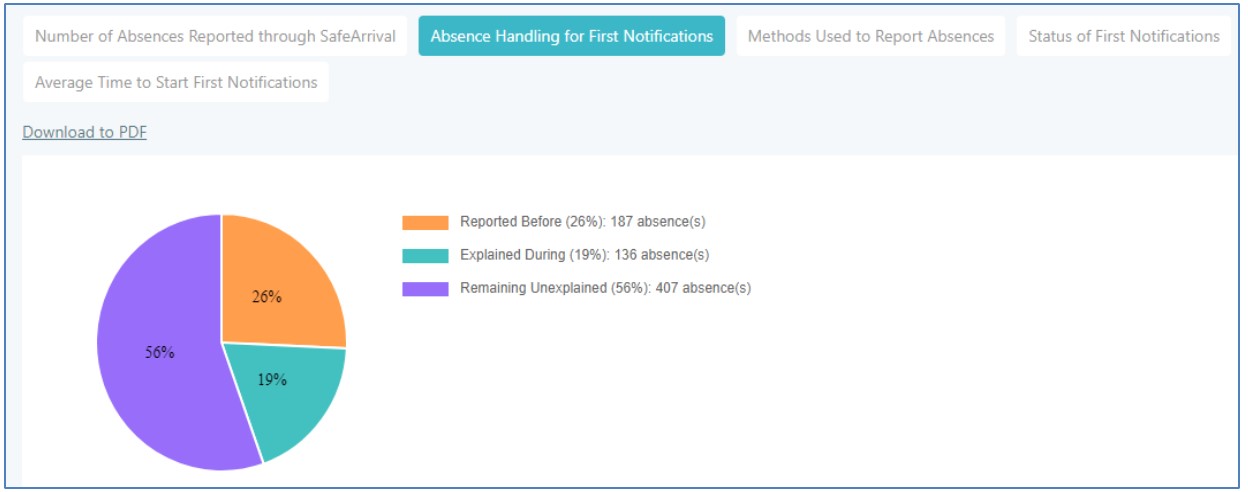
Absence Handling for First Notifications tab
Methods Used to Report Absences: This report shows you the various means parents/ guardians are using to report absences.
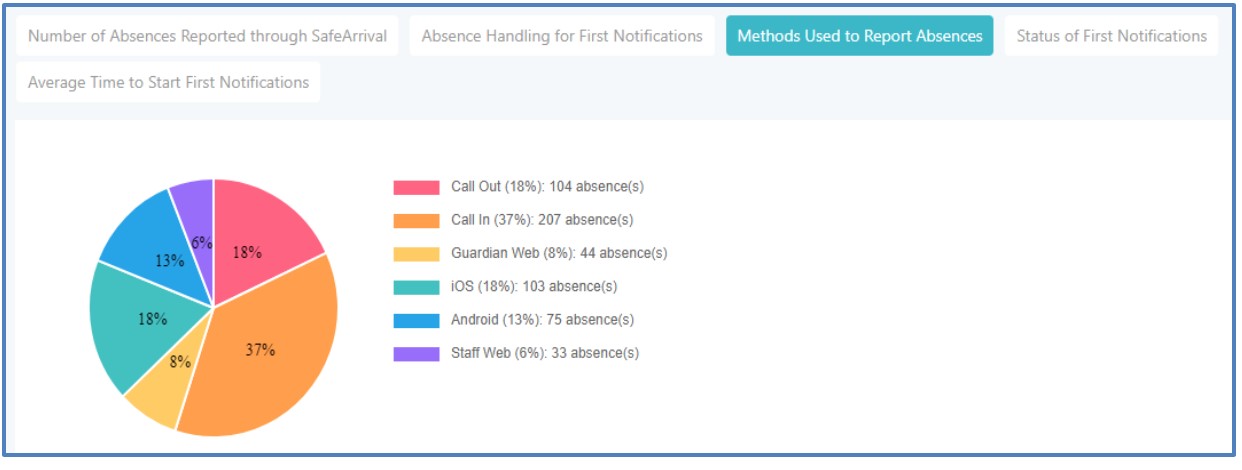
Methods Used to Report Absences tab
This report lets you get a sense of which reporting methods are most popular with your users.
Status of First Notifications: This report shows the status of first notifications in terms of i) those not been started; ii) those that have not been completed, and iii) those completed.
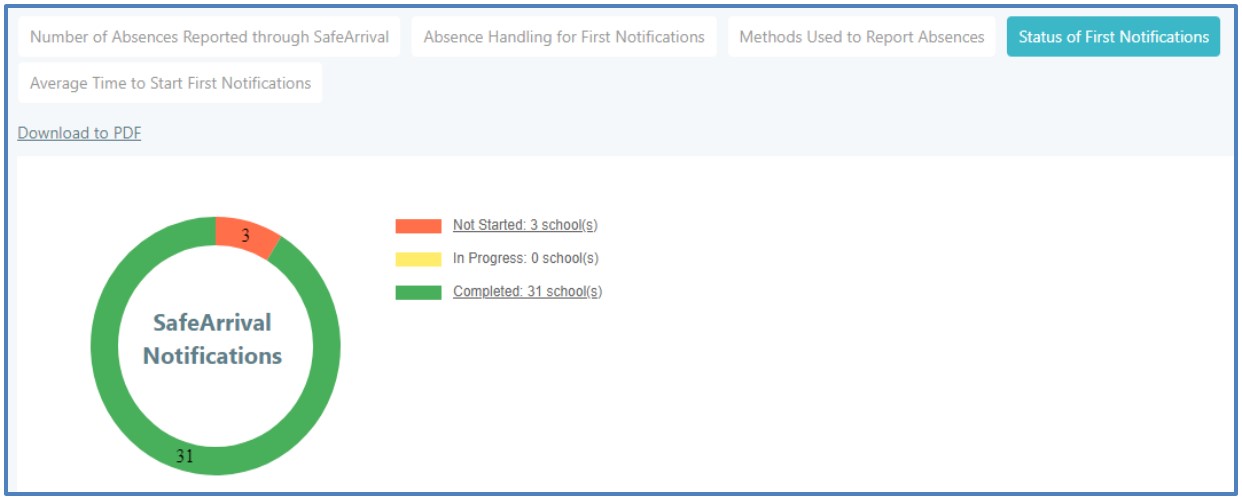
Status of First Notifications tab
Obviously, the highest number here should be for the completed group. It is, however, important to investigate all those cases (which will show up in the Details section) in which SafeArrival is not even being started.
Average Time to Start First Notifications: This report shows the average time it takes in minutes before the notification process begins. The “time to start” is based on the difference in time between your school’s bell time and the actual time notifications were initiated. It is especially important to study and analyze these statistics in cases where the notifications are initiated manually by school staff.
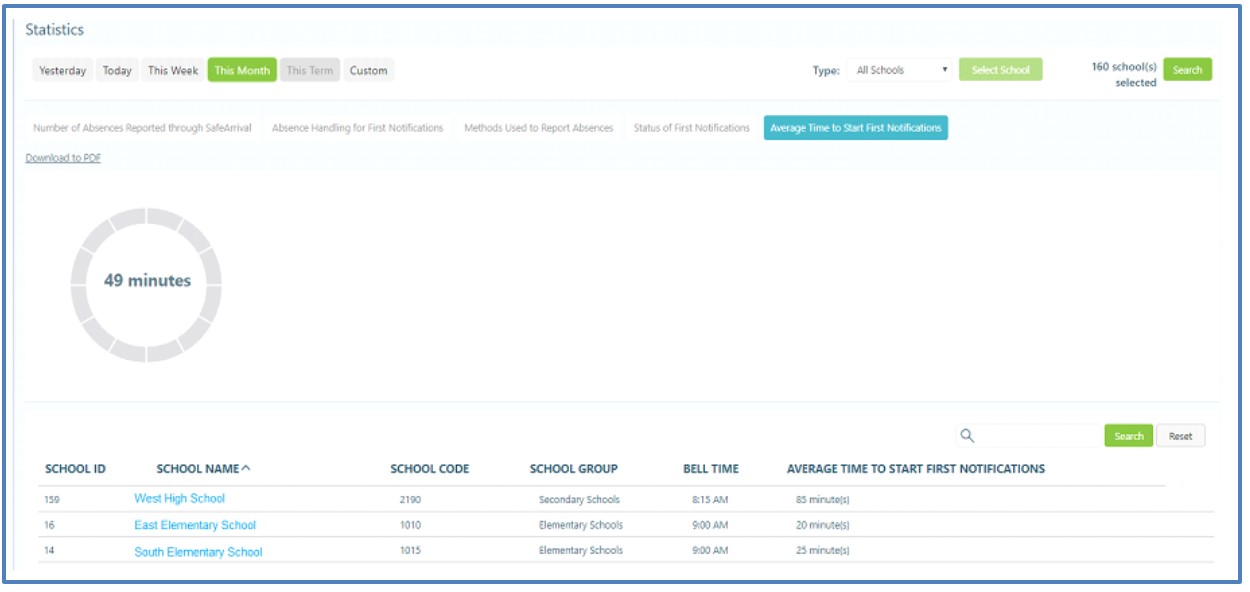
Average Time to Start First Notifications tab
The statistics in this report may prove to be crucial from the standpoint of student safety. SafeArrival’s highest priority is student safety. Hence, the sooner notifications go out for unexplained absences, the sooner the school can i) expect to receive assurances of the student’s safety, OR ii) take to appropriate actions to secure the student’s safety. Lag times decrease such assurances by degrees. The longer the lag times are, the less is known about the status of the student’s absence. Corrective action should be taken in all cases where these lag times are unacceptably long.
Downloads: Statistics reports can be downloaded in either a PDF file format or a CSV file format. PDFs are suitable for archiving and sharing information with others; whereas, CSV files can be used for various types of analyses. CSV files can be imported into Microsoft Excel or another external analytical tool, combined with others types of data (generated from any number of other sources), and the tools inherent in Excel, and so on, can be used to perform additional analyses. For example, a district may be able to determine that an unusually high number of students reported as “late” are being caused by delays in transportation when they correlated data from SafeArrival with data from their Transportation system database.
Summary Section: Displays graphs or summary statements concerning the statistical data.
Details Section: Displays the details for each of the different statistical reports.
Click Search to locate and display data for one or more schools which will be sought out according to the text entered in the text box next to it. Click Reset to restore the full list.
The Logs Page
Depending on your district settings, you can use this page to access the logs of the various activities in your SafeArrival account. This can include logs of Attendance File uploads and Settings changes.
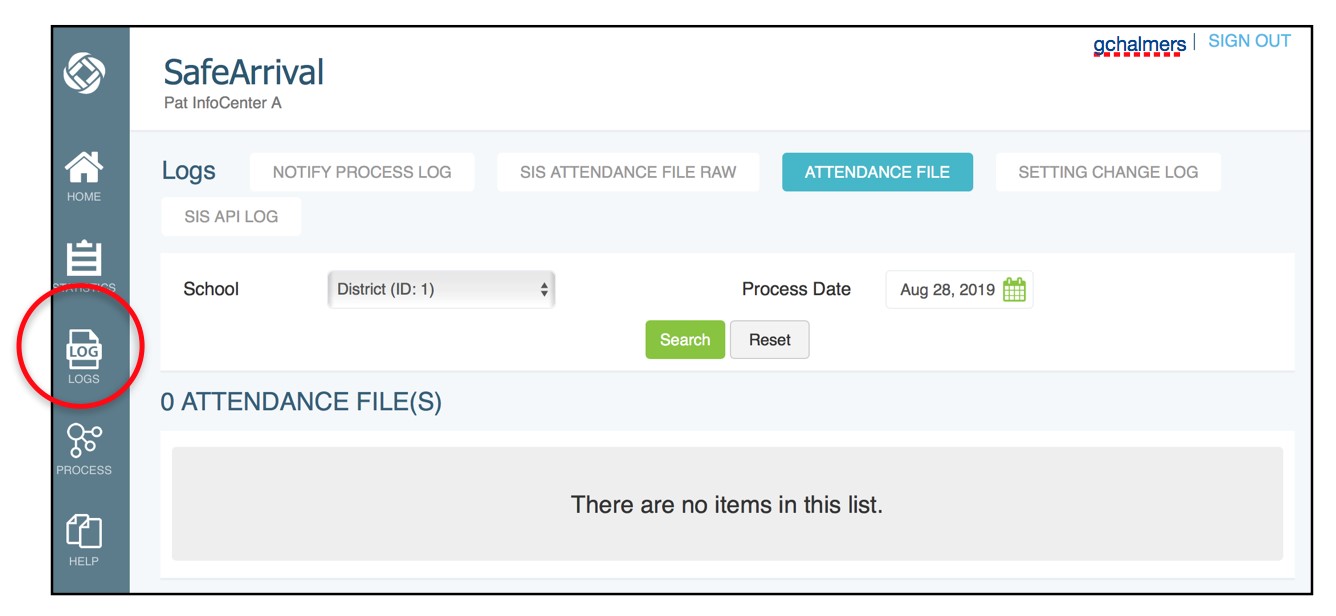
Logs page
Supporting School Staff
Cannot access SafeArrival?
See SchoolMessenger Communicate documentation for staff accounts for more information.
Check account login/password.
School Staff can login directly to the SafeArrival Staff page OR they can log in to SchoolMessenger Communicate then select SafeArrival under the System tab. Check both methods.
Check that the account has Use SafeArrival permission enabled in the user profile.
Cannot import an attendance file?
The attendance file must be in the format specified to the SafeArrival Implementation team.
Find out the exact error message (a screenshot is always helpful) and contact SchoolMessenger solutions support.
How often should I run the SafeArrival Process?
You should run the SafeArrival Process each time attendance is taken and you would like to notify parents/guardians of unexplained absences AND have parents/guardians confirm awareness of the absence and provide the reason. At a minimum, schools should run the SafeArrival process as soon as possible after the first morning attendance has been taken. The SafeArrival process can be run later, but remember that parents will receive Push notifications to the app, email, SMS text messages and repeated phone calls (until the notification time expires or someone explains the absence.)
How do I transfer the absence reasons from SafeArrival to my Student Information System?
Each time a notification process is run, there are 3 ways to find the collected absence reasons:
Recommended: On the SafeArrival Home page, click Explained Absences. This list of explained absences is displayed on the screen. On this screen, you can also view other absences in the All Absences list (for example, planned Early Departure or Leave and Return absences.)
On the SafeArrival Home page, click Download the Summary for the most recent notifications. You can open the file to see the lists of explained and unexplained absences.
If your email address is on the Recipients of the SafeArrival Report list, the SafeArrival Report will be emailed to you. You can open the file that is attached to the email and find the list of explained and unexplained absences.
The SafeArrival Report can be downloaded in PDF or CSV format from the Reports page. The CSV format only contains the information for explained absences (not unexplained absences).
For each student's full day absence or late arrival that is listed as an explained absence, find that student in the student information system and enter the absence reason provided by the parent. For Early Departures and Leave & Return absences, wait for the student’s actual departure, then enter the absence reason from the SafeArrival report into the student information system.
If you have a specific cut-off time later in the day (not before your first notifications and not at the end of your first notifications), the SafeArrival Report will be emailed at the cut-off time. Enter the absence reasons from this report into your student information system when you receive the report, or the following day if the report is scheduled after the end of the school day.
A Scheduled Notification Did not Run
If the auto-notification type for the school is “Schedule” but no notifications are sent, check to see if there are any unexplained absences for today. If so, then no notifications need to be sent. If there are unexplained absences, check that the school’s absence file has been uploaded. Otherwise, contact SchoolMessenger Solutions support.
If there is already a notification process in progress when a scheduled time is reached, the scheduled notification will be started but the system will set it to conflict status and stop it. The process that was in progress will continue to run. The scheduled notification will NOT be run when the first process ends.
We added a new school, but the attendance data is not being processed by SIS Integration
If you are using SIS integration AND creating the schools.csv and absences.csv files, the list of schools whose attendance data should be monitored is set up in schools.csv. If you add schools to SafeArrival, you will need to add them to the list in schools.csv.
