
Whether you need a simple content portlet, or a more advanced one, adding portlets to the pages of SchoolMessenger Presence is quick and easy. You can add portlets as easily as dragging and dropping them where you want them, or by manually adding them to a region of your page.
This guide shows you how to add a portlet to a page. For more advanced descriptions of the portlets or troubleshooting, see other documentation, refer to your site administrator(s), or contact SchoolMessenger solutions support for help.
Note: If you are unable to conduct any of these steps due to not seeing all or part of the instruction points listed, first check with your site administrator(s) to see if you have any restrictions preventing you from doing so. Users are sometimes restricted to editing only certain pages or performing certain actions, and this varies from organization to organization. If it is determined afterward that you should be able to do these steps, but you are still having trouble, contact SchoolMessenger solutions support for help.
Adding a New Portlet to a Page (Drag & Drop)
To add a portlet to a page, you must be in Design Mode. Navigate to the page in which you would like to add the portlet, and then flip to Design Mode by clicking on the toggle at the top-left of the screen on the toolbar.
Ensure That Drag & Drop is Enabled
In order to add a portlet via the drag-and-drop method, the “drag & drop” functionality must be enabled. If you do not see portlets upon flipping to Design Mode, look at the top-right of the screen beneath the toolbar – you should see a tab that says Enable drag & drop – click the tab. Now, the page will refresh, and the portlets should appear on the left side of the toolbar.
Drag and Drop the Portlet
Once you have flipped to Design Mode and identified the type of portlet that you would like to add to the page, you are ready to add your portlet using the drag-and-drop method.
Drag
Begin by left-clicking on the portlet that you wish to add, and holding the mouse button down. Now, try moving the mouse; you will notice that a “copy” of the image for the portlet is now trailing your cursor.
Drop
The areas in which you can place a portlet are outlined in a thin red line. Hover over the other portlets (if any are present) and they will move out of the way to one side or the other as you’re hovering. Once you have the position that you like, release the left mouse button, and “drop” the portlet. Now, your portlet is ready for use!
Note: Your portlet will look correct after the page refreshes – it will not retain its square icon shape.
Adjust Position as Needed
Accidentally dropped the portlet in the wrong place? No worries! Once your portlet is in place, you can adjust the position of the portlet(s) in the frame by left-clicking, holding the mouse button, and dragging above or below other portlets or into other frames, if needed.
Adding a New Portlet to a Page (Manually)
If you prefer not to use the drag-and-drop method as previously mentioned, you can easily add portlets manually with drag & drop disabled.
Important: Using the manual method, you are limited to just one of each portlet type per frame (region). For example, you cannot add two Content portlets, but you can add a Content portlet and a Calendar portlet. If you need to add more than one of the same type of portlet to a region, use the drag & drop method.
Enable Design Mode
To add a portlet to a page, you must be in Design Mode. Navigate to the page in which you would like to add the portlet, and then flip to Design Mode by clicking on the toggle at the top-left of the screen on the toolbar.
Ensure that Drag & Drop is Disabled
In order to add a portlet via the manual method, the drag & drop functionality must be disabled.
If you see portlets upon flipping to Design Mode, look at the right of the screen beneath the toolbar – you should see a tab that says Disable drag & drop – click the tab. Now, the page will refresh, and the portlets should disappear.
Add a Portlet
The portlets, with their title bars visible, will all appear once drag & drop is disabled, with no need to hover over them to display their toolbars.
Click “Add Portlet to Region” Link
Above the frame in which you want to add another portlet, you will see an “Add Portlet to Region” link. Click the link.
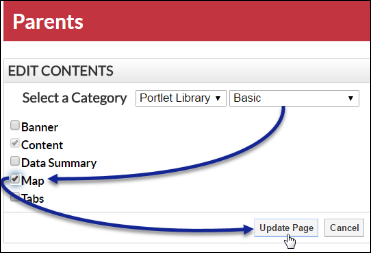
Choose the Portlet and Update the Page
On the page that appears, there are two drop-down menus next to Select a Category.
-
The first allows you to select the portlets from the Portlet Library (most common) or the Local Portlets (uncommon).
-
The second allows you to select the category itself (Basic, Collaboration, etc.) under which your portlet resides.
-
Once you make your selections, the portlets appear as checkboxes in the bottom left of this frame.
-
Check the box(es) for the portlet(s) you want to add to the region and click Update Page.
The portlet will now appear on your page.
Adjust Position as Needed
Use the arrow keys to the left of each portlet to move the portlet up or down in the frame.