
Broadcasts
The Broadcasts tab allows you to send broadcasts and view recent broadcasts.
The Broadcasts tab contains:
-
The System tab lists:
-
Active: Shows a list of all active broadcasts across the system.
-
Completed: Shows a list of all completed broadcasts across the system.
-
Repeating: Shows a list of all repeating broadcasts across the system.
-
Responses: Contains all voice responses received from phone broadcasts.
-
Tips: Search for tip submissions by School, Topic, and Date.
-
-
The My tab lists:
-
Broadcasts: Displays all broadcasts sent by users, currently being sent, or scheduled for future sending.
-
Forms: Allows users to manage all their forms.
-
Messages: Shows all saved messages.
-
Posts: Allows users to manage all post content.
-
Recipient Lists: Shows all broadcast lists.
-
Secure Files: Allows users to manage Secure File Delivery.
-
Surveys: Lists all surveys.
-
Templates: Displays all available templates.
-
To send a new broadcast:
-
Log in to SchoolMessenger.
-
Click the New SchoolMessenger button to view the new interface.
-
Click Create. Alternatively, click Send a broadcast to create a new broadcast message.
-
In step 1, you configure the Broadcast settings. Click Load from Template to create a broadcast from an existing template or continue to create a new one from scratch. To restore all content to its original settings at any point, click Reset Broadcast.
-
To create a new broadcast, Enter broadcast name.
-
Select Broadcast type. This is a searchable field, and you can select from the following options:
-
Emergency (Priority level: 1)
-
Non school Hours Emergency
-
School Hours Emergency
-
-
High Priority (Priority level: 2)
-
Attendance
-
-
General (Priority level: 3)
-
General
-
-
-
Configure Additional Broadcast settings.
-
Select General settings:
-
Days to Run: If a broadcast reaches the end of the day, the days to run will determine if the call should resume the following day.
-
Send Email Report: When a broadcast is completed, this will set whether a copy of the report is emailed to the user.
-
Skip Duplicate Recipients: Enables a guardian with multiple students to combine mail, phone, and SMS messages for all their children into a single message.
-
Save Message Content: This feature allows users to save a message for future use.
-
-
Select Phone settings:
-
Caller ID: Select the phone number you want to appear in the Caller ID.
-
Call Confirmation: Allows recipients to press 1 or 0, user can state in the message what those numbers represent.
-
Voice Responses: Allows recipients to record a response to a phone broadcast.
-
-
-
Click Next.
-
In step 2, you select Recipients. Refer to Manage recipients for more information.
-
Select Broadcast recipients. This allows users to filter and search by:
-
Lists: Choose to search and add recipients from All Lists, My Lists or Subscriptions.
-
Sections: Choose to search and add recipients from All Schools or specific sections.
-
Contacts: Choose to search and add recipients from All Schools or specific schools.
-
-
The stacked dot icon allows users to select and review recipients for the broadcast.
-
You can use Custom Rules to choose recipients based on specific criteria. Refer to Create Custom rules for Recipients for more information.
-
The Upload List allows users to select recipients based on an uploaded list of data.
-
The ID Lookup allows users to select recipients based on an uploaded list of IDs.
-
Click Add Me to add yourself to the list of recipients.
-
Click Show Recipient Details to view granular information about recipient selections.
-
Click Remove All to delete all added recipients.
-
-
The recipients list will display:
-
Recipients
-
Contacts
-
Guardians
-
Targets
-
Recipient Totals
-
Actions: Click the stacked dot icon to Preview or Remove recipients.
-
-
The Share Your Broadcast Message on Social Media and Other Platforms feature allows you to select how you would like to share your broadcast. You can select:
-
Presence sites
-
RSS feeds
-
-
Click Next.
-
In step 3, draft your broadcast message.
-
To insert preset forms, click on the Insert Form button.
-
To insert imported fields into your message, click Insert Field.
-
Click Load Stationery to use the preset email templates.
-
To use the pre-set newsletter email templates, click Load Newsletter.
-
To attach documents to the email broadcast, click Attach.
-
The stacked dot icon shows the default language of the editor. It also allows users to:
-
Select a saved message.
-
Reset a message to default.
-
-
Enter your broadcast message.
-
Click Next.
-
Preview the message formats and the percentage of recipients who will receive the message in their preferred language. To edit the message, click the pencil icon. To delete the message, click the trash can icon.
-
To hear the phone message, click the speaker icon.
-
Click the stacked dot icon for Phone message to view additional settings:
-
Click Text to Speech to hear the message read to users through the built-in text-to-speech engine.
-
Click Call Phone to Record to have the system call them to record a broadcast.
-
Click Record Voice to allow users to record a message directly through their browser.
-
Choose a gender for the voice type for the text-to-speech engine within Select TTS Voice Gender.
-
Click Preview TTS Audio to listen to a preview of the message content.
-
-
-
In step 4, you review your broadcast message before sending it.
-
The Total Recipients donut graph shows the number of guardians and contacts the broadcast will reach.
-
The Recipient Languages stacked bar graph shows the number of recipients by language.
-
The Recipient Destination Types donut and bar graphs show the number of recipients by report by broadcast message type; email, SMS, phone call.
-
The Recipient Destination Types per Language stacked bar graph displays the number of recipients with a specific destination type by language.
-
-
To send the broadcast immediately, click Send Now. To schedule the broadcast to send at a later date or time, click Schedule for Later. To receive a copy of the broadcast before sending or scheduling, click Send to Myself.
Create custom rules for recipients
You can choose broadcast recipients based on customer-defined rules. Apply one or more custom rules to determine a specific group of recipients. The more rules you apply, the more limited your list of recipients will become.
To create a rule:
-
Select a data field, operator, and value. Click Save. Repeat this to create additional rules.
-
The Recipients preview will list all the results based on the rules applied.
-
The Recipients totals will display the number of recipients.
-
Click Add Recipients Filter.
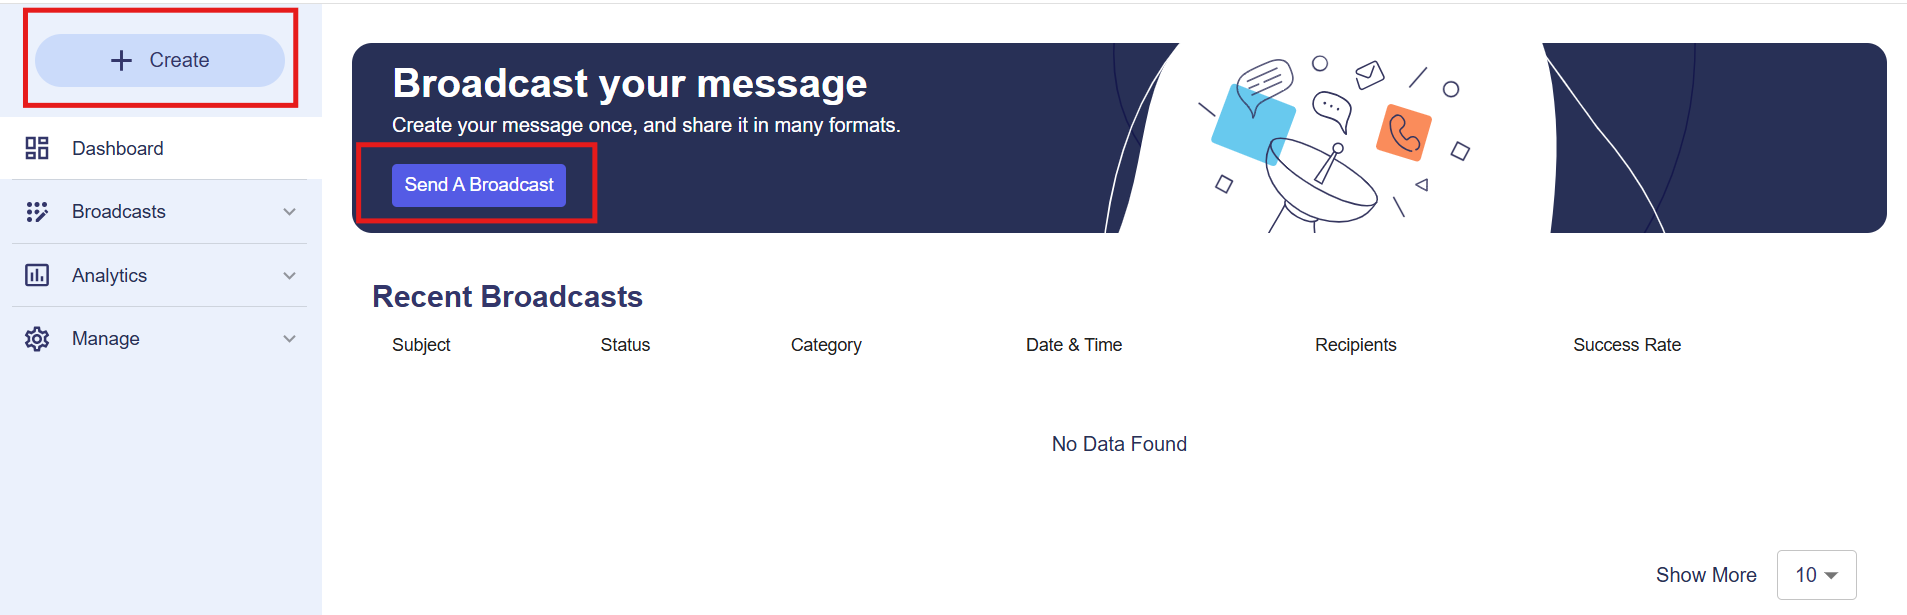
Recent broadcasts
This section provides an at-a-glance view of your sent messages.
Each row displays:
-
Subject: Title or purpose of the message.
-
Status: Indicates if the message is Completed, In Progress, or Failed.
-
Category: Type of message (for example, General, Emergency).
-
Date & Time: When the broadcast was sent.
-
Recipients: Number of individuals who received the message.
-
Success Rate: Delivery success visualized with a progress bar.
Click the purple external link icon beside each subject to view detailed information about that broadcast.
Message editor
|
Icon |
Description |
|---|---|
|
Undo |
Undo your last action. |
|
Redo |
Redo your last action. |
|
Style |
Choose the tag to apply to your text. Paragraph text is normal text, whereas the three headings are used to designate different header levels. |
|
Bold |
Allows users to emphasize important words or phrases by making the text appear thicker and darker. This helps highlight key points and improve readability. |
|
Italicize |
This slants text to the right, commonly used for emphasis, quotes, or foreign words. |
|
Underline |
Places a horizontal line beneath the selected text, often used for headings, links, or to draw attention to specific information. |
|
Strikethrough |
Draws a line through the middle of the text, indicating deletion, correction, or information that is no longer relevant. |
|
Remove Formatting |
Remove any formatting from the current text. |
|
Basic Styles |
Allows you to access the Font Size, Font Family, Font Color and Text Background Color style options. |
|
Font Size |
Choose the size of the font |
|
Font Family |
Choose from a list of available fonts. |
|
Font Color |
Allows users to change the color of the text, helping to highlight important information, categorize content, or improve readability. |
|
Text Background Color |
Enables users to apply a colored background behind the text. This feature is useful for emphasizing key points or marking sections that need attention. |
|
Text Alignment |
Allows users to control the positioning of text within a document or editor. Users can align text in the following ways:
|
|
Bullet List |
Creates an unordered list where each item is marked with a bullet point. This is useful for listing items without a specific order. |
|
Numbered List |
Creates an ordered list where each item is numbered sequentially. This is ideal for step-by-step instructions or ranked information. |
|
Decrease Indent |
Moves text closer to the left margin, reducing the indentation level. This is useful for adjusting hierarchy in lists or formatting nested content. |
|
Increase Indent |
Moves text further away from the left margin, increasing the indentation level. This is useful for organizing subpoints or nested lists. |
|
More Actions |
Provides additional formatting and editing options that may not be visible in the main toolbar. This includes advanced formatting, special characters, or linking options. |
|
Link |
Enter the URL for a site or page you wish to link to. |
|
Table |
Add a table. You can choose how many rows and columns to include. |
|
Horizontal Line |
Inserts a visual divider across the page. It is often used to separate sections of content, improve readability, or create a clear break between different topics. |
|
View Source |
View the HTML for the message. You can add HTML, but unsupported HTML, such as <script> tags, will be automatically removed. You will need to switch back out of View Source before proceeding. |