
Overview
After provisioning users into your account (through Imports for example), you may integrate with Office 365 to authenticate users into Schoology using their Office 365 login credentials. For enhanced security, Schoology also requires that you add your Azure Tenant ID.
Schoology offers an Azure app that has been approved as a trusted authentication receiver by Microsoft. This app is configured to accept logged-in Microsoft user information. During the SSO login flow, Schoology uses specific credentials from its app when requesting identity information about Microsoft users.
At no point does Schoology have access to the district's entire LDAP/Azure Directory. We will only ever have read access to specific pieces of information about the logged-in user such as name, email, and tenant_id.
With this feature, you can authenticate users based on their Microsoft Username, Email Address, or Unique ID. Schoology uses OpenID authentication (a layer on top of OAuth 2.0) to authenticate users in Microsoft Azure and sign them into Schoology.
Authentication
When users access Schoology, they begin on the Schoology login page and are redirected to their organization's custom login domain after selecting their school or organization.
Users are then redirected to Microsoft to sign in with their Office 365 credentials. After Microsoft verifies the user's identity, it returns a JSON Web Token (JWT) containing information about the authenticated user.
Schoology compares the information in the token against existing user records and attempts to match the user based on the authentication method selected during setup:
-
Username
-
Email address
-
Unique ID
If a matching user is found, the user is signed in and redirected to Schoology.
Office 365 SSO
To set up Office 365 SSO by Username, the prefix of the Office 365 email address must match the Username field in Schoology. If you're provisioning users from your SIS, your SIS will most likely populate the Unique ID.
To set up Office 365 SSO by Email, the email address in Schoology must match the users' Office 365 email address.
Configure your Microsoft external account settings
-
Click Tools in the top menu of your home page in Schoology.
-
Select School Management in the drop-down menu.
-
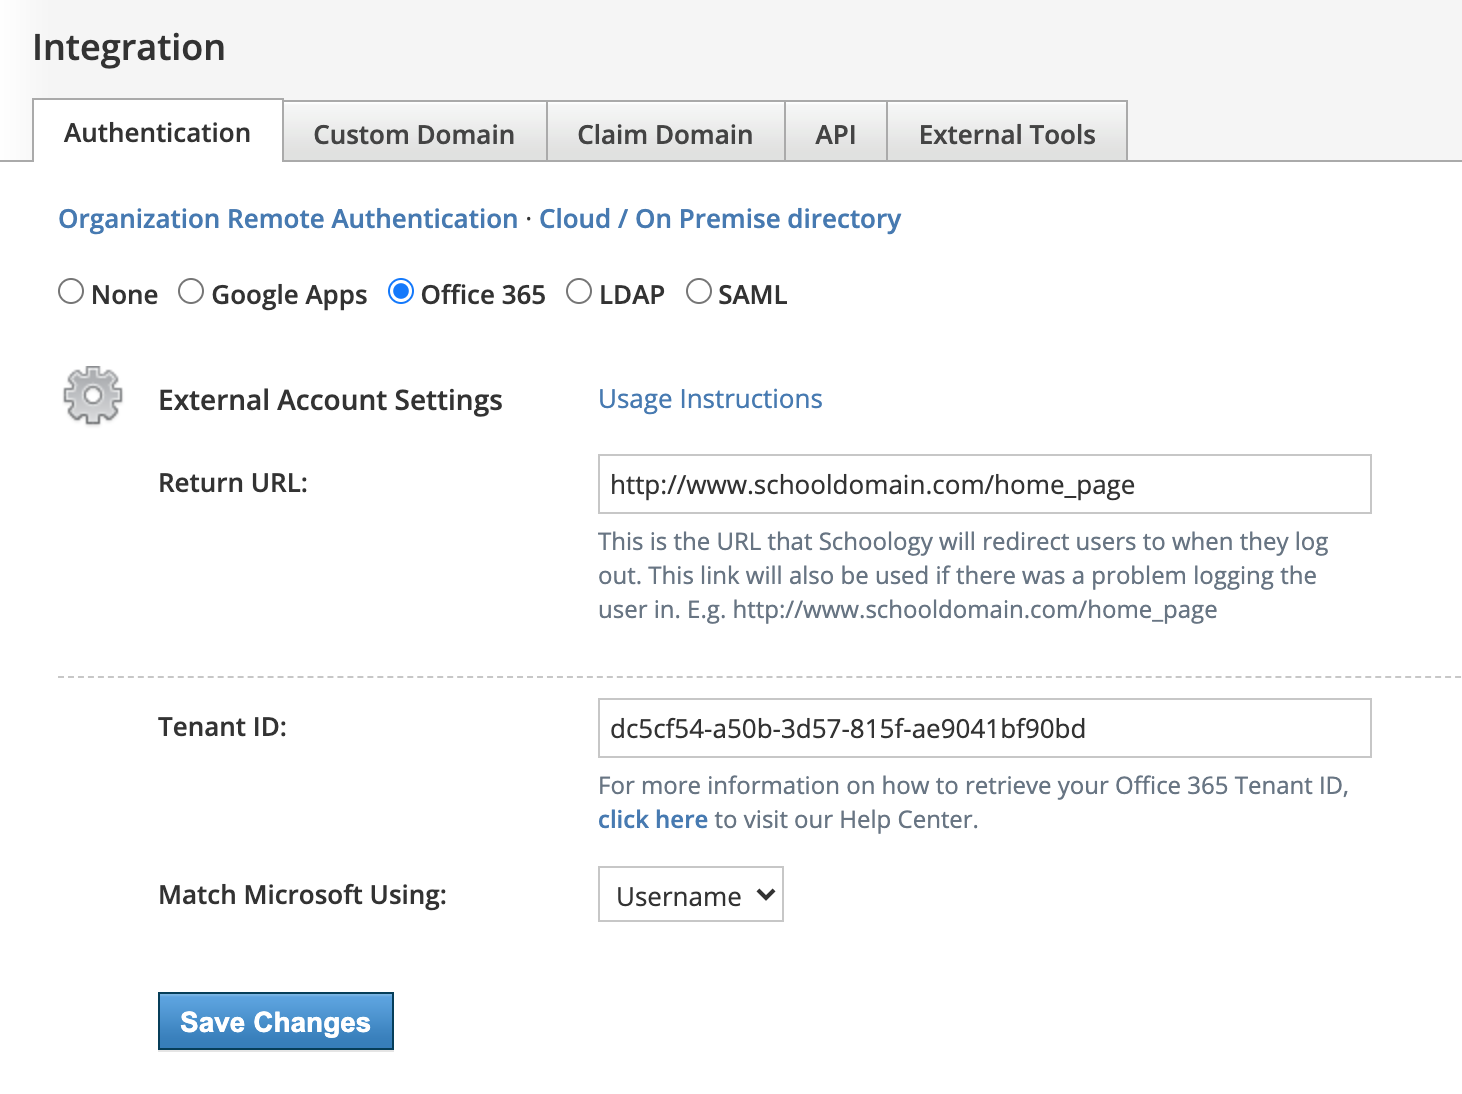
Select Integration from the left menu to view the Authentication tab.
-
Select Cloud/On Premise directory.
-
Select Office 365.
-
Set the Return URL to the address to redirect users when they log out of Schoology. Set your Return URL to https://login.microsoftonline.com/logout.srf to ensure users are logged out of Microsoft when they log out of Schoology. This is especially suggested for schools that use shared computers.
-
Add your Microsoft Azure Tenant ID. You can find your organization's Tenant ID by logging into the Azure Active Directory portal.
-
Contact Microsoft if you encounter any difficulty locating your Tenant ID.
-
Schoology validates the Tenant ID included in the Microsoft authentication response against the Tenant ID configured in Schoology. This verification helps ensure users are authenticated through the correct Microsoft tenant and provides additional protection when matching users by Username or Unique ID.
-
-
In the Match Microsoft Using menu, select Username, Unique ID, or Email, according to your user authentication plan:
-
Microsoft Username: The Username field in Schoology must match the prefix of the Office365 email addresses.
-
Microsoft Email Address: The Email field in Schoology must match the Office365 email addresses.
-
Microsoft Unique ID: The Unique ID field in Schoology must match the corresponding Office365 credentials.
-
-
Click Save Changes.
Change your landing page
After you've successfully established the link to your Microsoft instance, click the Custom Domain tab.
Here, you should see that your Domain Type has been set and your Domain Alias has been changed to your school's custom subdomain. These are configured by working with your Schoology representative or the Schoology Onboarding team during your school's implementation process. If these fields are not configured in the Custom Domain tab, contact Schoology Support.
On the Landing Page menu, choose External Account Provider and click Save Changes. Changing the landing page is the important final step in enabling your Microsoft 365 SSO configuration. Once you click Save Changes, your users will be able to log in to Schoology using your custom domain and Microsoft credentials.
To prevent students and teachers from logging in outside of your Custom Domain or Subdomain, System Administrators can enable permission to ensure user logs in using an external authentication provider.